



Models: GO24SP-NG or LP, GO30SP-NG or LP GO24SP-REM-NG or LP, GO30SP-REM-NG or LP GO35SP-REM-NG or LP,GO40SP-REM-ng or LP GO24-IPI-NG or LP, GO30-IPI-NG or LP GO35-IPI-NG or LP, GO40-IPI-NG or LP
Installation and service of this appliance should be performed by qualified personnel. Hearth & Home Technologies suggests NFI certified or factory-trained professionals, o r t e c h n i c i a n s s u p e r v i s e d b y an NFI certified professional.

Grand Oak Gas Log Sets
Check with your local building code agency before you begin installation to ensure compliance with local codes, including the need for permits and follow-up inspections. If you encounter any problems regarding code approvals, or if you need clarification of any of the instructions contained here, contact the Technical Services Dept., Hearth & Home Technologies Inc., 20802 Kensington Blvd., Lakeville, MN 55044, www.hearthnhome.com


WARNING
If the information in these instruc tions is not followed exactly, a fire may result causing property damage, personal injury, or death.
HOT! DO NOT TOUCH. SEVERE BURNS MAY RESULT. CLOTHING IGNITION MAY RESULT.
Glass and other surfaces are hot during operation and cool down.
- Do not try to light any appliance. - Do not touch any electrical switch. Do not
use any phone in your building. - Immediately call your gas supplier from
combustibles away.
a neighbor’s phone. Follow the gas supplier’s instructions. - If you cannot reach your gas supplier, call
the fire department. • Installation and service must be performed by a qualified installer, service agency, or the gas supplier.
In the Commonwealth of Massachusetts:

Read this manual before installing or operating this appliance.
Please retain this owner’s manual for future reference.
Congratulations on selecting a Hearth & Home Technologies gas log set—an elegant and clean alternative to burning wood. The Hearth & Home Technologies gas log set you have selected is designed to provide the utmost in safety, reliability, and efficiency.
The information contained in this owner’s manual, unless noted otherwise, applies to all models and gas control systems.
Your new gas log set will give you years of durable use and trouble-free enjoyment. Welcome to the Hearth & Home Technologies family of appliance products!
As the owner of this new gas log set, you’ll want to read and carefully follow all of the instructions contained in this owner’s manual. Pay special attention to all cautions and warnings.
This owner’s manual should be retained for future reference. We suggest you keep it with your other important documents and product manuals.
We recommend that you record the following pertinent information about your gas log set:
Listing Label Information/Location The model information regarding your specific gas log set can be found on the rating plate.
Gas Type


WARNING
Improper installation, adjustment, alteration, service or maintenance can cause injury or property damage. Refer to the owner’s information manual provided with this appliance. For assistance or additional information consult a qualified installer, service agency or the gas supplier.
HOT! DO NOT TOUCH. SEVERE BURNS MAY RESULT. CLOTHING IGNITION MAY RESULT.
Glass and other surfaces are hot during operation and cool down.
Sharp Edges • Wear protective gloves and safety glasses during installation.
A. Design and Installation Considerations The Gas Log Hearth Kit consists of the following:
B. Tools and Supplies Needed Tools and supplies normally required for installation:
Fire Risk Exhaust Fumes Risk • Do NOT use this appliance as a “vent- free” heater. The flue must be permanently open according to Tables 1 and 2.
Pliers Phillips screwdriver Tape measure Crescent wrenches Gas shutoff valve Non-corrosive leak check solution 3/4 in. wrench, 7/16 in. wrench

Do NOT use this appliance if any part has been under water. Immediately call a qualified service technician to inspect the appliance and to replace any part of the control system and any gas control which has been under water.
D. Appliance Certification This appliance is design certified by Omni International un der the ANSI Z21.60b-2004 or CSA 2.26b-2004, Decora tive Appliances for Installation in Solid-fuel Burning Fireplaces. Installation and the provisions for combustion and ventilation air must conform to the National Fuel Gas Code, ANSI Z223.1/NFPA 54, or the CSA B149.1, Natural Gas and Propane Installation Code.
E. Gas Supply Connection A 3/8 in. flared fitting has been installed on the gas valve inlet at the factory. Ensure fittings are of the appropriate size and type on the gas line connection. If the tubing has to be cut to length be sure to use the proper cutting and flaring tool. Also, be careful not to crimp the tubing while bending. If the tubing becomes crimped, do not use for installation.
Gas resistant pipe compound must be used on all threaded male connections to ensure a tight seal.
F. Gas Pressure Proper input pressures are required for optimum appliance performance. Gas line sizing requirements need to be made following NFPA51.

G. Negative Pressure Negative pressure results from the imbalance of air avail able for the fireplace to operate properly. Causes for this imbalance include:
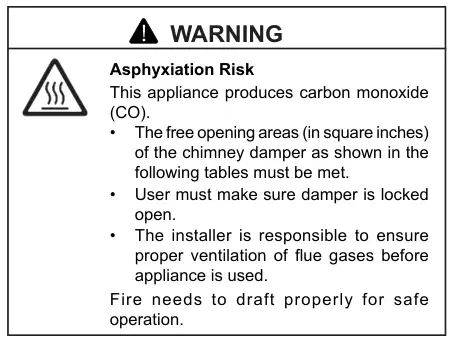
Table 1 for Factory Built Fireplaces
Free Opening Area (in square inches) of Chimney Damper for Venting combustion Products from Decorative Appliances for Installation in Solid Fuel Burning Fireplaces.
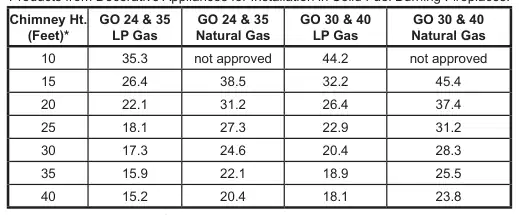
Table 2 for Masonary Built Fireplaces
Free Opening Area (in square inches) of Chimney Damper for Venting combustion Products from Decorative Appliances for Installation in Solid Fuel
Burning Fireplaces.
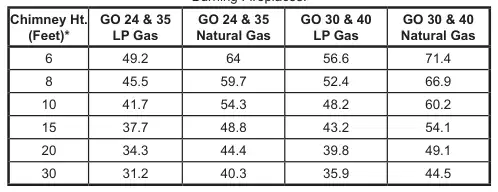
* Height is measured from the hearth to the top of the chimney. Minimum height is 6 ft.
Table 3 for Minimum Fireplace Dimensions
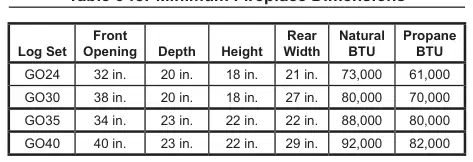


Figure 1 Measure Firebox
Figure 3 Battery Box and Cover (for IPI units only)

Figure 3A Control Box for IPI
Figure 2 Valve Cover (Safety Pilot)
Figure 4 Placing Grate

I. For Natural Gas Installation (for all units) • Pour sand into the burner pans to the point where the burner pipe is covered. See Figure 5. Level the sand from right to left to ensure an even flame pattern. At this point the pan should be half full. Be sure not to cover pilot assembly.


Figure 7 Placing Rock Wool

Figure 6 Placing Vermiculite
Fire Risk Explosion Risk Personal Injury Risk Failure to position the parts in accordance with the diagrams provided with the log packages or failure to use only parts approved with this appliance may result in property damage or personal injury.
Figure 5 Sand

J. For Propane Gas Installation (for all units).
Fire Risk Explosion Risk Personal Injury Risk An explosion could occur if a connection is made directly to an unregulated propane (LP) tank.
Pour vermiculite into each burner pan to the point where each pan is completely full. Level the vermiculite from right to left to ensure an even flame pattern. See Figure 6.
Fire Risk Explosion Risk Personal Injury Risk Pour vermiculite into each burner pan (LP) to the point where each pan is completely full. Failure to do so may cause the lighting to be delayed and this can be dangerous..
Included in the burner assembly box is a damper stop clamp which attaches to the damper as shown (Figure 8). Install the clamp to the damper ensuring that the minimum require ments (Tables 1 and 2) are achieved. Use a 7/16 in. wrench to secure the clamp to the damper. If the damper clamp pro vided does not fit your application, other means of securing the proper opening must be provided by the installer.
Figure 8 Damper Stop Clamp
Damper Stop Clamp · Damper

L. Inspect the Venting System The fireplace venting system is designed and constructed to develop a positive flow adequate to remove flue gases to the outside atmosphere. See fireplace installation instructions.
After burning, the logs become fragile. Take care in handling.
Before cleaning the appliance, be sure it is turned completely off. The pilot should also be turned off. The unit must be completely cooled.
Do not allow soot to build up on the logs Your logs require little care. Keep the burner assembly, logs and burner area surrounding the logs clean by brushing with a dry paint brush at least twice a year.
Cleaning • Periodic examination and cleaning of the venting system of the fireplace should be done before initial use and at least annually by a qualified agency.
M. Cleaning and Maintenance Instructions Always remember:
N. Safety Valve Pilot Flame Adjustment In structions The pilot flame adjustment screw is located on the front side of the pilot gas tubing port. Using a small straight blade screwdriver, turn the screw clockwise to adjust the pilot flame down and counterclockwise to adjust the flame up. This screw is sensitive; therefore it will not take much adjust ment to accomplish this flame adjustment.
ON OFF Pilot
Thermocouple

Can I close the glass doors on my fireplace when using my gas logs?
No. The gas log sets are designed for use in fireplaces with all fireplace doors fully opened. Operating your log set with the doors closed will cause overheating, premature failure of valve systems, and will void the warranty of your log set.
What sort of maintenance do gas logs require?
Vented gas logs do not require regular maintenance. However, it is a good idea to have valves, pilots and gas connections on your set periodically inspected by a hearth professional. Although it is not required maintenance, annually refurbishing the ember material and periodic cleaning of the logs will help maintain your set’s beauty and realism.
Why do I need a safety pilot control for my LP gas log set?
Since LP gas is heavier than air, it tends to gather or pool in low spots, rather than dissipating through the chimney flue. Furthermore, escaping LP gas can go unnoticed until a significant quantity has gathered, creating a potential hazard. Installation of a safety pilot control ensures that gas cannot accidentally pass through the burner when not operating, eliminating the risk of such an occurrence.
Does the ember material burn-up, and do I need to replace it periodically?
The ember material is a fireproof, organic mineral material called rock wool, and does not burn or require periodic replacement; however, annual refurbishment of the embers will help maintain the beauty and realism of your log set.
Can I burn real wood along with my gas logs?
No. The intense heat of a wood fire will damage your logs, burners, grates and valves, and will void your warranty.
Will gas logs help my chimney that drafts poorly?
No. Improper or poor draft will not be helped by gas logs. Please have your chimney inspected by a hearth professional or chimney sweep in order to determine how to correct the problem.
Can I close my fireplace damper to get more heat from my vented gas log set?
No. Vented gas logs are designed to be operated with the damper in the fully opened position. This gas log set produces carbon monoxide gas. The damper must be removed or clamped fully open using the “C” clamp provided with the set.
My gas logs make a whistling noise when I burn them. What causes this?
This behavior is normally caused by using a corrugated flex connector to hook up the gas log set. We recommend the installer use the supplied aluminum connector rather than the corrugated flexible type.
Can I move or change the position of the logs on my gas log set?
Omni certified log sets should not be altered - log placement must be exactly as indicated in the set’s installation instructions.
Can I install my gas log set myself?
No. We recommend installation be performed by an NFI certified hearth professional, HVAC professional, gas fitter, or plumber experienced in gas log installation. Most localities require installation of any gas appliance to be performed by a professional. Please check with your local inspection agency/department.
What are the gas logs made of?
The gas logs are made of a mixture of pre-fired, expanded clay and a special high-temperature cement, with a wire mesh reinforcement. This combination creates a strong, ceramic material capable of withstanding extreme temperatures, yet also allows molding of the intricate detail found in these gas log sets.
I have a vented log set, and the logs have black soot on them. Is this normal?
Soot build-up on vented gas logs is a normal part of the combustion process. Natural gas log sets generally produce less soot than liquid propane log sets. We recommend any soot build up be removed periodically using a product designed for gas log soot removal.
Can I add a remote control to my log set after it has been installed?
You can easily add a remote to the gas log set if it is already equipped with a solenoid type valve or an IPI ignition system. In addition, vented sets without solenoid valves can also be converted to remote operation by adding, in the field, a solenoid type valve; however, a hearth professional must do this type of in-the-field modification.
Do I have to re-light the pilot light every time I use my log set?
No. You can light the pilot in the fall and leave it on throughout the winter, as the pilot is extremely clean burning and uses very little gas (approximately 1,500 BTU/hr.). The log set is equipped with a safety shut off device that will automatically shut the gas off if the pilot flame is extinguished.
Is the gas log set approved by a testing agency?
Yes. The GO series has been design certified by Omni under the ANSI Z21.60-2004 Decorative Appliances for Installation in Solid Fuel Burning Fireplaces. The installation and the provisions for combustion and ventilation air must conform to the National Fuel Gas Code, ANSI Z223.1/NFPA 54. Check with your local inspections department for further information.

P. Lighting Instructions • Remote Ready Valve (REM)
CAUSING PROPERTY DAMAGE, PERSONAL INJURY OR LOSS OF LIFE.
A. This appliance has a pilot that must be lighted by hand. When lighting the pilot, follow these instructions exactly. B. BEFORE LIGHTING smell all around the appliance area for gas. Be sure to smell next to the floor because some
by hand, do not try to repair it. Call a qualified service technician. Force or attempted repair may result in fire or explosion. D. Do not use this appliance if any part has been under water. Immediately call a qualified service technician to inspect
the appliance and to replace any part of the control system and any gas control that has been under water.
Turn gas control handle clockwise to “OFF” position. Do not force.
Control Knob (Shown in “Pilot” Position)
N
O
N
O
U
F
F
F

WARNING: IF THESE INSTRUCTIONS ARE NOT FOLLOWED EXACTLY, A FIRE OR EXPLOSION MAY RESULT CAUSING PROPERTY DAMAGE, PERSONAL INJURY OR LOSS OF LIFE. A. This appliance has a pilot that must be lighted by hand. When lighting the pilot, follow these instructions exactly. B. BEFORE LIGHTING smell all around the appliance area for gas. Be sure to smell next to the floor because some gas is heavier than air and will settle on the floor. WHAT TO DO IF YOU SMELL GAS Do not try to light any appliance. Do not touch any electrical switch: do not use any phone in your building. Immediately call your gas supplier from a neighbor’s phone. Follow gas supplier’s instructions. If you cannot reach your gas supplier, call the fire department. C. Use only your hand to push in or turn the gas control handle. Never use tools. If the handle will not push in or turn by hand, do not try to repair it. Call a qualified service technician. Force or attempted repair may result in fire or explosion. D. Do no use this appliance if any part has been under water. Immediately call a qualified service technician to inspect the appliance and to replace any part of the control system and any part of the gas control that has been under water.
2. Turn gas control handle clockwise to the “OFF” position. 3. Wait 5 minutes to clear out any gas. Then smell for gas, including near the floor. If you smell gas, STOP!. Follow “B” in the safety information above. If you do not smell gas go on to next step. 4. Locate pilot (mounted on the right side of the top burner pan). 5. Turn control handle counterclockwise to the “PILOT” position. 6. Place a lit match at the pilot burner and simultaneously push in on the control handle. This should ignite the pilot. 7. Once the pilot lights, continue to depress the control handle for 1 minute. 8. After 1 minute slowly release control handle and it will pop back out. Pilot should remain lit. If it goes out, repeat steps 1 through 7. If the handle does not pop out when released, stop immediately and call your service technician or gas supplier. If the pilot will not stay lit after serveral tries, turn the gas control handle to the “OFF” position and call your service technician or gas supplier. 9. Turn gas control handle counterclockwise to the “ON” position.
Turn gas control handle clockwise to the “OFF” position. Do not force.




· ·

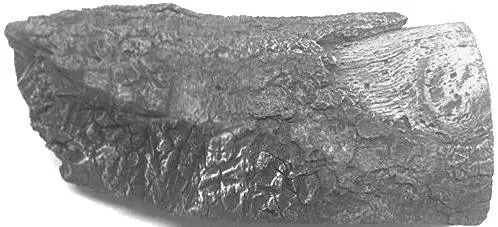
T. GO24 Grand Oak Series Log Placement Instructions • Place logs EXACTLY as the following photos depict.
Fire Risk Explosion Risk Personal Injury Risk Failure to position the parts in accordance with these diagrams or failure to use only parts specifically approved with this appliance may result in property damage or personal injury.


SRV727 not shown. See page 12, Step 3 for placement of log.

U. GO30 Grand Oak Series Logs Open the log box and remove the paper packaging and logs. • Inspect each log for breakage that may have occurred during shipping and handling.


SRV721A


V. GO30 Grand Oak Series Log Placement Instructions • Place logs EXACTLY as the following photos depict.

SRV721B
Step 2


X. GO35 Grand Oak Series Log Placement Instructions • Place logs EXACTLY as the following photos depict.


Z. GO40 Grand Oak Series Log Placement Instructions • Place logs EXACTLY as the following photos depict.

SRV701 SRV700

SRV724 SRV808


Grand Oak Gas Logs Service Parts
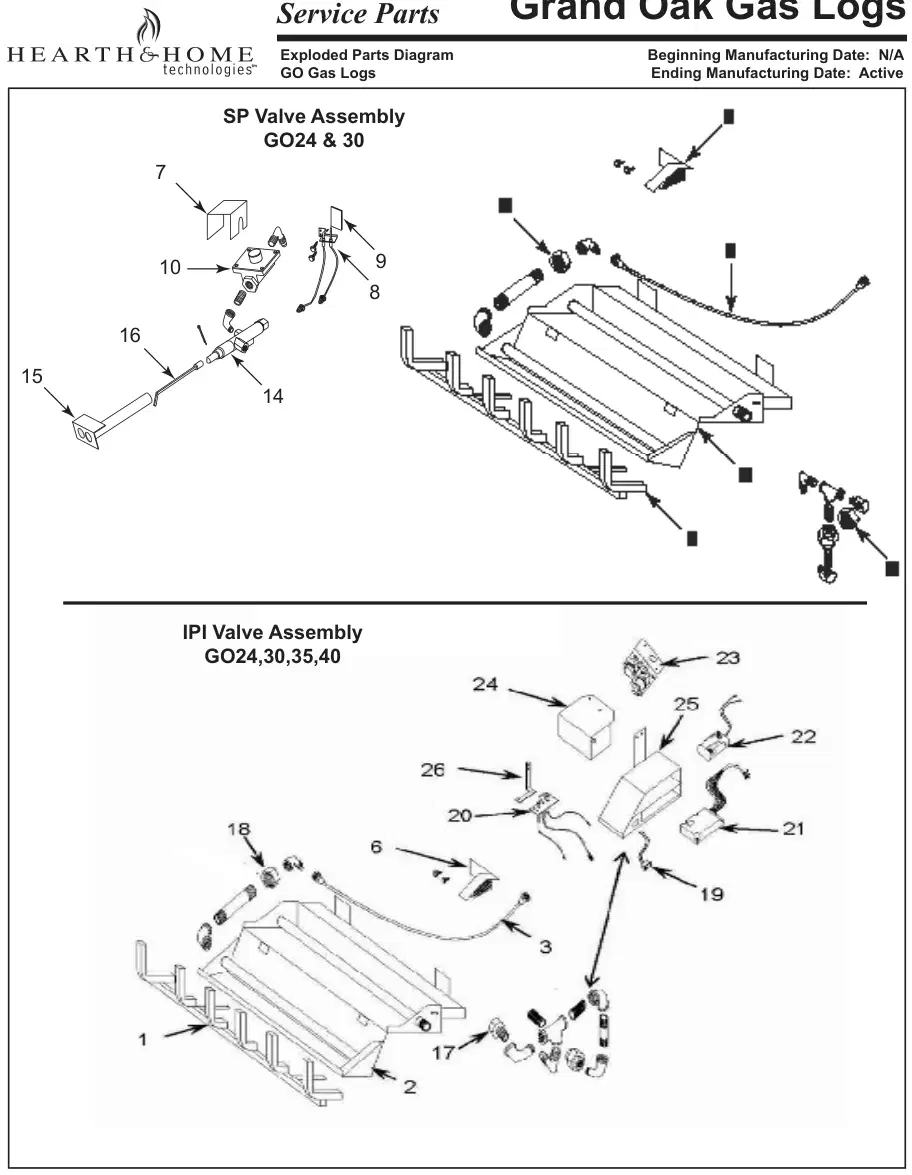
Exploded Parts Diagram Beginning Manufacturing Date: N/A GO Gas Logs Ending Manufacturing Date: Active

Exploded Parts Diagram Beginning Manufacturing Date: N/A GO Gas Logs Ending Manufacturing Date: Active Grand Oak Gas Logs


GO24,30,35 & 40
2A


Service Parts List Beginning Manufacturing Date: N/A GO Gas Logs Ending Manufacturing Date: Active
# Description of Part 24 in. 30 in. Qty.
1 Grate Assembly GR-300-24 GR-300-30 1
2 Burner Pan Assembly BPA-300-24 BPA-300-30 1
2A Burner Pan Assembly GO35 & GO40 BPA-300-35 BPA-300-40 1
3 Connector FT-1-24 FT-1-30 1
4 Bottom Burner Orifice NG BPO-2-40 BPO-2-38 1
4 Bottom Burner Orifice LP AM-2-54 AM-2-52 1
5 Top Burner Orifice NG BPO-2-26 BPO-2-26 1
5 Top Burner Orifice LP AM-2-44 AM-2-43 1
6 Pilot Booster (LP only) MT300-IC MT300-IC 1
7 Valve Cover MT300-VC MT300-VC 1
8 Pilot Assy NG (SP only) 07-1008-NG 07-1008-NG 1
8 Pilot Assy LP 07-1008-LP 07-1008-LP 1
9 Pilot Heat Pad 10-1041 10-1041 1
10 Regulator NG (4.0) 08-1031 08-1031 1
10 Regulator LP (10.0) 08-1030 08-1030 1
11 Valve (REM units only) 11-2267 11-2267 1
12 Valve Knob (REM units only) 11-2268 11-2268 1
13 Log Switch (REM units only) Switch Log Switch Log 1
14 Valve SP 07-1025 07-1025 1
15 SP Handle Tube Assy 11-2110 11-2110 1
16 SP Handle Assy 14-1019 14-1019 1
17 Top Burner Orifice NG (24” & 30”IPI Unit Only) BPO-2-26 BPO-2-26 1
17 Top Burner Orifice LP (24” & 30”IPI Unit Only) AM-2-49 AM-2 49 1
18 Bottom Burner Orifice NG (24” & 30”IPI Unit Only) BPO-2-50 BPO-2-50 1
18 Bottom Burner Orifice LP (24” & 30”IPI Unit Only) AM-2-54 AM-2-54 1
19 Switch (IPI Unit Only) 01-1069 01-1069 1
20 Pilot NG (IPI Unit Only) 2090-012 2090-012 1
20 Pilot LP (IPI Unit Only) 2090-013 2090-013 1
21 Control Module (IPI Unit Only) 593-592 593-592 1
22 Battery Holder (IPI Unit Only) 593-594A 593-594A 1
23 Valve NG (IPI Unit Only) 593-500 593-500 1
23 Valve LP (IPI Unit Only) 593-501 593-501 1
24 Valve Bracket (IPI Unit Only) MT-350-VC MT-350-VC 1
25 Control Box (IPI Unit Only) MT-350-CBA MT-350-CBA 1
26 Pilot Bracket (IPI Unit Only) MT-350-PB MT-350-PB 1
27 Wire Harness (IPI Unit Only) 593-590A 593-590A 1
28 Top Burner Orifice NG (GO35” & 40” units only) BPO-2-24 BPO-2-10 1
28 Top Burner Orifice LP (GO35” & 40” units only) AM-2-51 AM-2-51 1
29 Middle Burner Orifice NG (GO35” & 40” units only) BPO-2-28 BPO-2-16 1
29 Middle Burner Orifice LP (GO35” & 40” units only) AM-2-47 AM-2-47 1
30 Bottom Burner Orifice NG (GO35” & 40” units only) BPO-2-42 BPO-2-20 1
30 Bottom Burner Orifice LP (GO35” & 40” units only) AM-2-52 AM-2-56 1

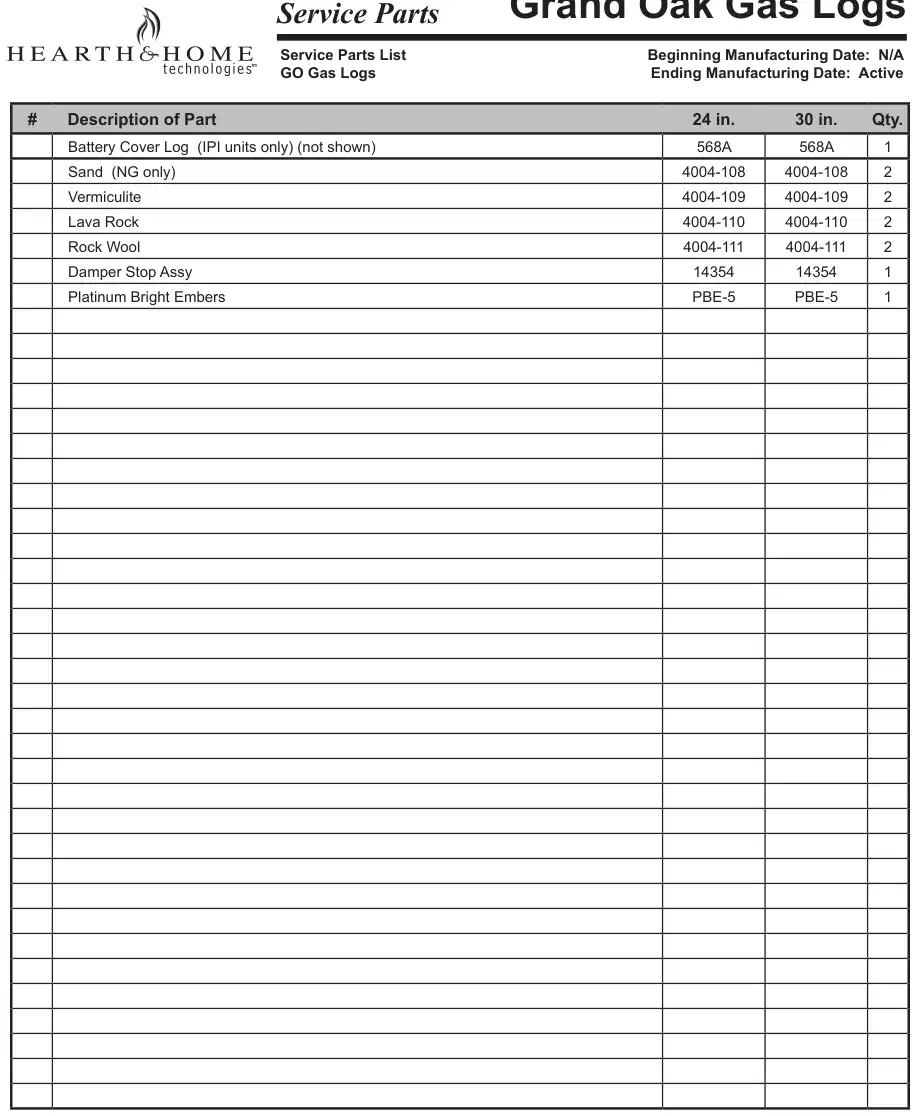
Service Parts List Beginning Manufacturing Date: N/A GO Gas Logs Ending Manufacturing Date: Active
# Description of Part 24 in. 30 in. Qty.
Battery Cover Log (IPI units only) (not shown) 568A 568A 1

TM
DECORATIVE GAS LOG LIMITED WARRANTY
Hearth & Home Technologies Inc. (HHT) extends the following warranty for decorative gas log sets as described herein, while it is in its loca tion or original installation. Dealers and employees of HHT have no authority to make any warranty or authorize any remedies in addition to or inconsistent with the terms of this Program. This warranty gives you specific legal rights. You may also have other rights which vary from state to state.
LIMITED WARRANTY. This decorative gas log set is comprised of a gas burner assembly with safety pilot valve and ceramic logs that are manufactured by HHT. This Limited Warranty does not cover any part of the woodburning fireplace system in which this decorative gas appli ance must be installed. This decorative gas log set is warranted to be free of defects in material and workmanship for a period of five (5) years from the date of installation. This Limited Warranty extends only to decorative gas log sets installed in the United States or Canada.
EXCLUSIONS AND QUALIFICATIONS. This Limited Warranty is subject to the following exclusions and qualifications: (1) This Limited War ranty does not apply to, and HHT assumes no responsibility for, any damages that result due to the installation or operation of this decorative gas log set not in accordance with both the installation instructions and operating instructions furnished. (2) The decorative gas log set must be subjected to normal use as explained in the operating instructions and the listing agency identification label attached to the burner pan assem bly. This decorative gas log set is only intended to burn the fuel specified on the listing agency identification label. Use of any other fuel other than specified on the listing agency identification label can create a life threatening situation and will void this limited warranty. (3) This Limited Warranty applies only if the decorative gas log system has been installed in a vented fireplace that is suitable for burning wood. Adequate ven tilation must be provided to allow proper drafting of the fireplace chimney system. HHT assumes no responsibility for improper performance of the decorative gas log set caused by inadequate draft due to environmental conditions (e.g. wind currents, downdrafts), tight-sealing construc tion of the structure, or mechanical devices (e.g. air handling devices that include forced air furnaces and air conditioning units, exhaust fans and ventilating devices), any and all of which may cause a negative pressure within the structure where the decorative gas log set is installed. (4) This Limited Warranty applies only to the components of the Appliance manufactured by HHT. HHT expressly excludes from this Limited Warranty any liability hereunder for defects or damage caused by the installation or use of any parts, devices or components that are not manu factured by HHT. (5) Labor costs to be paid by HHT pursuant to this Limited Warranty must be approved in advance of the performance of the work by HHT and must not exceed the retail price of the replacement part. (6) This Limited Warranty will be voided if the decorative gas log set is at any time removed or has been removed from the location in which it was originally installed. (7) Since building code requirements vary greatly throughout the United States and Canada, users of this decorative gas log set should determine in advance whether there are any build ing code restrictions on the installation and use of this product. HHT makes no representation or warranty regarding building code compliance and shall not be responsible for compliance therewith.
THERE ARE NO IMPLIED WARRANTIES OF MERCHANTABILITY OR FITNESS FOR PARTICULAR PURPOSE LIMITATION OF LIABILITY. IT IS EXPRESSLY AGREED AND UNDERSTOOD THAT HHT’S OBLIGATION AND PURCHASERS EXCLUSIVE REMEDY UNDER THIS LIMITED WARRANTY, UNDER ANY OTHER WARRANTY, EXPRESSED OR IMPLIED (INCLUDING MERCHANTABILITY AND FITNESS FOR PARTICULAR PURPOSE), OR OTHERWISE, SHALL BE LIMITED TO THE REPLACEMENT OR REPAIR Of ONLY HHT BRAND COMPO NENTS AND OPTIONAL COMPONENTS AS SPECIFIED ABOVE. THE DURATION OF ANY IMPLIED WARRANTY INCLUDING MERCHANT ABILITY AND FITNESS FOR PARTICULAR PURPOSE APPLICABLE TO THIS GAS APPLIANCE IS LIMITED TO THE DURATION OF THE FOREGOING WARRANTY. SOME STATES DO NOT ALLOW LIMITATIONS ON HOW LONG AN IMPLIED WARRANTY LASTS SO THE ABOVE WARRANTY MAY NOT APPLY TO YOU. IN NO EVENT SHALL HHT BE RESPONSIBLE FOR ANY INCIDENTAL OR CONSEQUEN TIAL DAMAGES CAUSED BY DEFECTS IN THE DECORATIVE GAS LOG SET, WHETHER SUCH DAMAGE OCCURS OR IS DISCOVERED BEFORE OR AFTER REPLACEMENT OR REPAIR, AND WHETHER SUCH DAMAGE IS CAUSED BY HHT NEGLIGENCE. SOME STATES DO NOT ALLOW THE EXCLUSION OR LIMITATION OF INCIDENTAL OR CONSEQUENTIAL DAMAGES, SO THE ABOVE LIMITATION OR EXCLUSION MAY NOT APPLY TO YOU.
HOW TO OBTAIN SERVICE. To obtain service under this Program, you must:
ADDITIONAL INFORMATION. If you would like information on current Hearth & Home Technologies products or want to locate a dealer in your area, visit www.hearthnhome.com
2003 Hearth & Home Technologies Inc.

TM
Please contact your Hearth & Home Technologies dealer with any questions or concerns. For the number of your nearest Hearth & Home Technologies dealer, please call 1-800-927-6841 or 1‑ 888‑427‑3973.
CAUTION
DO NOT DISCARD THIS MANUAL
DO NOT DISCARD
This product may be covered by one or more of the following patents: (United States) 4593510, 4686807, 4766876, 4793322, 4811534, 5000162, 5016609, 5076254, 5113843, 5191877, 5218953, 5263471, 5328356, 5341794, 5347983, 5429495, 5452708, 5542407, 5601073, 5613487, 5647340, 5688568, 5762062, 5775408, 5890485, 5931661, 5941237, 5947112, 5996575, 6006743, 6019099, 6048195, 6053165, 6145502, 6170481, 6237588, 6296474, 6374822, 6413079, 6439226, 6484712, 6543698, 6550687, 6601579, 6672860, 6688302B2, 6715724B2, 6729551, 6736133, 6748940, 6748942, 6769426, 6774802, 6796302, 6840261, 6848441, 6863064, 6866205, 6869278, 6875012, 6880275, 6908039, 6919884, D320652, D445174, D462436; (Canada) 1297749, 2195264, 2225408, 2313972; (Australia) 780250, 780403, 1418504 or other U.S. and foreign patents pending.
Pages referenced in this manual — manufacturer, support and downloads.
Owners and our team usually reply within a day — and your question helps the next person too.
Be the first to ask — other owners or our team will answer.