EN
Hearth and Home Technologies logo
Official user manual

Hearth and Home Technologies GRL-700-AU

17 pages·1004 KB·Indoor Fireplace·PDF·ENDEFRITNLJA
Hearth and Home Technologies GRL-700-AU
Table of Contents 7 sections GRL-700-AU Installers Guide · Table of Contents · Section 1: Introduction · Section 2: Assembly · … ShowHide
Page 1 of the Hearth and Home Technologies GRL-700-AU user manual — 2010-900C 7/03
Page 1 · click to enlarge
Page 1
Hearth and Home Technologies GRL-700-AU — GRL-700-AU Installers Guide diagram (page 1)
Fig. 1 · GRL-700-AU Installers Guide

INSTALLATION AND OPERATION

INSTRUCTIONS

Hearth and Home Technologies GRL-700-AU — INSTALLATION AND OPERATION diagram (page 1)
Fig. 2

MODEL: GRL-700-AU AUSTRALIAN GAS ASSOCIATION APPROVED

THIS MANUAL MUST BE USED FOR INSTALLATION AND RETAINED

BY HOMEOWNER FOR OPERATION AND MAINTENANCE.

HEAT-N-GLO, a brand of Hearth & Home Technologies Inc. 20802 Kensington Boulevard, Lakeville, MN 55044, U.S.A. • (952) 985-6000

This product is covered by one or more of the following patents: (United States) 4,112,913; 4,408,594; 4,422,426; 4,424,792; 4,520,791; 4,793,322; 4,852,548; 4,875,464; 5,000,162; 5,016,609; 5,076,254 5,191,877; 5,218,953; 5,328,356; 5,429,495; 5,452,708; 5,542,407; 5,613,487; (Australia) 543790; 586383; (Canada) 1,123,296; 1,297,746; 2,195,264; (Mexico) 97-0457; (New Zealand) 200265; or other U.S. and foreign patents pending.

2010-900C 7/03

Approval Number 5669

Page 2 of the Hearth and Home Technologies GRL-700-AU user manual — PLEASE READ THIS MANUAL BEFORE INSTALLING
Page 2 · click to enlarge
Page 2

INSTALLATION AND OPERATION INSTRUCTIONS

PLEASE READ THIS MANUAL BEFORE INSTALLING

AND USING THIS APPLIANCE.

MODEL GRL-700-AU IS AUSTRALIAN GAS ASSOCIATION APPROVED FOR NATURAL GAS OR PROPANE AS A DECORATIVE GAS LOG.

them will void your warranty and may present a fire hazard.

The Heat-N-Glo, a brand of Hearth & Home Technologies Inc. warranty will be voided by, and Heat-N-Glo, a brand of Hearth & Home Technologies Inc. disclaims any responsibil- ity for the following actions:

Refer to the appliance data plates for gas consumptions and pressures.

Installation of this appliance should only be carried out by an authorized person in ac- cordance with the manufacturer's instruc- tions. All relevant codes and regulations laid down by the gas piping authorities, munici- pal building regulations, electrical wiring regulations and the requirements of the AGA Gas Installation Code must be observed.

  • Installation of any damaged heater.
  • Modification of the heater installation other than as instructed by Heat-NGlo, a brand of Hearth & Home Technologies In c.
  • Improper positioning of the gas logs.

This appliance and its components are tested and safe when installed in accor- dance with this Installation Manual. Report to your dealer any parts damaged in ship- ment. Read all instructions before starting installation and follow these instructions carefully during installation to ensure maxi- mum benefit and safety. Failure to follow

  • Installation and/or use of any component part not manufactured or approved by Heat-N-Glo, a brand of Hearth & Home Technologies Inc., not withstanding any independent testing laboratory or other party approval of such component part or accessory.

Copyright 2003 Heat-N-Glo, a brand of Hearth & Home Technologies Inc. 20802 Kensington Boulevard, Lakeville, MN 55044, U.S.A. Printed in U.S.A.

Page 5 of the Hearth and Home Technologies GRL-700-AU user manual — !
Page 5 · click to enlarge
Page 5

1.0 INTRODUCTION

Model GRL-700-AU Gas Log Sets are Decorative Gas Appliances for Installation in a Solid-Fuel Burning Fire- place. Minimum fireplace size for GRL-700-AU: height 425mm, width 700mm, depth 300mm.

This log set is to be installed only in a solid-fuel burn- ing fireplace with a working flue and one constructed of noncombustible material or into an approved Jetmaster gas firebox. The minimum permanent vent opening pro- vided by the fireplace chimney damper to vent the flue products must not be less than 40,000mm2. The chim- ney damper MUST be fixed in a fully opened position and the fireplace must have a proper draft.

!

TO REDUCE THE RISK OF FIRE OR INJURY FROM BURNS AND FOR THE PROTECTION OF YOUNG CHILDREN OR THE INFIRM, A SECONDARY GUARD IS RECOMMENDED.

!

2.0 ASSEMBLY

!

!

Model GRL-700-AU contains complete gas-burner, decorative front, and log components needed. Use cau- tion when handling logs to avoid damage. Position gas- burner assembly to the rear of the fireplace. Once fully assembled slide access door into place.

!

The installation, including provisions for combustion and ventilation air, must conform with the AGA Gas Instal- lation Code.

Do not use this appliance if any part has been under water. Immediately call a qualified service technician to inspect the unit and to replace any part of the control system and any gas control which has been underwater.

Page 6 of the Hearth and Home Technologies GRL-700-AU user manual — Section 1: Introduction
Page 6 · click to enlarge
Page 6

A. Inlet gas supply pressure for purposes of input ad-

E. NOTEAn Optional Remote Control Kit and Wall

justment, shall be 6.0 inches w.c. (1.5kPa) for natu- ral gas and 11 inches w.c. (2.75kPa) for propane. Manifold (outlet) pressure should be 3.2 inches w.c. (.80kPa) for natural gas and 9.6 inches w.c. (2.40kPa) for propane models.

Switch Kit , for turning the burner ON/OFF are avail- able. Detailed installation instructions are found in each kit.

F. Test fire the unit after referring to the SAFETY IN-

FORMATION and LIGHTING INSTRUCTIONS found in Section 3 in this manual, or on label plate assembly found on the gas-burner.

B . NOTETHE GAS SUPPLY LINE SHOULD BE

PURGED OF ANY TRAPPED AIR PRIOR TO THE FIRST FIRING OF THE UNIT.

G. Using a soap-solution or other device, check sys-

C. CAUTIONDuring the initial purging and subse-

tem for leaks. Refer to Section 3, OPERATING GUIDELINES and MAINTENANCE INSTRUC- TIONS.

quent lightings, NEVER allow the gas control valve knob to remain depressed in the "PILOT" position without pushing the red ignitor button at least once every second.

H. Once the gas-burner is test fired and gas supply

lines are purged, assembly of the grate and logs is required.

D. Your appliance control system is a millivolt type. It

consists of a pilot burner, a gas control valve/regula- tor, a thermopile, a piezo ignitor, and an ON/OFF rocker switch. For control system wiring diagram see Figure 2.

Hearth and Home Technologies GRL-700-AU — Section 1: Introduction diagram (page 6)
Fig. 3 · Section 1: Introduction
Page 7 of the Hearth and Home Technologies GRL-700-AU user manual — Log Set Assembly: GRL-700-AU-LOGS Model: GRL-700-AU
Page 7 · click to enlarge
Page 7

Log Set Assembly: GRL-700-AU-LOGS Model: GRL-700-AU

LOG PLACEMENT

INSTRUCTIONS

1. Attach grate to assembly by sliding hooks into openings on the front surround.
Hearth and Home Technologies GRL-700-AU — Log Set Assembly: GRL-700-AU-LOGS Model: GRL-700-AU diagram (page 7)
Fig. 4 · Log Set Assembly: GRL-700-AU-LOGS Model: GRL-700-AU
2. Ensure that tabs on front and rear surrounds are bent as shown in Figure 1. Carefully remove logs from carton and place as shown.
Hearth and Home Technologies GRL-700-AU — Log Set Assembly: GRL-700-AU-LOGS Model: GRL-700-AU diagram (page 7)
Fig. 5 · Log Set Assembly: GRL-700-AU-LOGS Model: GRL-700-AU
Hearth and Home Technologies GRL-700-AU — Log Set Assembly: GRL-700-AU-LOGS Model: GRL-700-AU diagram (page 7)
Fig. 6 · Log Set Assembly: GRL-700-AU-LOGS Model: GRL-700-AU
Page 8 of the Hearth and Home Technologies GRL-700-AU user manual — Heat-n-Glo GRL-700/GRL-850 Glowing Embers (Mineral Wool) Placement
Page 8 · click to enlarge
Page 8

Heat-n-Glo GRL-700/GRL-850 Glowing Embers (Mineral Wool) Placement

Natural Gas

Hearth and Home Technologies GRL-700-AU — Heat-n-Glo GRL-700/GRL-850 Glowing Embers (Mineral Wool) Placement diagram (page 8)
Fig. 7 · Heat-n-Glo GRL-700/GRL-850 Glowing Embers (Mineral W…
Hearth and Home Technologies GRL-700-AU — Heat-n-Glo GRL-700/GRL-850 Glowing Embers (Mineral Wool) Placement diagram (page 8)
Fig. 8 · Heat-n-Glo GRL-700/GRL-850 Glowing Embers (Mineral W…
  • Place single layer of 10mm circular sized pieces next to burner ports, taking care not to place material on or between ports.
  • Do not use all of the ‘ember’ in the packet. One packet should last 5-6 applications.
  • Repeat application at the start of each season or at the next fireplace service (annually). Note: The contents of the bag is intended for multiple applications. Do not use complete contents for the initial application. Save remaining material for use at the next fireplace servicing. Keep away from children. Do not eat.
Page 9 of the Hearth and Home Technologies GRL-700-AU user manual — Heat-n-Glo GRL-700/GRL-850 Glowing Embers (Mineral Wool) Placement
Page 9 · click to enlarge
Page 9

Heat-n-Glo GRL-700/GRL-850 Glowing Embers (Mineral Wool) Placement

LPG

Hearth and Home Technologies GRL-700-AU — Heat-n-Glo GRL-700/GRL-850 Glowing Embers (Mineral Wool) Placement diagram (page 9)
Fig. 9 · Heat-n-Glo GRL-700/GRL-850 Glowing Embers (Mineral W…
  • Place single layer of 10mm circular sized pieces on top of burner ports.
  • Increase the quantity of the “glowing embers” on the right, centre and left hand side, as indicated, of the burner where there is a cluster of burner ports.
  • Do not use all of the ‘ember’ in the packet. One packet should last 4-5 applications.
  • Repeat application at the start of each season or at the next fireplace service (annually). Note: The contents of the bag is intended for multiple applications. Do not use complete contents for the initial application. Save remaining material for use at the next fireplace servicing. Keep away from children. Do not eat.
Page 10 of the Hearth and Home Technologies GRL-700-AU user manual — STEP 5: LOG #3 (SRV506-717)
Page 10 · click to enlarge
Page 10
Hearth and Home Technologies GRL-700-AU — Section 1: Introduction diagram (page 10)
Fig. 10 · Section 1: Introduction
Hearth and Home Technologies GRL-700-AU — Section 1: Introduction diagram (page 10)
Fig. 11 · Section 1: Introduction
Hearth and Home Technologies GRL-700-AU — Section 1: Introduction diagram (page 10)
Fig. 12 · Section 1: Introduction
Hearth and Home Technologies GRL-700-AU — Section 1: Introduction diagram (page 10)
Fig. 13 · Section 1: Introduction
Hearth and Home Technologies GRL-700-AU — Section 1: Introduction diagram (page 10)
Fig. 14 · Section 1: Introduction
Hearth and Home Technologies GRL-700-AU — Section 1: Introduction diagram (page 10)
Fig. 15 · Section 1: Introduction
Hearth and Home Technologies GRL-700-AU — Section 1: Introduction diagram (page 10)
Fig. 16 · Section 1: Introduction

STEP 3: LOG #1 (SRV506-701)

Put log #1 behind the locating tab on the right rear corner and up against the locating tab in the center.

Hearth and Home Technologies GRL-700-AU — STEP 3: LOG #1 (SRV506-701) diagram (page 10)
Fig. 17
Hearth and Home Technologies GRL-700-AU — STEP 3: LOG #1 (SRV506-701) diagram (page 10)
Fig. 18
Hearth and Home Technologies GRL-700-AU — STEP 3: LOG #1 (SRV506-701) diagram (page 10)
Fig. 19
Hearth and Home Technologies GRL-700-AU — STEP 3: LOG #1 (SRV506-701) diagram (page 10)
Fig. 20
Hearth and Home Technologies GRL-700-AU — STEP 3: LOG #1 (SRV506-701) diagram (page 10)
Fig. 21
Hearth and Home Technologies GRL-700-AU — STEP 3: LOG #1 (SRV506-701) diagram (page 10)
Fig. 22
Hearth and Home Technologies GRL-700-AU — STEP 3: LOG #1 (SRV506-701) diagram (page 10)
Fig. 23
Hearth and Home Technologies GRL-700-AU — STEP 3: LOG #1 (SRV506-701) diagram (page 10)
Fig. 24
Hearth and Home Technologies GRL-700-AU — STEP 3: LOG #1 (SRV506-701) diagram (page 10)
Fig. 25
Hearth and Home Technologies GRL-700-AU — STEP 3: LOG #1 (SRV506-701) diagram (page 10)
Fig. 26

STEP 4: LOG #2 (SRV2010-703)

Place log #2 on the right front corner of the unit using its locating slots (on log bottom).

Hearth and Home Technologies GRL-700-AU — STEP 4: LOG #2 (SRV2010-703) diagram (page 10)
Fig. 27
Hearth and Home Technologies GRL-700-AU — STEP 4: LOG #2 (SRV2010-703) diagram (page 10)
Fig. 28
Hearth and Home Technologies GRL-700-AU — STEP 4: LOG #2 (SRV2010-703) diagram (page 10)
Fig. 29
Hearth and Home Technologies GRL-700-AU — STEP 4: LOG #2 (SRV2010-703) diagram (page 10)
Fig. 30
Hearth and Home Technologies GRL-700-AU — STEP 4: LOG #2 (SRV2010-703) diagram (page 10)
Fig. 31
Hearth and Home Technologies GRL-700-AU — STEP 4: LOG #2 (SRV2010-703) diagram (page 10)
Fig. 32

STEP 5: LOG #3 (SRV506-717)

Place log #3 against the left front corner of log #2 as shown.

Page 11 of the Hearth and Home Technologies GRL-700-AU user manual — Section 1: Introduction
Page 11 · click to enlarge
Page 11
Hearth and Home Technologies GRL-700-AU — Section 1: Introduction diagram (page 11)
Fig. 33 · Section 1: Introduction
Hearth and Home Technologies GRL-700-AU — Section 1: Introduction diagram (page 11)
Fig. 34 · Section 1: Introduction
Hearth and Home Technologies GRL-700-AU — Section 1: Introduction diagram (page 11)
Fig. 35 · Section 1: Introduction
Hearth and Home Technologies GRL-700-AU — Section 1: Introduction diagram (page 11)
Fig. 36 · Section 1: Introduction
Hearth and Home Technologies GRL-700-AU — Section 1: Introduction diagram (page 11)
Fig. 37 · Section 1: Introduction
Hearth and Home Technologies GRL-700-AU — Section 1: Introduction diagram (page 11)
Fig. 38 · Section 1: Introduction
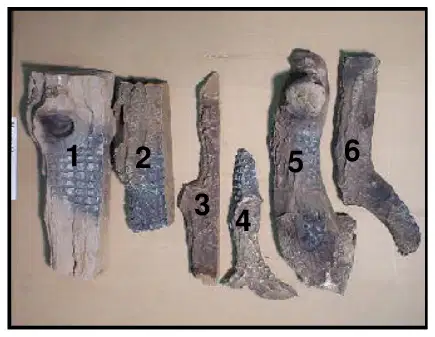
6. LOG #4 (SRV591-703) Rest log #4 in between the locating tabs on the rear shelf and rest its front top 330mm from the left corner of

the decorative front.

Hearth and Home Technologies GRL-700-AU — Section 1: Introduction diagram (page 11)
Fig. 39 · Section 1: Introduction
Hearth and Home Technologies GRL-700-AU — Section 1: Introduction diagram (page 11)
Fig. 40 · Section 1: Introduction
Hearth and Home Technologies GRL-700-AU — Section 1: Introduction diagram (page 11)
Fig. 41 · Section 1: Introduction
Hearth and Home Technologies GRL-700-AU — Section 1: Introduction diagram (page 11)
Fig. 42 · Section 1: Introduction
Hearth and Home Technologies GRL-700-AU — Section 1: Introduction diagram (page 11)
Fig. 43 · Section 1: Introduction
7. LOG #5 (SRV550-714) Rest log #5 against log #3 and rest its right edge on log #1.
Hearth and Home Technologies GRL-700-AU — Section 1: Introduction diagram (page 11)
Fig. 44 · Section 1: Introduction
Hearth and Home Technologies GRL-700-AU — Section 1: Introduction diagram (page 11)
Fig. 45 · Section 1: Introduction
Hearth and Home Technologies GRL-700-AU — Section 1: Introduction diagram (page 11)
Fig. 46 · Section 1: Introduction
Hearth and Home Technologies GRL-700-AU — Section 1: Introduction diagram (page 11)
Fig. 47 · Section 1: Introduction
Hearth and Home Technologies GRL-700-AU — Section 1: Introduction diagram (page 11)
Fig. 48 · Section 1: Introduction
Hearth and Home Technologies GRL-700-AU — Section 1: Introduction diagram (page 11)
Fig. 49 · Section 1: Introduction
8. LOG #6 (SRV530-716) Place log #6 in the groove on top of log #2 with its front on log #1.

330mm

Page 12 of the Hearth and Home Technologies GRL-700-AU user manual — 3.0 OPERATING GUIDELINES AND MAINTENANCE INSTRUCTIONS
Page 12 · click to enlarge
Page 12

3.0 OPERATING GUIDELINES AND MAINTENANCE INSTRUCTIONS

Hearth and Home Technologies GRL-700-AU — 3.0 OPERATING GUIDELINES AND MAINTENANCE INSTRUCTIONS diagram (page 12)
Fig. 50

Upon completing the gas line connection, a small amount of air will be in the lines. When first lighting the pilot light, it will take a few minutes for the lines to purge themselves of this air. Once the purging is com- plete, the pilot and burner will light and operate as indi- cated in the instruction manual. Subsequent lighting of the appliance will not require such purging.

Hearth and Home Technologies GRL-700-AU — 3.0 OPERATING GUIDELINES AND MAINTENANCE INSTRUCTIONS diagram (page 12)
Fig. 51

WARNING: BE SURE FIREPLACE SCREEN OR GLASS DOORS ARE IN PLACE WHEN BURNING FIREPLACE LOGS. UNLESS OTHER PROVISIONS FOR COMBUSTION AIR ARE PRO- VIDED, THE SCREEN OR DOORS SHALL HAVE AN OPENING FOR INTRODUCTION OF COM- BUSTION AIR. THIS GAS LOG SET IS NOT DE- SIGNED TO OPERATE WITH AIR TIGHT GLASS DOORS. IF GAS ODOR IS NOTICEABLE, TURN CONTROL KNOB TO "OFF" POSITION AND CHECK ALL CONNECTIONS FOR LEAKS. DO NOT USE OPEN FLAME. ADEQUATE COMBUS- TION AND COOLING AIR MUST BE PROVIDED OR THE UNIT WILL NOT FUNCTION PROPERLY.

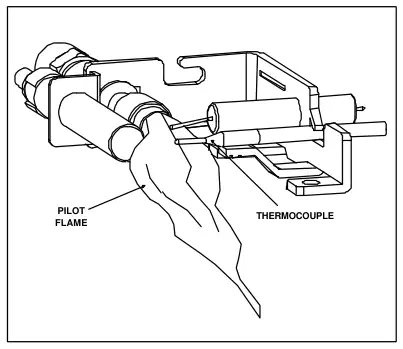
The thermocouple should be engulfed in the pilot flame (see Figure 3).

Periodically examine the area around the burner neck and the pilot. Any dirt or lint in this area should be removed. This will ensure long life and trouble free operation. When the appliance is put back in service, check the burner flame patterns.

The following conditions must not cause spillage of combustion products:

The appliance and venting system should be inspected before initial use and inspected and cleaned at least annu- ally by an authorized field service person.

  • cold chimney or flue system
  • open or closed doors or windows
  • operation of any exhaust or extraction fans
  • operation of any other gas appliance in the room or dwelling

Proper means must be employed to ensure sufficient draft.

To obtain proper operation, it is imperative that the pilot and main burner flame characteristics are steady, not lifting or floating.

Page 13 of the Hearth and Home Technologies GRL-700-AU user manual — !
Page 13 · click to enlarge
Page 13

SAFETY INFORMATION

FOR YOUR SAFETY READ BEFORE LIGHTING

!

A. This appliance has a pilot which must be lighted

C. Use only your hand to push in or turn the gas

by hand. When lighting the pilot, follow these in- structions exactly.

control knob. Never use tools. If the knob will not push in or turn by hand, don’t try to repair it, call a qualified service technician. Force or at- tempted repair may result in a fire or explosion.

B. BEFORE LIGHTING smell all around the appli-

ance area for gas. Be sure to smell next to the floor because some gas is heavier than air and will settle on the floor.

D. Do not use this appliance if any part has been

under water. Immediately call a qualified ser- vice technician to inspect the appliance and to replace any part of the control system and any gas control which has been under water.

WHAT TO DO IF YOU SMELL GAS: • Do not try to light any appliance.

  • Do not touch any electric switch; do not use any phone in your building.
  • Immediately call your gas supplier from a neighbor’s phone. Follow the gas supplier’s instructions.
Page 14 of the Hearth and Home Technologies GRL-700-AU user manual — TO TURN OFF GAS APPLIANCE
Page 14 · click to enlarge
Page 14

LIGHTING INSTRUCTIONS

LIGHTING INSTRUCTIONS

1. "STOP!" Read the safety information on previous page.

PILOT ASSEMBLY

2. Remove the control access cover.
3. Turn the valve control knob to the "OFF" position. To do this, you must turn the knob clockwise to the "Pilot" position, and then press in and continue turning clockwise to the "OFF" position.
6. To put the control in the "Pilot" position, turn the control knob counter-clockwise

to the "Pilot" position.

7. To light the pilot depress the control knob and then depress the red piezo button until it makes a clicking sound. It may be necessary to repeat this step. If the pilot does not light after 10 seconds, go back to step 3. The control knob should be held in for a MINUTE after pilot ignition.

GAS CONTROL VALVE

  • If the control knob does not pop out when released, STOP -shut off the gas supply to the fireplace control valve, and IMMEDIATELY call your service technician or gas supplier.

"OFF" unless knob is pushed in slightly. Do not force.

4. WAIT FIVE (5) MINUTES TO CLEAR OUT ANY GAS. Then smell for gas, including near the floor. If you then smell gas, STOP ! Follow "B" in the safety information on the previous page. If you don't smell gas, go to the next step.
  • If the pilot will not stay lit after two tries, turn the control knob to the "OFF" position and call your service technician or gas supplier.
8. After the pilot has been lit, the burner can be turned on by turning the knob counter-clockwise to the "ON" position. Flip the ON/OFF switch to the "ON" position.
5. The pilot should not require accessing for lighting purposes. The pilot is located at the left end of the burner.
9. Replace control access cover.

TO TURN OFF GAS APPLIANCE

1. Remove the control access cover.
3. Turn the valve control knob clockwise to the "Pilot" position, then depress knob and continue turning to "OFF" position.
2. Turn ON/OFF switch to "OFF".
4. Replace control access cover.
Page 15 of the Hearth and Home Technologies GRL-700-AU user manual — Service Parts GRL-700-AU
Page 15 · click to enlarge
Page 15

Service Parts GRL-700-AU

(NG, LP) Exploded Parts Diagram

Beginning Manufacturing Date4-2003
Ending Manufacturing Date________
Hearth and Home Technologies GRL-700-AU — Service Parts GRL-700-AU diagram (page 15)
Fig. 52 · Service Parts GRL-700-AU
Page 16 of the Hearth and Home Technologies GRL-700-AU user manual — 4.0 REPLACEMENT PARTS: GRL-700-AU
Page 16 · click to enlarge
Page 16

4.0 REPLACEMENT PARTS: GRL-700-AU

When requesting service or replacement parts for your decorative gas log set, please provide model number and serial number. All parts listed in this manual may be ordered from an authorized dealer.

Hearth and Home Technologies GRL-700-AU — 4.0 REPLACEMENT PARTS: GRL-700-AU diagram (page 16)
Fig. 53
Page 17 of the Hearth and Home Technologies GRL-700-AU user manual — Warranty
Page 17 · click to enlarge
Page 17

LIMITED 10 YEAR WARRANTY HEAT-N-GLO, a brand of Hearth & Home Technologies Inc.

In order to presumptively establish the dates to which your HEAT-N-GLO Limited Warranty runs, you must mail the completed warranty card to HEAT-N-GLO, a brand of Hearth & Home Technologies Inc., 20802 Kensington Boulevard, Lakeville, MN 55044, within 60 days of the date of the fireplace installation. If you fail to do so, you may be required to prove the date of installation before warranty work can be performed.

The warranty exclusions and limitations of liability are effective upon installation of the fireplace.

Subject to the conditions set forth herein, HEAT-N-GLO, a brand of Hearth & Home Technologies Inc. (“HEAT-N- GLO”) extends the following warranty with respect to HEAT-N-GLO, a brand of Hearth & Home Technologies Inc.

If HEAT-N-GLO is reasonably satisfied that any part or portion of the fireplace covered by this Limited Warranty is defective in material or workmanship under normal use and service as described in the Operating Instructions, HEAT-N-GLO will take the following actions:

1. If the defect is reported during the first year from the date of installation (stainless steel burners and fiber logs are covered for 3 years), HEAT-N-GLO will replace or repair the defective components at its sole expense. The decision whether to replace a component shall be made at HEAT-N-GLO’s sole discretion. This Limited Warranty does not cover components broken during shipping, misuse or careless handling. HEAT-N-GLO shall be not responsible for any indirect, incidental, or consequential damages or for any costs other than those incurred by HEAT-N-GLO to repair or replace the defective component. If components (including venting) other than factory approved components are used, all warranty and liability on the fireplace is voided. Defects reported after the first year will not be covered by warranty unless they fall within the purview of paragraph 2 or 3 below.

2. If the following defects are reported during the second year after the date of installation, HEAT-N-GLO will supply replacement parts at the current wholesale price: defective electrical or manual components, optional components or accessories, and glass panels (not including glass panels broken during misuse or careless handling). HEAT-N-GLO shall not be responsible for any labor, transportation or other costs. Furthermore, it shall not be liable for any indirect, incidental or consequential damages.
3. HEAT-N-GLO will replace or repair a defective firebox or heat exchanger, at any time during the 10 years from the date of installation. The decision whether to replace the defective component shall be made at HEAT-NGLO’s sole discretion. HEAT-N-GLO shall not be responsible for any indirect, incidental or consequential damages or for any costs other than those incurred by HEAT-N-GLO to repair or replace the defective component.

This Limited Warranty is the exclusive remedy available to you. If HEAT-N-GLO cannot effectively resolve a warranty problem in an expedient and cost-effective manner, it can discharge its entire warranty liability by refunding the price of the product to you.

Products made by other manufacturers, whether sold with the fireplace or added thereafter, are NOT covered by this Limited Warranty. The use of other unauthorized components will make this warranty null and void. This Limited Warranty will also be void if the appliance is not installed by a qualified installer in accordance with the Installation Instructions. Furthermore, the Limited Warranty will be void if the fireplace is not operated, at all times, according to the Operating Instructions furnished with the fireplace. Any service work must be performed by authorized service representatives.

EXCEPT TO THE EXTENT PROVIDED BY LAW, NO OTHER EXPRESS OR IMPLIED WARRANTIES, INCLUDING WARRANTIES OF MERCHANTABILITY OR FITNESS FOR A PARTICULAR PURPOSE, SHALL APPLY TO THE FIREPLACE PRODUCT. In States that do not allow limitations on how long an implied warranty lasts, or do not allow exclusion of indirect damages, those limitations or exclusions may not apply to you. You may also have additional rights not covered in this Limited Warranty.

HEAT-N-GLO reserves the right to make changes at any time, without notice, in design, material, specifications and prices. It also reserves the right to discontinue styles and products.

Ask about the Hearth and Home Technologies GRL-700-AU

Owners and our team usually reply within a day — and your question helps the next person too.

Add your email to get notified when it’s answered — no spam, ever.

0 questions
No questions yet about the Hearth and Home Technologies GRL-700-AU

Be the first to ask — other owners or our team will answer.

Original document

Hearth and Home Technologies GRL-700-AU manual PDF

17 pages·1004 KB·Indoor Fireplace·PDF
Click any page above to open it here
Page 1 / …
100%
Loading pages…