



6530 SERIES 6531 SERIES 6532 SERIES 6930 SERIES 6931 SERIES 6932 SERIES
Certified to comply with ANSI A112.18.1M US PATENT D371956
Thank you for selecting American-Standard...the benchmark of fine quality for over 100 years.
To ensure that your installation proceeds smoothly--please read these instructions carefully before you begin.
P r i n t e d i n M e x i c o
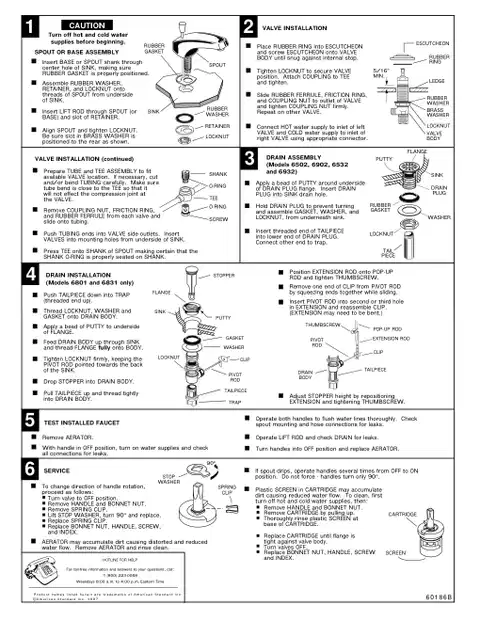
Turn off hot and cold water
supplies before beginning.
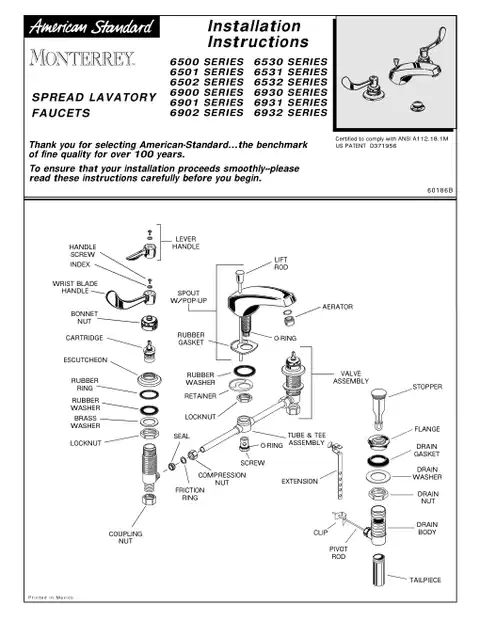
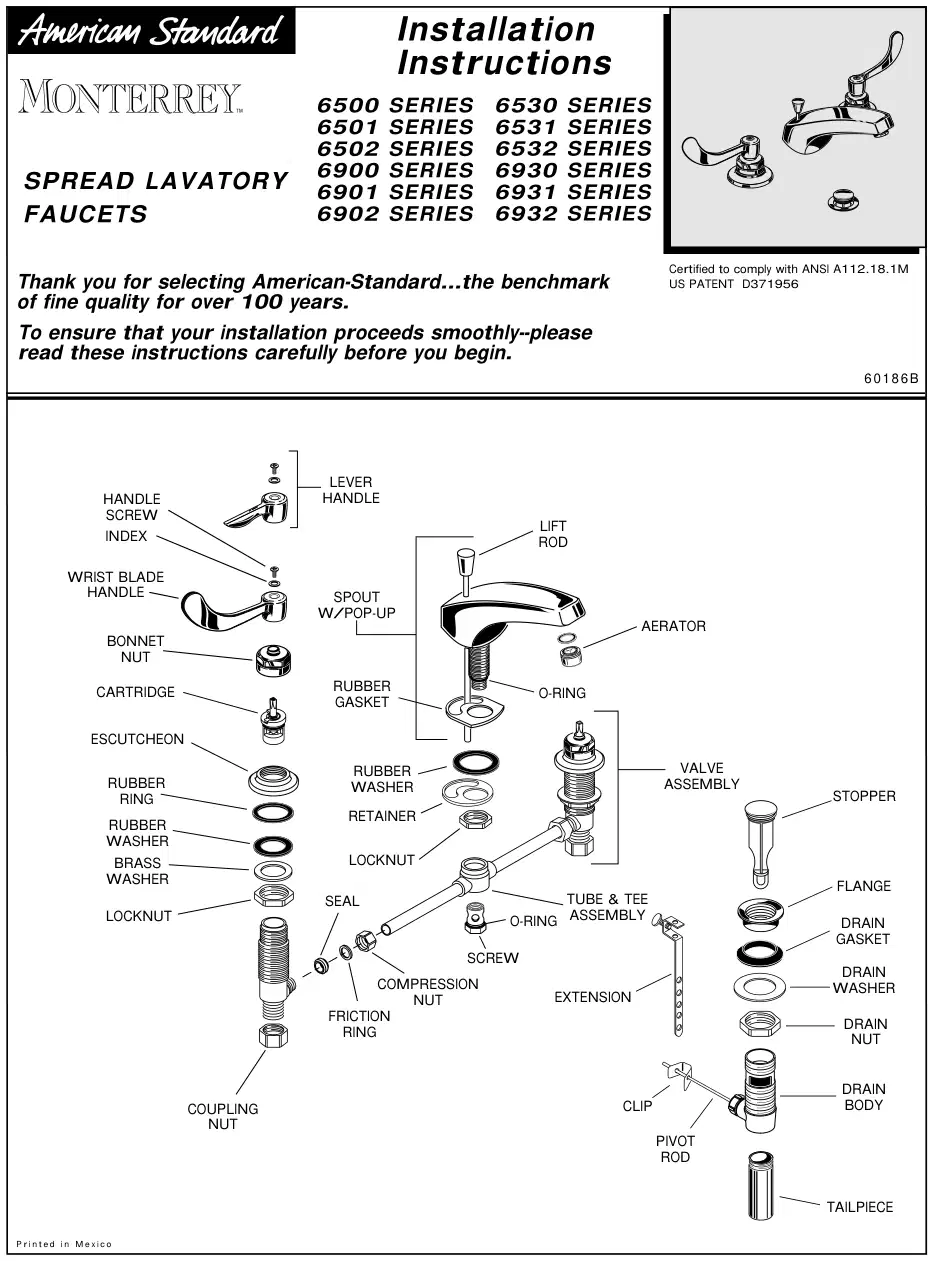
Place RUBBER RING into ESCUTCHEON and screw ESCUTCHEON onto VALVE BODY until snug against internal stop.
GASKET
SPOUT OR BASE ASSEMBLY
RUBBER RING
Insert BASE or SPOUT shank through center hole of SINK, making sure RUBBER GASKET is properly positioned.
Tighten LOCKNUT to secure VALVE position. Attach COUPLING to TEE and tighten.
5/16'' MIN.
Assemble RUBBER WASHER, RETAINER, and LOCKNUT onto threads of SPOUT from underside of SINK.
Slide RUBBER FERRULE, FRICTION RING, and COUPLING NUT to outlet of VALVE and tighten COUPLING NUT firmly. Repeat on other VALVE.
Insert LIFT ROD through SPOUT (or BASE) and slot of RETAINER.
RUBBER WASHER
RETAINER
Connect HOT water supply to inlet of left VALVE and COLD water supply to inlet of right VALVE using appropriate connector.
Align SPOUT and tighten LOCKNUT. Be sure slot in BRASS WASHER is positioned to the rear as shown.
LOCKNUT
SINK 3 VALVE INSTALLATION (continued)
FLANGE
DRAIN ASSEMBLY (Models 6502, 6902, 6532 and 6932)
Prepare TUBE and TEE ASSEMBLY to fit available VALVE location. If necessary, cut and/or bend TUBING carefully. Make sure tube bend is close to the TEE so that it will not effect the compression joint at the VALVE.
O-RING Apply a bead of PUTTY around underside of DRAIN PLUG flange. Insert DRAIN PLUG into SINK drain hole.
PLUG
TEE
O-RING
Hold DRAIN PLUG to prevent turning and assemble GASKET, WASHER, and LOCKNUT, from underneath sink.
Remove COUPLING NUT, FRICTION RING, and RUBBER FERRULE from each valve and slide onto tubing.
SCREW
WASHER
Push TUBING ends into VALVE side outlets. Insert VALVES into mounting holes from underside of SINK.
Insert threaded end of TAILPIECE into lower end of DRAIN PLUG. Connect other end to trap.
Press TEE onto SHANK of SPOUT making certain that the SHANK O-RING is properly seated on SHANK.
Position EXTENSION ROD onto POP-UP ROD and tighten THUMBSCREW.
STOPPER
(Models 6801 and 6831 only)
Remove one end of CLIP from PIVOT ROD by squeezing ends together while sliding.
Push TAILPIECE down into TRAP (threaded end up).
Insert PIVOT ROD into second or third hole in EXTENSION and reassemble CLIP. (EXTENSION may need to be bent.)
Thread LOCKNUT, WASHER and GASKET onto DRAIN BODY.
PUTTY
Apply a bead of PUTTY to underside of FLANGE.
POP-UP ROD
GASKET PIVOT
EXTENSION ROD
Feed DRAIN BODY up through SINK and thread FLANGE fully onto BODY.
ROD
CLIP
LOCKNUT
Tighten LOCKNUT firmly, keeping the PIVOT ROD pointed towards the back of the SINK.
TAILPIECE
PIVOT
DRAIN
ROD
BODY
Drop STOPPER into DRAIN BODY.
Pull TAILPIECE up and thread tightly into DRAIN BODY.
Adjust STOPPER height by repositioning EXTENSION and tightening THUMBSCREW.
TEST INSTALLED FAUCET 5
Operate both handles to flush water lines thoroughly. Check spout mounting and hose connections for leaks.
Remove AERATOR.
Operate LIFT ROD and check DRAIN for leaks.
With handle in OFF position, turn on water supplies and check all connections for leaks.
Turn handles into OFF position and replace AERATOR.
If spout drips, operate handles several times from OFF to ON position. Do not force - handles turn only 90°.
To change direction of handle rotation, proceed as follows:
CLIP
Plastic SCREEN in CARTRIDGE may accumulate dirt causing reduced water flow. To clean, first turn off hot and cold water supplies, then:
Turn valve to OFF position. Remove HANDLE and BONNET NUT. Remove SPRING CLIP. Lift STOP WASHER, turn 90° and replace. Replace SPRING CLIP. Replace BONNET NUT, HANDLE, SCREW, and INDEX.
Remove HANDLE and BONNET NUT. Remove CARTRIDGE by pulling up. Thoroughly rinse plastic SCREEN at base of CARTRIDGE.
Replace CARTRIDGE until flange is tight against valve body. Turn valves OFF. Replace BONNET NUT, HANDLE, SCREW and INDEX.
AERATOR may accumulate dirt causing distorted and reduced water flow. Remove AERATOR and rinse clean.
HOTLINE FOR HELP
For toll-free information and answers to your questions, call:
Weekdays 8:00 a.m. to 4:00 p.m. Eastern Time
P r o d u c t n a m e s l i s t e d h e r e i n a r e t r a d e m a r k s o f A m e r i c a n S t a n d a r d I n c .
A m e r i c a n S t a n d a r d I n c . 1 9 9 7 C
90° · 1 (800) 223-0068
Owners and our team usually reply within a day — and your question helps the next person too.
Be the first to ask — other owners or our team will answer.