


Dual Camera
Model No. HX-DC10
HX-DC1
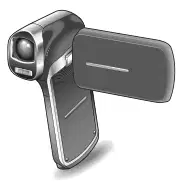
Before connecting, operating or adjusting this product, please read the instructions completely.
For USA and Puerto Rico assistance, please call: 1-800-211-PANA(7262) or, contact us via the web at: http://www.panasonic.com/contactinfo

Things You Should Know Thank you for choosing Panasonic! You have purchased one of the most sophisticated and reliable products on the market today. Used properly, we’re sure it will bring you and your family years of enjoyment. Please take time to fill in the information on the right. The serial number is on the tag located on the battery holder of your camera. Be sure to retain this manual as your convenient camera information source.
Dealer Phone No.
Model No.
Serial No.
WARNING: TO REDUCE THE RISK OF FIRE, ELECTRIC SHOCK OR PRODUCT DAMAGE,
i DO NOT EXPOSE THIS APPARATUS TO RAIN, MOISTURE,
DRIPPING OR SPLASHING AND THAT NO OBJECTS FILLED WITH LIQUIDS, SUCH AS VASES, SHALL BE PLACED ON THE APPARATUS. i USE ONLY THE RECOMMENDED ACCESSORIES. i DO NOT REMOVE THE COVER (OR BACK); THERE ARE NO USER
SERVICEABLE PARTS INSIDE. REFER SERVICING TO QUALIFIED SERVICE PERSONNEL.
Date of Purchase · Dealer Purchased From · Dealer Address

FCC Note: This equipment has been tested and found to comply with the limits for a Class B digital device, pursuant to Part 15 of the FCC Rules. These limits are designed to provide reasonable protection against harmful interference in a residential installation. This equipment generates, uses, and can radiate radio frequency energy and, if not installed and used in accordance with the instructions, may cause harmful interference to radio communications. However, there is no guarantee that interference will not occur in a particular installation. If this equipment does cause harmful interference to radio or television reception, which can be determined by turning the equipment off and on, the user is encouraged to try to correct the interference by one or more of the following measures:
i Reorient or relocate the receiving antenna. i Increase the separation between the equipment and receiver. i Connect the equipment into an outlet on a circuit different from that to
which the receiver is connected. i Consult the dealer or an experienced radio/TV technician for help. FCC Caution: To assure continued compliance, follow the attached installation instructions and use only shielded interface cables with ferrite core when connecting to computer or peripheral devices. Any changes or modifications not expressly approved by the party responsible for compliance could void the user’s authority to operate this equipment. Declaration of Conformity Trade Name: Panasonic Model No.: HX-DC10/HX-DC1 Responsible party: Panasonic Corporation of North America One
Panasonic Way, Secaucus, NJ 07094 Support Contact: Panasonic Consumer Electronics Company 1-800- 211-PANA (7262) This device complies with Part 15 of the FCC Rules. Operation is subject to the following two conditions: (1) This device may not cause harmful interference, and (2) this device must accept any interference received, including interference that may cause undesired operation.

AC adaptor This AC adaptor operates on AC between 100V and 240V. But
i In the U.S.A. and Canada, the AC adaptor must be connected to a
120V AC power supply only. i When connecting to an AC supply outside of the U.S.A. or Canada,
use a plug adaptor to suit the AC outlet configuration.
THE SOCKET OUTLET SHALL BE INSTALLED NEAR THE EQUIPMENT AND SHALL BE EASILY ACCESSIBLE.
k Concerning the battery
Battery pack (Lithium ion battery pack)
i Use the specified unit to recharge the battery pack. i Do not use the battery pack with equipment other than the specified
unit. i Do not get dirt, sand, liquids, or other foreign matter on the terminals. i Do not touch the plug terminals (+ and -) with metal objects. i Do not disassemble, remodel, heat or throw into fire. If any electrolyte should come into contact with your hands or clothes, wash it off thoroughly with water. If any electrolyte should come into contact with your eyes, never rub the eyes. Rinse eyes thoroughly with water, and then consult a doctor.

k Product Identification Marking
A lithium ion battery that is recyclable powers the product you have purchased. Please call 1-800-8-BATTERY for information on how to recycle this battery.

i DO NOT EXPOSE YOUR
CAMERA TO EXTENDED HIGH TEMPERATURE... Such as, in direct sunlight, inside a closed car, next to a heater, etc... This action could permanently damage the internal parts of your camera. i AVOID SUDDEN CHANGES IN
i TO AVOID SHOCK HAZARD...
Your camera and power supply should not be exposed to rain or moisture. Do not connect the power supply or operate your camera if it gets wet. Your camera has been designed for outdoor use, however it is not designed to sustain direct exposure to water, rain, sleet, snow, sand, dust, or a direct splashing from a pool or even a cup of coffee. This action could permanently damage the internal parts of your camera. Do not attempt to disassemble this unit. There are no user serviceable parts inside. Unplug your camera from the power supply before cleaning. i AS WITH ANY SMALL OBJECT,
TEMPERATURE... If the unit is suddenly moved from a cold place to a warm place, moisture may form on the SD card and inside the unit. i DO NOT LEAVE YOUR
CAMERA OR THE POWER SUPPLY TURNED ON WHEN NOT IN USE. i STORAGE OF YOUR CAMERA
... Store and handle your camera in a manner that will not subject it to unnecessary movement (avoid shaking and striking). Your camera contains a sensitive pick- up device which could be damaged by improper handling or storage.
SD CARDS CAN BE SWALLOWED BY YOUNG CHILDREN. DO NOT ALLOW CHILDREN TO HANDLE THE SD CARD.
i TO CLEAN YOUR CAMERA...
Do not use strong or abrasive detergents when cleaning your camera body. i TO PROTECT THE LENS... Do
i DO NOT AIM YOUR CAMERA
AT THE SUN OR OTHER BRIGHT OBJECTS i DO NOT LEAVE THE CAMERA
not touch the surface of the lens with your hand. Use a commercial camera lens solution and lens paper when cleaning the lens. Improper cleaning can scratch the lens coating.
WITH THE EVF AIMED DIRECTLY AT THE SUN AS THIS MAY CAUSE DAMAGE TO THE INTERNAL PARTS OF THE EVF

i TO PROTECT THE FINISH OF
YOUR CAMERA ... Before handling your camera, make sure your hands and face are free from any chemical products, such as sunblock, as it may damage the finish.
-If you see this symbol-
Information on Disposal in other Countries outside the European Union
This symbol is only valid in the European Union. If you wish to discard this product, please contact your local authorities or dealer and ask for the correct method of disposal.

k About the models covered by this owner’s manual
i This manual pertains to models HX-DC10 and HX-DC1. i Where passages refer to a specific model(s), the model number is
indicated.
k Be sure to take some test pictures beforehand Before those important events, be sure to take some trial pictures to confirm that the images and audio are being properly recorded.
k Indemnity about recorded content Panasonic does not accept any responsibility for damages directly or indirectly due to any type of problems that result in loss of recording or edited content, and does not guarantee any content if recording or editing does not work properly. Likewise, the above also applies in a case where any type of repair is made to the unit (including any other non-built-in memory/HDD related component).
k Handling of built-in memory This unit is equipped with an built-in memory (HX-DC10: Approx. 80 MB, HX- DC1: Approx. 80 MB). When using this component, pay attention to the following points.
Back up data periodically. The built-in memory is temporary storage. In order to avoid erasing data due to static electricity, electromagnetic waves, breakage, and failures, back up the data to a computer or DVD disc. (page 129)
i The status indicator (page 21) illuminates while the SD card or built-in
memory is being accessed (reading, recording, playback, deleting etc.). Do not perform the following operations when the lamp illuminates. It may damage the built-in memory or cause a malfunction in the unit. h Turn the unit off (remove the battery) h Eject the SD card from the camera h Insert or remove the USB cable h Expose the unit to vibrations or shock i For disposing of or transferring this unit, please see page 118.

k Concerning this unit’s recording method and compatibility <Video compatibility>
i This camera is an MP4 standard (MPEG-4AVC/H.264 format) digital movie
camera that records high-definition HDTV video. The AVCHD and MPEG2 video formats are different and are therefore not compatible. i This camera may degrade or be unable to play back videos recorded or
created with other products, and other products may degrade or not be able to play back videos recorded with this camera, even if the products support the MP4 format. <Photo compatibility>
i This unit is compliant with the unified standard DCF (Design rule for
Camera File system) established by JEITA (Japan Electronics and Information Technology Industries Association) and with Exif (Exchangeable Image File Format). Files which do not comply with the DCF standard cannot be played back. i The file format of images supported by this unit is JPEG. (Not all JPEG
format files will be played back.) i This unit may degrade or not play back images recorded or created on
other products, and other products may degrade or not play back images recorded on this unit.
k About the battery pack
i Never place the battery pack within the reach of infants. In the event that
the battery pack is swallowed, consult a doctor immediately.
k About the photos and illustrations in this manual
i The product images, illustrations, menu displays etc. in this manual may
differ slightly from the actual product. i Unless noted otherwise, the screen and camera illustrations are those of
Model HX-DC10.
k For the purposes of this owner’s manual
i SD Memory Card, SDHC Memory Card and SDXC Memory Card are
referred to as the “SD card”. i Pages for reference are indicated by parentheses, for example: (page 00).


Intelligent Auto Mode (HX-DC10) ... (page 48) Just point the camera at the subject, and it automatically ascertains the scene and captures the images with the optimum settings.

Image stabilizer... (pages 43, 74)
Subject tracking... (pages 45, 80)
Scene mode... (pages 41, 72, 171 to 173)
i Applicable to VIERA units sold from December 2010. i To connect the camera to the VIERA via an HDMI mini cable, please see
pages 150 to 152.

From built-in memory to SD card... (page 47)
DVD recorder and video deck... (page 154)
* It is not possible to directly insert in the card slot an SD card recorded with this camera and play back or dub from it. * It is not possible to connect the camera to the USB connector and play back or dub from it. * Recording with HD image quality on a Blu-ray disc recorder is not possible.


Check the accessories before using this unit. Product numbers correct as of February, 2011. These may be subject to change.
VSK0750
VFA0544
VFA0543
CD-ROM
VFC4701 Lens cap strap VFC4702
Handstrap * To prevent the camera from dropping, be sure to attach the handstrap (page 52). VFC4627
i Please dispose of packing materials properly. i Keep the battery pack and the lens cap out of reach of children to
prevent swallowing.

Media cards that can be used with this camera (as of February 2011)
Use SD cards conforming to Class 4 or higher of the SD Speed Class Rating* for video recording.
This camera is compatible with SDXC devices (SD Memory Card/SDHC Memory Card/SDXC Memory Card compatible devices). If using an SDHC memory card/SDXC memory card in different device, please confirm that it is compatible with the respective memory card.
Card type Capacity Video recording Photo shooting
8 MB/16 MB/ 32 MB/64 MB/ 128 MB/256 MB
Operation is not guaranteed.
Operation is not guaranteed.
4 GB/6 GB/ 8 GB/12 GB/ 16 GB/ 24 GB/32 GB
Can be used. Can be used. SDHC Memory
* The SD Speed class Rating is the speed standard for successive writes. See the card label to confirm the rating.
Please confirm which of our SD Memory Cards/SDHC Memory Cards/ SDXC Memory Cards can be used with this product by visiting the support web site at the address below.
http://panasonic.jp/support/global/cs/e_cam
(This website is in English only.)

i 4 GB or more Memory Cards that do not have the SDHC logo or 48 GB or
more Memory Cards that do not have the SDXC logo are not based on SD Memory Card specifications. i Cards with capacity larger than 64 GB cannot be used. i When the write-protect switch on the SD card is locked, no recording,
deletion or editing will be possible on the card. i Keep the Memory Card out of reach of children to prevent swallowing.

PARTS NAMES
SETUP
Front
i The flash unit
becomes very hot and may cause a burn. Avoid touching the flash unit when shooting.
* The tripod mounting hole is on the bottom.
Attaching to a tripod having a screw length longer than 5.5 mm (0.22”) may damage the camera.

k About the status indicator (See page 173 regarding the charging
status.)
i The status indicator lights or flashes to
show the camera’s operating status.
Status indicator status Camera
Lit Accessing built-in memory or SD card
Flashing During sleep mode
Lit AV cable/ HDMI mini cable connection


* During recording: zoom photography [W/T] (page 57) During playback: volume adjustment (page 60 and 70), image magnification (page 67), playback display switching (page 66)

At the time of purchase, the battery pack is not charged. Please charge it fully before using it.
It has been found that counterfeit battery packs which look very similar to the genuine product are made available to purchase in some markets. Some of these battery packs are not adequately equipped with protective devices to meet the requirements of appropriate safety standards. There is a possibility that these battery packs may lead to fire or explosion. Please be advised that we are not liable for any accident or failure occurring as a result of use of a counterfeit battery pack. To ensure that safe products are used we recommend that a genuine Panasonic battery pack be used.
i Temperature: 25 °C (77 °F)/humidity: 60 %RH i It is recommended that the battery be recharged in a place where the
ambient temperature (and the battery temperature as well) is between 10 °C and 30 °C (50 °F to 86 °F). (The battery temperature should also be the same.) The indicated charging time is for when the AC adaptor is used for charging.
Battery model number [voltage/ capacity (minimum)]
Maximum continuous recordable time
Approx. 1 h Approx.
Approx.
Approx. 1 h 10 min Approx.
(optional) [3.7 V/700 mAh]
35 min Approx. 1 h 15 min Approx. 1 h 10 min
< Approx. 1 h 20 min -

Battery model number [voltage/ capacity (minimum)]
Maximum continuous recordable time
Approx. 50 min Approx.
Approx.
Approx. 1 h Approx.
(optional) [3.7 V/700 mAh]
35 min Approx. 1 h 25 min Approx.
40 min Approx. 1 h 5 min Approx.
< Approx. 1 h 30 min -
i These times are approximations. i The indicated charging time is for when the battery has been discharged
completely. Charging time and recordable time vary depending on the usage conditions such as high/low temperature. i The actual recordable time refers to the recordable time when repeatedly
starting/stopping recording, turning the unit on/off, moving the zoom lever etc. i The batteries heat up after use or charging. This is not a malfunction. i See page 121 concerning the remaining battery pack charge. i Always use genuine Panasonic batteries (VW-VBX070). i If you use other batteries, we cannot guarantee the quality of this product. i Do not heat or expose to flame. i Do not leave the battery in an automobile exposed to direct sunlight for a
long period of time with doors and windows closed.

Number of recordable images
Approx. 170 images By CIPA standard Recording time Approx. 85 min Playback time Approx. 180 min
Number of recordable images
Approx. 180 images By CIPA standard Recording time Approx. 90 min Playback time Approx. 180 min
Recording conditions by CIPA standard
i CIPA is an abbreviation of Camera & Imaging Products Association. i Using the supplied battery i Using a Panasonic SD Memory Card (2 GB)

1 Insert the battery pack. h It is possible to insert the battery incorrectly, so please pay particular

i Be sure the turn off the camera by
pressing the power button until the status indicator (page 21) turns off before removing the battery pack. i Raise the end of the battery pack
6 Close firmly until you hear a click.
1 Push out

2 Use the USB cable (supplied) to connect the camera and the AC adaptor, and then connect the AC adaptor to a power outlet.
h Use only the supplied USB cable. Operation is not guaranteed if
a different USB cable is used. h The AC adaptor is for this camera only. Do not use it with other
devices.
h Recharging takes place only when the camera is turned off or is in the
sleep mode (page 33). Recharging does not take place when the camera is in the recording mode or playback mode.
3 To power outlet
h Do not use any other AC adaptors except the supplied one. h Do not use any other USB cables except the supplied one. <During charging...> h The status indicator flashes red at 0.5-second intervals if the battery
pack is defective or is not installed correctly. Make sure that the battery pack is correctly installed. h If the battery pack still fails to recharge, it is possible that there is a
malfunction in the camera, the battery pack or the AC adaptor. In case the status indicator is flashing fast or slow, please see page 173. h When charging is completed, the status indicator turns off. h The charging time is approx. 120 minutes.

i The battery can be recharged while the camera is connected to a
computer. i Use only the supplied USB cable. Operation is not guaranteed if a different
USB cable is used. i The charging time is two to three times longer than when the AC adaptor is
used to charge the battery pack. i It is not possible to charge the battery if the status indicator flashes fast
and then turns off, or if it doesn't light at all. In this case, use the AC adaptor to charge the battery. i Connect the USB cable to the USB terminal on your computer. Do not
connect it to the USB terminal on the monitor or the keyboard, or to the USB hub. i If the camera is not going to be used for an extended period of time, please
disconnect the USB cable from the camera. Do not use the battery with the outer covering or label removed
i Doing so may result in malfunction. When not using the camera for a long time, remove the battery pack
i A small amount of power is still used even if the camera is turned off, and it
is therefore recommended that the battery pack be removed from the camera if it is not going to be used for a long time. Note that when the battery pack is removed for a long period, the time and date settings may be cleared. Before using your camera again, be sure to confirm that the camera settings are correct. To maximize the battery pack life
i The battery pack is a consumable product, but the battery life can be
prolonged by heeding the following suggestions. h Don’t leave the battery pack in a high-temperature environment, such as
outside in extremely hot weather in the summer. h Don’t repeatedly charge the battery pack when it is fully charged. After a
full recharge, the battery should be used for a while before charging again. h For prolonged periods of unuse, avoid fully charging the battery pack,
and store it in a cool dark place.

During camera use, if the temperature of the battery or inside the camera (excluding the battery) rises, a temperature alert icon will appear as described below.
k When the battery or internal camera (excluding battery) temperature
rises during use h During camera use, if the temperature of the battery or inside the
camera (excluding the battery) rises, a icon lights on the LCD monitor. It is still possible to record and play back even when the icon is lit; however it is advised that you discontinue use as soon as possible and turn the camera off. h If the temperature rises further, the icon will start to flash, and the camera will turn off automatically. The camera cannot be turned on until the temperature has dropped (or as long as the icon remains flashing). Please wait until the temperature has dropped before resuming use. h If the camera is turned off while the temperature is high (that is, while
the icon is flashing), it cannot be turned on again until the temperature has dropped (or as long as the icon remains flashing).

Before using a newly purchased card or one that was used in another device, be sure to format it with this camera (page 107 and 118). If an unformatted card is used, the card itself may become unusable.

4 Close firmly until you hear a click.
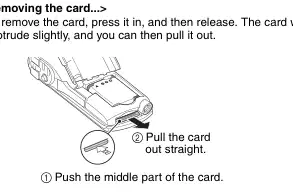
h To remove the card, press it in, and then release. The card will
protrude slightly, and you can then pull it out.

i Doing so may damage the card or the stored files. If the status indicator is lit red...
i Never remove the card when the status indicator is flashing red, as doing
so may result in loss of files stored in the card.


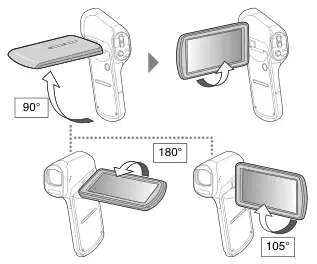
1 Open the monitor unit, and press the power button. h The LCD monitor turns on.
<How to open the monitor unit>

1 Press the power button for at least 1 second. h The camera turns off. h If you briefly press the power button, once, the camera will switch to
the sleep mode.
In order to preserve battery pack power, the ECONOMY function operates to automatically turn off the camera (sleep mode) after about 5 minutes of no use during shooting, or about 5 minutes of no use during playback (factory- preset settings).
i When the camera is in the sleep mode, it turns on when the monitor unit is
opened or one of the camera’s buttons is pressed. i When the AC adaptor is connected, the ECONOMY mode will become
active about 5 minutes after the camera is turned on (factory-preset setting). i The user can specify the time elapsed before the sleep mode is activated
(page 105).
i The camera goes into the standby mode if you close the monitor unit, or if
you leave it in the sleep mode for about 1 hour. The standby mode uses almost no power. i Open the monitor unit, or press the power button briefly, and the camera
turns on immediately and you are ready to shoot or view images without any delay. Use the standby mode to turn off the camera only briefly, or if you want to be able to use it immediately. i If you close the monitor unit while recording a video, recording stops and
the camera switches to the standby mode.

The camera will record the date and time an image or audio recording is taken so that you can display them during playback. Therefore, before capturing images, make sure the correct date and time are set.
h If the screen to set the date and time appears when you turn on the
camera, skip to step 3 and follow the steps to set the date and time. h To correct the date and time setting, please see under HINT on page 36.
1 Turn on the camera (page 32), and display Option Setting Menu 1 (page 103).
2 Select [CLOCK SET] and press the SET button. h The Clock Set Screen appears. h Follow the procedures below to

enable or disable the date display during playback, to set the display format for the date, and to set the date and time.
3 Set the date. 1 Select [DATE]. 2 Press the SET button. h The Set Date Screen
appears. 3 Set the date to “DEC/20/2011”. h The date is set in the
following order: Set the month → Set the day → Set the year. h Toggle the SET button left or
right to select month, day or year. Toggle the SET button up or down to increase or decrease the number. 4 Press the SET button.

4 Set the clock. 1 Select [TIME]. 2 Press the SET button. h The Set Time Screen
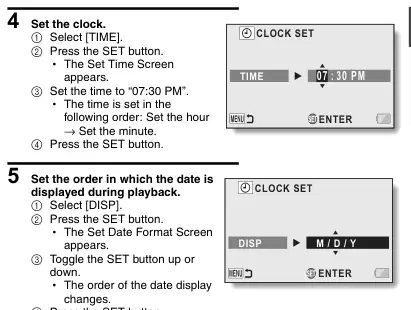
appears. 3 Set the time to “07:30 PM”. h The time is set in the
following order: Set the hour → Set the minute. 4 Press the SET button.
5 Set the order in which the date is displayed during playback. 1 Select [DISP]. 2 Press the SET button. h The Set Date Format Screen
appears. 3 Toggle the SET button up or down. h The order of the date display
changes. 4 Press the SET button.
6 Press the MENU button. h The date and time setting is completed. h To display the Recording or Playback Screen, press the MENU button.

HINT To correct the date and time settings 1 Turn on the camera. 2 Display the Option Setting Menu 1 (page 103). 3 Select [CLOCK SET] and press the SET button. h The screen to set the date and time appears. h The current date and time settings are shown. 4 Select the line you wish to change, and make the correction. If the camera’s date and time are not set...
h The screen display and capture date information will show as follows:
* The date and time format is determined by the [DISP] setting specified on the Clock Set Screen. Recording Screen display: ---.--. --:-- Photo capture date/time information: JAN/01/2011 00:00:00 Video/audio file recording date/time information: JAN/01/2011 00:00:00
Under normal conditions, while the battery pack is being replaced, an internal battery will maintain the date and time settings. However, there is a small chance the settings may be lost (the backup will last for about 7 days). It is recommended to check that the date and time settings are still correct after replacing the battery pack and before shooting or recording of any type.
i This camera’s internal battery serves to maintain the date and time
settings, as well as the shooting settings. To charge the backup battery, leave the fully charged battery pack installed in the camera continuously for about 2 days. In the fully charged state, the backup battery will maintain the camera settings for about 7 days.

Switch between the recording mode (for recording) and the playback mode (for viewing your recorded images).
1 Turn on the camera (page 32).
2 Press the REC/ button. h The mode changes. h The mode changes each time
the REC/ button is pressed.
REC/ button

Accessing/exiting the Menu Screen
1 Set the camera to the recording or playback mode (page 37).
2 Press the MENU button. h The Menu Screen appears. h To cancel the Menu Screen, press the MENU button again.

1080-30p REC MODE PICTURE SIZE SCENE MODE COLOR MODE FLASH SELF TIMER
Tabs Menu (tabs 1, 2 and 3) and the Option Tabs Menu (tabs 1, 2 and 3). h To switch from the active tab menu
to the other tab menu, while the screen shown above is displayed, toggle the SET button to the left; then toggle the SET button up or down to select the desired tab. The menu for the selected tab appears.

1 Display the desired menu (page 38).
2 Toggle the SET button up or down to select the item you wish to change, and press the SET button. h The Setting Screen for the selected item appears. h To return to the Menu Screen, press the MENU button.

1080-30p RECORDING MENU 1 REC MODE PICTURE SIZE SCENE MODE COLOR MODE FLASH SELF TIMER
i This indicator shows the shooting mode(s) for which the selected setting is
effective. i O@: This setting is effective during photo shooting. i O@: This setting is effective during video recording. i O@: This setting is effective during photo shooting and video
recording.

Recording Menu <Tab 1>
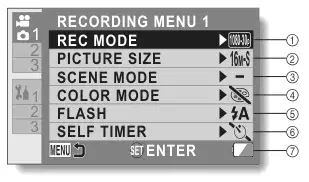
RECORDING MENU 1 REC MODE PICTURE SIZE SCENE MODE COLOR MODE FLASH SELF TIMER
1 Recording mode (page 68) <HD mode>
2 Recorded pixels (page 71) <Photo recording (single- shot)>
: Record at 1920 × 1080
pixels (60i). : Record at 1920 × 1080
pixels (30p). : Record at 1280 × 720
pixels (60p). : Record at 1280 × 720
pixels (normal compression). : Image size is 4608 × 2592
pixels (30p). : Record at 960 × 540
pixels (16:9 aspect ratio). HX-DC1 6: Image size is 4352 × 3264 pixels (low compression). 7: Image size is 4352 × 3264 pixels (normal compression). : Image size is 4352 × 2448
pixels (30p).
: Record at 640 × 480
pixels (30p).
pixels (16:9 aspect ratio).
<SD mode>

:Light up both the subject
: Image size is 1920 × 1080
and the background. :Shoot in darkened
surroundings, such as at dusk.
pixels. : Image size is 1280 × 720
:Color mode is deactivated. :Enhanced color saturation. :Reduce sharpness to
pixels.
produce a softer image. :Reduce sharpness and
increase color saturation. :Skin tones are enhanced.
:Produces a monochrome
(black and white) image. :Produces a sepia image.
subject brightness and use the flash only when necessary. m: The flash will operate with
hi-speed burst.
3 Scene mode (page 72)
:Scene mode is
every image captured regardless of the conditions. :The flash will not operate
deactivated. :Shoot fast-moving subjects
with less blur. :Blur the background to
even in dark situations.
accentuate the subject in the foreground. :Record a clear image of a
6 Self-timer (page 73)
subject illuminated by spotlight. :Natural looking images in
after the [O] button or [@] button is pressed. x: Shooting begins
bright surroundings, such as in a ski area. :Vivid blue for sea and sky,
10 seconds after the [O] button or [@] button is pressed.
subjects do not appear dark even in bright sunlight. :Capture the vibrant reds in
7 Remaining battery power indication (page 121)
sunrise and sunset shots. :Record fireworks in the
night sky. :When recording a
landscape, focus on the distant subject. :Beautiful shots of evening
and night scenes.


4 3 2 1 RECORDING MENU 2 E.I.S. FOCUS FOCUS MODE METERING MODE ISO WHITE BALANCE
<Tab 2>

1 Image stabilizer (page 74) h Compensate for camera shake
5 ISO sensitivity (page 76)
during recording.
automatically *: Sets sensitivity to ISO 50 u: Sets sensitivity to ISO 100 v: Sets sensitivity to ISO 200 w: Sets sensitivity to ISO 400 6: Sets sensitivity to ISO 800 -: Sets sensitivity to ISO 1600 z: Set sensitivity to ISO 3200
:During video recording, the
image stabilizer is always active. : Camera shake in the
captured photo is corrected. :Camera shake during video
and photo recording is compensated for and corrected. :The image stabilizer is not
h The indicated ISO value is the
standard output sensitivity. 6 White balance (page 77)
active.
2 Focus (page 75) h Adjust the focus according to
automatically adjusted depending on the ambient lighting (auto). :For shooting in sunny
the distance to the subject.
*: The camera automatically focuses on the subject with a range of 10 cm (3.9”) to ∞ (normal). -: The focus can be set
conditions (cloudy). :For shooting under
manually. :The camera focuses on the
incandescent lighting (incandescent). :For setting the most
subject within a range of 1 cm (0.4”) to ∞ (macro).
accurate white balance (white set).
:9-point range finder focus :Spot focus
7 Remaining battery power indication (page 121)
A focus mark ' appears in the center of the LCD monitor.
A metering spot @ mark appears in the center of the LCD monitor.
3 Focus mode · 4 Metering mode


7 6 5 4 3 2 1 RECORDING MENU 3 EXPOSURE SUBJECT TRACKING DIGITAL ZOOM WIND CUT AUTO REVIEW SHORTCUTS
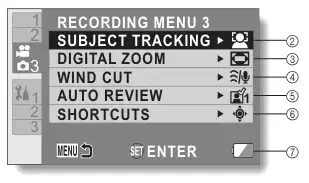
6 5 4 3 2 RECORDING MENU 3 SUBJECT TRACKING DIGITAL ZOOM WIND CUT AUTO REVIEW SHORTCUTS
<Tab 3> <HX-DC10>

1 Exposure (page 78)
5 Auto review h Specify the duration that the
captured image is shown on the LCD monitor after the [O] button is pressed.
: The image is shown on the
LCD monitor for about 1 second after capture.
: The image is shown on the
LCD monitor for about 2 seconds after capture.
shutter speed manually.
2 Subject tracking (page 80) h Automatically target a specific
: The image is not shown on
the LCD monitor after capture. 6 Shortcuts setting (page 82) h Assign operation shortcuts to
color with the color tracking function, or capture sharp face shots with the face tracking function.
the SET button. 7 Remaining battery power indication (page 121)
: Enable face tracking. : Enable color tracking.
:Disable face tracking and
color tracking.
:Enable the digital
zoom. :Disable the digital
zoom.
4 Wind noise reduction h Turn ON/OFF the wind noise
reduction function during video/audio recording.
: Wind noise is reduced.
: Wind noise is not affected.
3 Digital zoom

4 3 2 1 PLAYBACK MENU 1
SLIDESHOW PLAY VOLUME PROTECT DELETE ROTATE RESIZE
ENTER
1 Slideshow (page 86) h Specify the slideshow settings
4 Delete (page 63) h Delete files. 5 Rotate (page 89) h Rotate a photo. 6 Resize (page 89) h A captured image can be
and play the slideshow. 2 Play volume h Adjust the volume for video
and audio file playback. 3 Protect (page 87) h File protect setting (delete
resized to a smaller size and saved as a separate image. 7 Remaining battery power indication (page 121)
prohibited)

3 2 1 PLAYBACK MENU 2
RED-EYE CORRECT. EDIT VIDEO COPY
ENTER
1 Red-eye correction (page 90) h Repair the “red-eye” caused
3 Copy (page 100) h Copy files from the built-in
by the flash (photos only). 2 Edit video (page 91) h Edit videos.
memory to the card. 4 Remaining battery power indication (page 121)
<Tab 2>

The following modes (appropriate for the condition) are set just by pointing the unit to what you want to record.
button Press the button once to activate the Intelligent Auto (iA) mode.
i The icon appears on the LCD monitor. i Press it again to cancel the
Intelligent Auto mode.
Portrait When the subject is a person
Faces are detected and focused automatically, and the brightness is adjusted so it is recorded clearly.
Landscape Recording outdoors The whole landscape will be recorded vividly without whiting out the background sky, which may be very bright.
*1 Spot light Under a spotlight Very bright subject is recorded clearly.
*1 Low light Dark room or twilight
It can record very clearly even in a dark room or twilight.
A subject and the background are recorded with near real-life brightness.

You can record night scenery vividly by slowing the shutter speed.
*2 Macro Recording zooming in on a flower etc.
This allows recording at very close proximity to the object of recording.
Normal Other situations Contrast is adjusted automatically for clear images.
*1 Video recording only *2 Photo shooting only
i Depending on the recording conditions, the unit may not enter the desired
mode. i Using a tripod is recommended in Night Portrait, Night Scenery and Low
Light modes. i Faces may not be detected depending on the recording conditions, such
as when faces are of certain sizes or at certain tilts.

k Intelligent Auto Mode When switching to Intelligent Auto Mode, the Auto White Balance and Auto Focus operate and automatically adjust the color balance and focusing. Depending on the brightness of the subject etc., the aperture and shutter speed are automatically adjusted for an optimum brightness.
i Color balance and focus may not be adjusted automatically depending on
light sources or scenes. If so, manually adjust these settings.
Automatic white balance The illustration shows the range over which Automatic white balance functions.
1 The effective range of Automatic white balance adjustment on this unit 2 Cloudy sky (rain) 3 Sunlight 4 White fluorescent lamp 5 Halogen light bulb 6 30-minute span just before and after sunset 7 Incandescent light bulb 8 Sunrise or sunset 9 Candlelight
5 000K
4 000K
3 000K
2 000K
1 000K
If the automatic white balance is not functioning normally, adjust the white balance manually. (page 77)
Auto focus The unit focuses automatically.
i Auto focus does not work correctly in the following situations. Record
pictures in the Manual Focus Mode. (page 75) h Recording distant and close-up objects at the same time h Recording a subject through a dirty or dusty window h Recording a subject that is surrounded by objects with glossy surfaces
or by highly reflective objects

SHOOTING BASIC OPERATION/SHOOTING BEFORE TAKING PICTURES
For best results
Hold the camera securely, keeping your elbows close to your body and making sure the camera is stable. When zooming in or out, you can minimize the effects of camera shake by using your other hand on the monitor unit to help stabilize the camera.

A finger is blocking the lens or flash. <Holding the camera>
Example 1: Grip the camera by wrapping the fingers of the right hand, from the little finger to the middle finger, around the camera, and hook the index finger above the lens.
Example 2: Grip the camera by wrapping the fingers of the right hand, from the little finger to the index finger, around the camera.
i To avoid dropping the camera, be sure to attach a handstrap.
Make sure that the lens and flash unit are not blocked by your fingers or the handstrap. And don’t block the built-in microphone on the monitor unit with your hand.
i Due to the characteristics of the camera, the outer surface may
become warm during use, but this does not indicate a malfunction. i If the camera starts to feel uncomfortably hot during use, you might
temporarily discontinue use until it cools down, or try holding it in your other hand for a while. Please use a tripod or other support when using the camera for a long time.

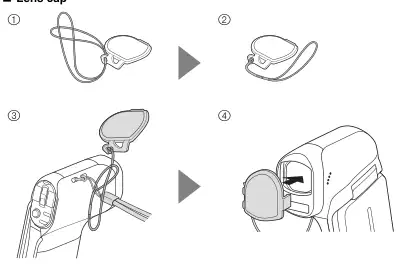
k Handstrap · k Lens cap

1 Turn on the camera (page 32), and set it to the recording mode (page 37). h If the subject is a person, a
[@] button
green double-frame appears around the face (page 80).
2 Press the [@] button. h Recording begins. h It is not necessary to keep the
[@] button pressed while recording. h When the remaining recording
time available for the currently recording video becomes 30 seconds or less, a countdown of the remaining recording time appears on the display. h When the file size of the
current recording exceeds 4 GB, the file is saved once, and recording begins in a new file. (4-GB files are automatically created (page 181).) h HX-DC1: When the file size of
(hours:minutes:
the recording exceeds 4 GB, recording pauses (from a few seconds up to 10 seconds), and then resumes.

1080-30p 000:00:09 000:00:09 5 5 000:00:09 5
3 End the recording. h Press the [ @ ] button again
to stop recording. h The elapsed recording time
returns to 000:00:00 each time recording is stopped.


1 Turn on the camera (page 32), and set it to the recording mode (page 37). h If the subject is a person, a
2 Press the [O] button. 1 Press the [O] button halfway. h The autofocus operates,
and the image is focused (focus lock). 2 Continue to gently press the [O] button all the way. h The shutter releases and
image on the LCD monitor by keeping the [O] button depressed when you capture the image. For shooting hi-speed burst, see page 71.

i A target mark & on the LCD monitor
shows the area the camera is focusing on. i The camera automatically
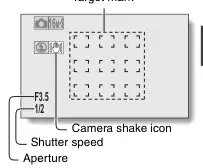
determines the correct focus by measuring from 9 different focus points within the shooting area. If the target mark is at a position that is different from the point you wish to focus on, you can refocus, for example, by changing the shooting angle. i The large target mark appears when
the camera focuses on a wide area in the center of the screen. The focus and exposure can be locked
i By assigning an operation shortcut to the SET button (page 82), you can
set the autofocus or the exposure to a fixed setting. When the exposure setting is fixed, the icon appears on the LCD monitor; when the autofocus setting is fixed, the icon appears on the LCD monitor. i When the focus setting or scene mode setting (pages 72 and 75) is
changed, the focus lock and AE lock are released. The shutter speed and aperture are displayed
i The shutter speed and aperture settings are shown on the Recording
Screen. If the camera shake icon > appears...
i During photo shooting, if the shutter speed is slow and the possibility that
the image may be blurred due to camera shake becomes high, the camera shake icon may appear on the LCD monitor. In this case, use a tripod to stabilize the camera when shooting, or set the flash operation mode to Auto (page 41). i When shooting with the scene mode function set to the fireworks mode, the camera shake icon always appears, but this is normal. Does it seem to take a long time to save images?
i When shooting in dimly lit conditions, it may take some time to save the
data to the card. Does the image in the LCD monitor appear to waver?
i When the [O] button is pressed halfway, the image in the LCD monitor
may waver vertically. This is the result of internal image processing and is not a malfunction. This wavering is not recorded and will not affect your images in any way.
Target mark

You can capture a photo (single frame) while recording a video.
1 While recording a video, when you see a scene you’d like to capture a photo of, press the [O] button.
HINT
i When shooting a photo while recording a video, the flash does not operate. i The photo stabilizer (page 74) is inoperative. i When the remaining video recording time becomes approximately
30 seconds, it will no longer be possible to capture a photo while recording a video. The exact remaining recording time at which this occurs will differ depending on the subject and on the recording size (page 71), as well as on the recording mode setting (page 68).
About the recording size of photos
i The size of a photo captured during video recording depends on the video
recording size setting.
Video recording size setting Photo recording size
(16:9)
(16:9)
h It is not possible to capture a photo while recording a video in the mode. h It is not possible to shoot hi-speed bursts.

Your camera has two zoom functions: Optical zoom and Digital zoom (page 45).
1 Point the camera lens at the subject.
2 Push the zoom switch toward [T/]] or [W/P] to compose the desired image. [T/]]: Zoom in on the subject. [W/P]: Zoom out. h When the zoom switch is
pushed, the zoom bar appears on the LCD monitor.
3 Take the picture. For video recording, see page 53. For shooting photos (single), see page 54. For shooting hi-speed bursts, see page 71.
When both optical and digital zoom are enabled
When optical zoom only is enabled

i When recording videos at a high magnification, a moving subject or
moving camera can cause camera shake, resulting in a distorted playback image. This phenomenon is due to the characteristics of the MOS sensor and is not a malfunction. i It is recommended that you use a tripod to stabilize the camera when
recording videos at a high magnification. i When the digital zoom is used, the picture quality becomes grainier as the
magnification increases. i See page 186 regarding zoom magnification. When the ZOOM RANGE button is pressed... (HX-DC1)
i The magnification is approximately doubled (double-range zoom). Press
the button again to return to normal magnification. i The [W] icon is shown on the Recording Screen during normal
magnification, and a [T] icon on the double-range zoom Recording Screen. i Double-range zoom is effective only when recording video. Photos are
recorded without enlargement.
ZOOM RANGE button

PLAYING BACK VIDEOS AND PHOTOS

1 Set the camera to the playback mode (page 37).
2 Select the image to play back. h Toggle the SET button up,
down, left or right to move the yellow frame to the file you wish to play back. h The image information for the
framed image is shown at the bottom of the LCD monitor.
step 2 is displayed on the LCD monitor. h If a video was selected,
playback begins. <Photo file: To return to the screen to select playback files> Toggle the SET button down.
are played back (pages 46 and 89). i If you close the monitor unit,
playback stops and the camera switches to the standby mode.

To do this... Do this
Normal forward playback Press the SET button or toggle the SET button up. Stop playback During playback, toggle the SET button down.
During playback, press the SET button or toggle the SET button up. During accelerated playback, toggle the SET button up. To play back
After pausing playback, toggle the SET button to the right.
After pausing playback, toggle the SET button to the left.
After pausing playback, press and hold the SET button to the right. During reverse
After pausing playback, press and hold the SET button to the left.
During forward playback, toggle the SET button to the right. h The forward playback speed changes each
time the SET button is toggled to the right. Toggle the SET button to the left to resume normal playback speed.
During forward playback, toggle the SET button to the left. h The reverse playback speed changes each
time the SET button is toggled to the left. Toggle the SET button to the right to resume normal playback speed. Return to normal playback
speed Press the SET button.
Louder During playback, push the zoom switch toward the [T/]] side.
Softer During playback, push the zoom switch toward the [W/P] side.


1 Play back the video. Pause the playback at the point you wish to “snap” a photo.
2 Press the [O] button. h The screen to select the aspect ratio of the photo appears. Select the
desired aspect ratio, and press the SET button. Note, however, that if the video aspect ratio is 4:3, you cannot select 16:9. h The latest image number is assigned to the photo when it is saved.
i Therefore, be aware that if the video is uploaded to a computer to be
played back, the computer may not be able to play back the video fast enough, making it appear jerky. (The video will always be displayed properly on the camera LCD monitor or a television.) If no audio is heard...
i The audio is not played back when the video is played back in the frame-
by-frame, slow-motion, fast playback or reverse playback mode.

Deleted files cannot be restored, so delete files only after carefully checking the contents.
1 Display the Playback Menu 1 (page 38), select the delete setting, and press the SET button. DELETE SINGLE: Deletes one file at a time. DELETE SELECTED: Deletes the selected files (page 64). DELETE ALL: Deletes all files. DELETE FOLDER: Delete the folder and all the files in the folder.
DELETE SINGLE DELETE SELECTED DELETE ALL DELETE FOLDER
SET
ENTER
2 Select the desired delete mode, and press the SET button. h The Delete Confirmation Screen appears. <DELETE SINGLE> h Toggle the SET button to the left or right to select the file you wish to
delete. h There is no confirmation screen when deleting single files.
Please make sure that the displayed image is one you wish to delete. <DELETE ALL> h Toggle the SET button to the left or right to confirm the files to delete. <DELETE FOLDER> h Toggle the SET button up or down to select the folder you wish to
delete, and press the SET button.

3 Select [DELETE], and press the SET button. <DELETE SINGLE> h The currently displayed file is deleted. h To delete other files, select the files, select [DELETE] and press the
SET button. <DELETE ALL, DELETE FOLDER> h The Delete Confirmation Screen again appears. To delete the files,
select [YES] and press the SET button. If [DELETE FOLDER] was selected, select [YES] again and press the SET button, and the files will be deleted.
Delete selected files.
1 Display the Playback Menu 1 (page 38), select the delete setting, and press the SET button.
2 Select [DELETE SELECTED], and press the SET button. h The screen to select files to

3 Select an image you wish to delete. h Toggle the SET button left, right, up or down to move the yellow frame
to the file you wish to delete.

4 Press the SET button. h The selected file is marked with the delete icon [>]. h Up to 100 files can be selected. h To cancel a delete selection and remove the delete icon from a file,
move the yellow frame to the marked file and press the SET button.
5 Press the [O] button or [@] button. h The Delete Confirmation Screen appears.
6 Select [YES], and press the SET button. h The selected files are deleted.
i Files that are protected from accidental delete cannot be deleted. To delete
protected files, set the protect setting for the files to off (page 87), and then follow the file delete procedure.

1 Display the image you wish to play back. h The 8-image display appears.
2 Push the zoom switch toward the [W/P] side. h The 21-image display appears. h While the 21-image display is

shown, you can push the zoom switch toward the [T/]] side to change to the 8-image display, and push it again toward the [T/ ]] side to change to the single- image display.
3 Select the image to play back. h Toggle the SET button left, right, up or down to move the yellow frame
to the desired image, and press the SET button. h If the zoom switch is pushed toward the [W/P] side while the 21-
image display is shown, the display changes to the screen to select the playback folder (page 115).

1 Display a photo.
2 Push the zoom switch toward the [T/]] side. h Magnification is enabled. h The image is magnified, and the

BASIC OPERATION/PLAYBACK
central portion of image is displayed. h For a photo that was captured
with the face tracking function enabled (page 80), the detected face is in the center of the magnified image. h Toggle the SET button left, right,
up or down to view different parts of the magnified image. To magnify: Magnification increases each time the zoom switch is pushed toward the [T/ ]] side. To return to normal size: Magnification decreases each time the zoom switch is pushed toward the [W/P] side. h Press the SET button to return to the
normal (100%) view.
i Press the [O] button. The magnified portion is saved as a new photo. i The image size of the saved photo of the magnified portion will be smaller
than that of the original photo.
105% · 100% 100% 100% · Move Move Move

SHOOTING ADVANCED OPERATION/SHOOTING
RECORDING MENU 1
To access and use the Menu Screen, see page 38 to 39.
When recording a video, smoother motion and better image clarity can be achieved by a higher pixel rate (resolution) and a faster frame rate. However, the file size will also be proportionately larger, requiring longer times to edit and store (page 47). It is recommended that you adjust the settings to those suitable for the desired purpose. Note that this menu is also used for recording audio only files.
i In order for videos to be spliced, they must have been recorded in the
same mode. i Videos that were recorded in different modes cannot be spliced. Playback of a video that was recorded in the mode. i In some cases it may not be possible to play back videos recorded in this
mode even on other devices equipped with this mode. About the compatibility of recorded videos
i This unit does not support non-MP4-compatible devices. Playback is not
possible on devices that are not MP4 compatible, so please check the user’s manual for your device to confirm its compatibility. i In some cases, playback may not be possible on an MP4-compatible
device. In this case, please use the camera for playback. Concerning recordable time and image quality
i See page 181.

1 Select
enabled. h The menu display is canceled if
340 014:59:15 340 014:59:15 16M-S 340 014:59:15
the MENU button is pressed.
2 Press the [@] button. h Audio recording begins. h During audio recording,
appears in the LCD monitor. h It is not necessary to continue
000:00:06 000:00:06
pressing the [@] button while recording. h When the remaining recording
time available for the currently recording video becomes 30 seconds or less, a countdown of the remaining recording time appears on the display.
3 End the audio recording. h Press the [@] button again to stop recording. h The elapsed recording time returns to 000:00:00 each time recording
is stopped.
i Press the [O] button during audio recording to capture a [ photo. Maximum audio recording time?
i When the recording mode setting is set to audio < and the recording exceeds
about 5 hours, the recorded file is saved and the audio recording ends. i If you close the monitor unit, audio recording stops and the camera
switches to the standby mode.
Remaining recordable time · Elapsed recording time · Turns red

1 Select an audio file (: icon), and press the SET button. h Playback begins.
To do this... Do this
Press the SET button. Toggle the SET button up.
Pause Press the SET button. Toggle the SET button up.
Stop playback Toggle the SET button down.
During playback, toggle the SET button to the right. Each time the SET button is toggled to the right, the speed increases. If the SET button is toggled to the left during fast forward, the speed decreases.
Fast forward (Maximum 15×)
During playback, toggle the SET button to the left. Each time the SET button is toggled to the left, the speed increases. If the SET button is toggled to the right during fast reverse, the speed decreases.
Fast forward/ fast reverse
Fast reverse (Maximum 15×)
Pause Toggle the SET button up.
Return to normal playback
Press the SET button.
Louder During playback, push the zoom switch toward the [T/]] side.
Softer During playback, push the zoom switch toward the [W/P] side.
i The audio is not played back when the audio recording is played back in
the fast playback or fast reverse mode.

For photos, you can select either the 4:3 or 16:9 horizontal to vertical aspect ratio. This menu is also used for shooting hi-speed bursts.
1 Select the desired hi-speed burst icon, and press the SET button. HX-DC10: Select C or t. HX-DC1: Select : or t. h The menu display is canceled if the MENU button is pressed.
2 Press the [O] button. h Shooting begins. Shooting continues as long as the [O] button is
kept pressed.
:: 9 shots t: 12 shots i If you continue shooting even after the maximum number of images has
been captured, recording does not stop. i If you continue shooting after the maximum number of images has been
captured, the photos are saved extending backward from the last photo captured.
Press the [O] button.
Release the [O] button. During recording, images are temporarily recorded in the built-in memory.
Images are recorded (maximum number of images) starting from this point.
Perfect shot · Not saved

When the self-timer is used...
i Shooting stops automatically after the maximum number of images has
been captured. About the focus when shooting hi-speed bursts
i When a hi-speed burst is captured, the autofocus operates when the [O]
button is pressed halfway, fixing the focus. Can the flash be used?
i The flash does not operate when shooting hi-speed bursts.
You can select from various preset settings (aperture, shutter speed, etc.) for specific shooting conditions.
HINT
i To return to normal photography, select from the scene mode menu, and press the SET button. i A table showing the limitations for settings corresponding to scene mode
icons other than is on page 171. Scene mode characteristics
Low light mode iThe shutter speed will be faster than 1/15 sec (when recording video). Sunset /fireworks /landscape /night scenery /night portrait modes iWhen shooting a nearby subject, the image may appear blurry. Fireworks mode iThe shutter speed is 1/30 sec (when recording video). iIf shooting in bright surroundings, the image may appear whitish. Night scenery /night portrait modes iIt is recommended that a tripod be used.

By assigning an operation shortcut to the SET button (page 82), you can set the self-timer from the Recording Screen.
i If the [O] button or [@] button is pressed again before the shutter is
released, the self-timer countdown is canceled. i For video photography, recording does not stop automatically. i The self-timer is automatically reset to off N after recording is ended and
the camera turned off.
When x is selected...

i When the [O] button or [@] button is
pressed, the status indicator will blink for about 10 seconds, and then the image is captured. Also, the countdown indication shown in the illustration to the right appears on the LCD monitor.
When y is selected...
i When the [O] button or [@] button is
pressed, the status indicator will blink and the indication shown in the illustration to the right appears on the LCD monitor to indicate when the shutter will release.

To access and use the Menu Screen, see page 38 to 39.
Your camera can minimize a jittery picture by compensating for unintentional hand motion.
i Due to the mechanical characteristics of this function, it may not be
possible for the camera to compensate for violent motion. i If the digital zoom (page 45) is being used, the large magnification factor
may make it difficult for the motion compensation function to work correctly. i When the scene mode function is set to night portrait , low light , night scenery or fireworks , the motion compensation effect may be insignificant. i When the optical zoom is used or when the autofocus is operating, the
image may appear to waver, but this is not a malfunction. When motion compensation is enabled,
i The following icons are shown on the LCD monitor:

The video stabilizer is active
The photo stabilizer is active
Both the video stabilizer and the photo stabilizer are active

How to use the manual focus
1 Select -, and press the SET button. h The focus adjustment bar
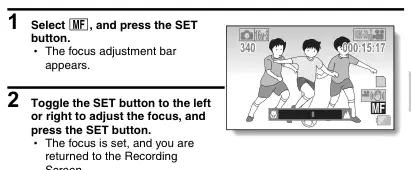
340 000:15:17 340 000:15:17 16M-S 340 000:15:17
2 Toggle the SET button to the left or right to adjust the focus, and press the SET button. h The focus is set, and you are
returned to the Recording Screen.
i When the focus range is set to macro , the zoom is temporarily set to the wide end. i By assigning an operation shortcut to the SET button (page 82), you can
change the focus setting from the Recording Screen. i In some cases it may be difficult for the auto focus to work.

With the initial settings, the ISO sensitivity is automatically set according to the brightness of the subject. However, the ISO sensitivity can be set to a fixed setting.
i By setting a higher ISO sensitivity, you can set faster shutter speeds and
capture images in darker locations, but noise in the captured images may increase or the images may be irregular. i By assigning an operation shortcut to the SET button (page 82), you can
change the ISO setting from the Recording Screen.

This camera automatically adjusts the white balance under most lighting conditions. However, if you want to specify the lighting conditions or change the overall tone of the image, the white balance can be manually set.
1 Fill the entire screen with a plain white card (or piece of paper, etc.).
2 Select the icon, and press the SET button. h This completes the white balance setting. h The LCD monitor display momentarily goes dark, and then you are
returned to the Recording Menu. If the icon shows on the Recording Menu, it indicates that the white balance setting was completed.
i Select >, and then press the SET button. If the color or brightness of the screen changes, if bands appear on the screen, or if the LCD monitor flickers during indoor photography...
i When shooting under fluorescent lighting, sodium-vapor lighting, mercury
lighting, etc., the color and/or brightness of the screen may change, or horizontal bands may appear across the screen. This is not a malfunction. Reset the white balance in the following cases.
h When there is a change in the lighting, or the recording location is
changed i If the colors in the image are not correct, confirm that the white balance
setting matches the actual light source.

To access and use the Menu Screen, see page 38 to 39
The shutter speed and aperture size can be set individually.
1 Select the desired icon from the exposure menu, and press the SET button. <If T, g or , was selected> 1 If , is selected, toggle the SET button up or down to select aperture value or shutter speed. 2 Toggle the SET button to the left or right to change the setting for the selected parameter. <Setting ranges>
F3.5 1/1000
Aperture: F3.5 to F8.0 Shutter speed: 2S (2 sec) to 1/1500 (1/1500 sec) * When the aperture is other than F8.0, the shutter speed range is 2S to 1/1000. * When the aperture priority g is set to F8.0, the shutter speed range is 2S to 1/1500. * Depending on the zoom magnification, the aperture value (F-number) may not be displayed.
2 Press the SET button. h This completes the exposure setting.
Shutter speed Aperture

i To prevent the effects of camera shake at slow shutter speeds, it is
recommended to use a tripod or other method to stabilize the camera. i A slow shutter speed may be useful for taking pictures in a darker
environment, but noise in the image may be increased. i If the exposure setting is set to T, g or H, by assigning an operation
shortcut to the SET button (page 82), you can select the T, g or H exposure setting from the Recording Screen. i The exposure setting automatically becomes @ if the scene mode
function is active. When shooting a hi-speed burst...
i The shutter speed will be faster than 1/30 sec. When recording a video...
i Even if the shutter speed is set to slower than 1/29 sec, the shutter speed
will be 1/30 sec.

Adjust the settings to automatically target a specific color with the color tracking function, or capture sharp face shots with the face tracking function.
1 Set the face tracking setting to . h When the face tracking function is activated, a double green frame
appears superimposed on the face in the center of the LCD monitor. h Each of the other faces is framed by a single green frame.
<When shooting photos: HX-DC10/HX-DC1> 2 Press the [O] button halfway. h The double green frame changes to orange.
3 Press the [O] button. h Gently press the [O] button all the way to capture the photo.
<When recording videos: HX-DC10> 2 Press the [@] button. h Recording begins.
i The tracking function may not work when the subject in the LCD monitor is
relatively small or appears dark. i If the scene mode function setting was fireworks , landscape or night scenery , it automatically changes to . i The focus mode changes to 9-point range finder , and the metering mode changes to multi n.

1 Set the color tracking setting to . h A target mark (+) appears in the center of the LCD monitor.
2 Move the target mark to the desired subject, and press the SET button. h When the subject is successfully targeted, a target frame icon (blue
) appears superimposed on the subject. <To cancel the color tracking operation> h While the target frame icon is displayed, press the SET button. <If the subject is not successfully targeted> h The target frame icon (red ) continues to be displayed. Press the
SET button once more, and try to engage the target again.
3 Press the [O] button. h The image is captured at the moment the [O] button is pressed.
i The target frame turns red if it has lost track of the subject. It will turn blue
when the subject is successfully targeted again.

Assign functions (operation shortcuts) to the SET button when it is toggled up, down, left or right when the Recording Screen is displayed.
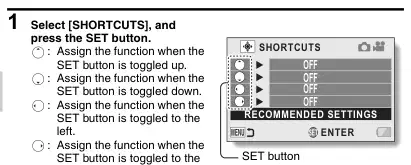
SET button is toggled up. : Assign the function when the
SET button is toggled down. : Assign the function when the
SET button is toggled to the left. : Assign the function when the
SET button is toggled to the right. RECOMMENDED SETTINGS:
The most commonly used settings are automatically assigned.
2 Select the SET button operation to which you wish to assign the function, and press the SET button. h The screen to assign a function to the key appears.
AF LOCK: Lock the focus (page 55). AE LOCK: Lock the exposure setting (page 55). FOCUS: Set the focus (page 75). (This operation shortcut can be assigned only to the or key.) m FLASH: Set the flash operation (page 41). ) EXP COMPENSATION: Adjust the exposure (page 85). s ISO: Set the ISO sensitivity (pages 43 and 76). O SELF TIMER: Set the self-timer (page 73). H EXPOSURE: Set the exposure value for the exposure setting (page 78) (HX-DC10). PHOTO VIEW: Select the desired field of view (photo view or video
view) for the Recording Standby Screen display. When “photo view” is selected, a frame to show the field of view during video recording appears. OFF: No operation shortcut is assigned to the key.

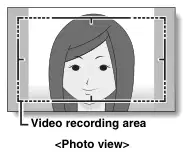

<Video view> Video recording area
3 Toggle the SET button up or down. h Display the function you wish to assign to the key.
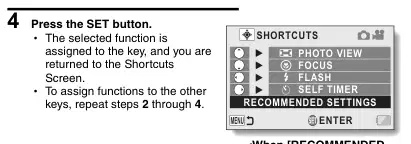
assigned to the key, and you are returned to the Shortcuts Screen. h To assign functions to the other
<When [RECOMMENDED · SETTINGS] is selected>

shortcut settings appears, and then you are returned to the Recording Menu. h This completes the shortcuts
setting. <To confirm the assigned shortcuts> h On the screen in step 1, press
the MENU button, and the screen to confirm the shortcut settings appears.

By assigning the exposure compensation operation shortcut to the SET button (page 82), you can make the image lighter or darker when capturing images.
1 Assign the operation shortcut to the SET button (page 82).
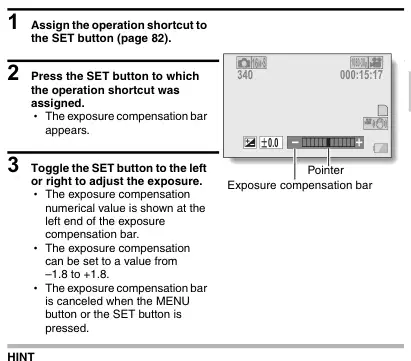
2 Press the SET button to which the operation shortcut was assigned. h The exposure compensation bar
3 Toggle the SET button to the left or right to adjust the exposure. h The exposure compensation
numerical value is shown at the left end of the exposure compensation bar. h The exposure compensation
can be set to a value from –1.8 to +1.8. h The exposure compensation bar
is canceled when the MENU button or the SET button is pressed.
i When the pointer is set to ±0.0. i When the camera is set to the playback mode. i After the power is turned off. i When the camera is set to the standby mode. i When the scene mode is changed. i When the USB cable is inserted or removed. i Intelligent Auto mode is activated or deactivated (HX-DC10).

PLAYBACK MENU 1
To access and use the Menu Screen, see page 38 to 39.
Specify the settings for playing back files continuously in a “slideshow” format. In a slideshow of photos, you can set the transition time, transition effects and BGM.
1 Select the item you wish to change, and press the SET button.
MODE SLIDES INTERVAL EFFECT SETUP MUSIC SELECT
ALL SHORT
2 Toggle the SET button up or down to change the setting.
ENTER
3 Press the SET button.
Begin the slideshow
1 Select [START] and press the SET button. h Slideshow playback begins. h To stop slideshow playback, press an operation button. (Playback also
stops if the zoom switch is pushed.)
i When videos are played back in a slideshow, the recorded audio track is
played back; the BGM is not played. BGM volume?
i Adjust the volume before beginning the slideshow (page 46).

Prevent accidental erasure of image and audio files.
1 Display the file that you want to protect from accidental erasure, and display the Playback Menu 1 (page 38).
2 Select [PROTECT] and press the SET button.
3 Select [PROTECT SINGLE] and press the SET button. h [LOCK] appears. h If the protect mode has already
PROTECT
been enabled for the file, then [UNLOCK] appears.
4 Select [LOCK] and press the SET button. h The protect mode is set for the
ENTER
file. h The protect mark indicates that the file is locked.
i Even if the protect mode is set for certain files, they will be deleted if the
card is reformatted. To select a different image in step 3...
i Toggle the SET button to the left or right. To cancel the protect mode for a file...
i Display the desired file and repeat steps 1 to 3, select [UNLOCK], and
press the SET button. The protect mark will disappear and the protect mode is canceled.

Protect selected files Select multiple files to protect.
1 Display the Playback Menu 1 (page 38).
2 Select [PROTECT] and press the SET button.
3 Select [PROTECT SELECTED] and press the SET button. h Toggle the SET button left, right,

up or down to move the yellow frame to the file you wish to protect.
4 Press the SET button. h The selected file is marked with the protect icon . h To cancel a protect selection and remove the protect icon from a file,
move the yellow frame to the marked file and press the SET button.

Captured photos can be rotated to the correct orientation for viewing.
i An image for which the protect mode has been enabled cannot be rotated.
To rotate a protected image, cancel the protect mode before beginning the rotate image procedure (page 87).
A captured image can be resized to a smaller size and saved as a separate image. You can set the size to 1600×1200 pixels or 640×480 pixels. The latest image number is assigned to the photo when it is saved.
i An image can be resized only to a smaller (or the same) size, not to a
larger size.

To access and use the Menu Screen, see page 38 to 39.
Repair the red-eye effect in photos to make the eyes appear more natural. In the case of [SAVE AS NEW], the latest image number is assigned to the photo when it is saved.
i The camera was not able to successfully repair the image. i The correction function works to automatically edit flaws that the camera
detects in captured images. In some cases, the camera may fail to correctly repair a flaw.

You can trim away unwanted portions from a video and save it as a new video (video trimming [extracting]). You can also join videos together and save them as one separate clip (“splicing”).
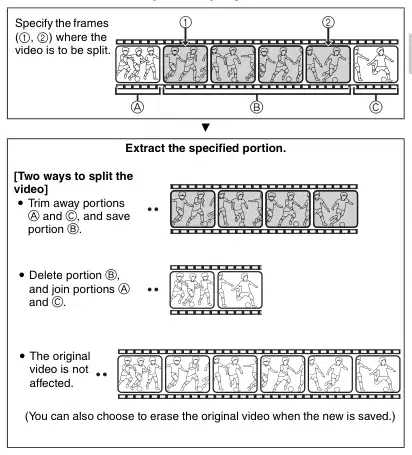
Specify the frames (1, 2) where the video is to be split.
A and C, and save portion B.
(You can also choose to erase the original video when the new is saved.)

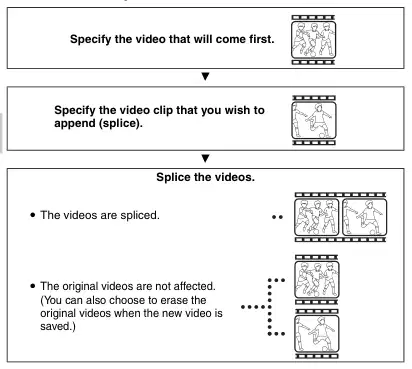
Specify the video clip that you wish to append (splice).
(You can also choose to erase the original videos when the new video is saved.)
When editing videos...
i When editing videos, do not turn off the camera, as doing so may erase
the original video. i As the number or size of the videos increases, the card memory may
become full, making it impossible to edit or save the videos. In this case, you will need to free some of the memory on the card by deleting files that are no longer necessary (pages 46 and 63).

1 Select the video to be trimmed from the 8-image display. h Move the yellow frame to the video you wish to trim (page 59).
2 Display the Playback Menu 2 (page 38), select [EDIT VIDEO], and press the SET button.
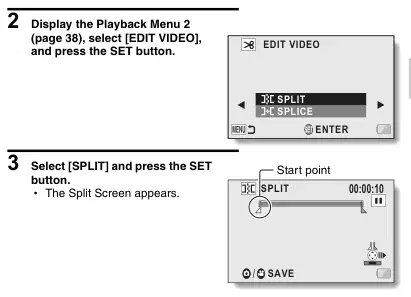
3 Select [SPLIT] and press the SET button. h The Split Screen appears.

4 Specify the start point of the extract. h Play the video until approximately the desired point, pause the video
then play the video one frame at a time, stopping at the start point of the extract. This will be the first frame of the extract. h If the start point of the video is also the start point of the extract,
proceed to step 5. <Procedure>
Play: After pausing playback, press and hold the SET button to the right for about 2 seconds for forward playback, or to the left for reverse playback. Pause: During playback, press the SET button. Accelerated playback: During playback, toggle the SET button to the left or right to change the playback speed. Single frame: After pausing playback, toggle the SET button to the right to move forward one frame, or to the left to move back one frame.

5 Toggle the SET button up. h The start point of the video

extract is set, and the screen to specify the end point appears. h Specify the end point of the
extract by following the same procedure as in step 4. <When joining the first and latter portions> 1 Toggle the SET button down. h Each time the SET button is
toggled down, the sections to delete and the sections to save are reversed. 2 Specify the end point of the extract. The frame following the end point of the extract will be the start point of the latter portion to be joined.
Portion to be deleted (Black)
6 Press the [O] button or [@ ] button. h A screen appears for you to
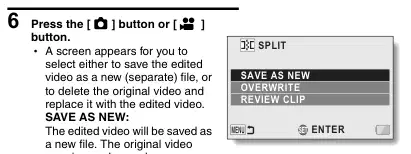
select either to save the edited video as a new (separate) file, or to delete the original video and replace it with the edited video. SAVE AS NEW: The edited video will be saved as a new file. The original video remains unchanged. OVERWRITE: The original video will be deleted. Only the edited video will be saved. REVIEW CLIP: Play back the edited video before saving it.

7 Select the desired option, and press the SET button. h Editing starts. h When editing videos, do not turn off the camera, as doing so may
erase the original video. h When editing ends, you are returned to the Playback Menu.
i You will not be able to overwrite the file if the original file is protected. i If the “CARD FULL.” or “Built-in Memory full.” message appears, you will
need to free some of the memory by deleting files that you do not need to keep. i Audio files cannot be trimmed. Playback volume?
i Adjust the volume before beginning editing (page 60). In case of prolonged recording...
i During the editing of lengthy videos, the time to process the large amount
of data can become quite long. To avoid problems caused by the battery pack becoming depleted in the middle of video editing, before starting to edit be sure that a sufficiently charged battery pack is installed in the camera, or connect the AC adaptor. i It is recommended that a computer (HD Writer VE 1.0) be used to edit long
videos. i Videos shorter than 1 second cannot be edited.

i Videos that were recorded in different modes cannot be spliced.
1 Display the Playback Menu 2 (page 38), select [EDIT VIDEO], and press the SET button.
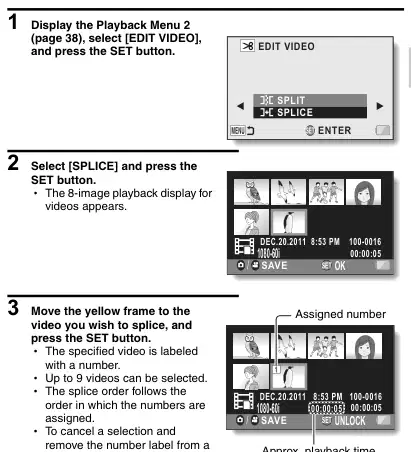
2 Select [SPLICE] and press the SET button. h The 8-image playback display for
3 Move the yellow frame to the video you wish to splice, and press the SET button. h The specified video is labeled
with a number. h Up to 9 videos can be selected. h The splice order follows the
order in which the numbers are assigned. h To cancel a selection and
remove the number label from a video, select the video and press the SET button.
Approx. playback time

4 Press the [O] button or [@] button. h A screen appears for you to
select either to save the spliced video as a new (separate) file, or to delete the original videos and replace them with the joined video. SAVE AS NEW: The spliced video clip will be saved as a new file. The original videos remain unchanged. OVERWRITE: The original videos will be deleted. Only the joined video will be saved. REVIEW CLIP: Play back the spliced video before saving it.
SET
ENTER
ADVANCED OPERATION/PLAYBACK
5 Select the desired option, and press the SET button. h Editing starts. h When editing videos, do not turn off the camera, as doing so may
erase the original video. h When editing ends, you are returned to the Playback Menu.

i If the file size of the video after editing exceeds 4 GB, it is not possible to
either “SAVE AS NEW” or “OVERWRITE”. i You will not be able to overwrite the file if the original file is protected. If you
want it to be erased, you will need to first remove the protection (page 87). i If the “CARD FULL.” or “Built-in Memory full.” message appears, you will
need to free some of the memory by deleting files that you do not need to keep. i Audio files cannot be spliced. Playback volume?
i Adjust the volume before beginning editing (page 60). In case of prolonged recording...
i During the editing of lengthy videos, the time to process the large amount
of data can become quite long. To avoid problems caused by the battery pack becoming depleted in the middle of video editing, before starting to edit be sure that a sufficiently charged battery pack is installed in the camera, or connect the AC adaptor. i It is recommended that a computer (HD Writer VE 1.0) be used to edit long
videos.

Files can be copied from the built-in memory to the SD card.
1 Display Playback Menu 2, select [COPY], and press the SET button. h The Copy Screen appears.
2 Select the desired option, and press the SET button. [COPY SINGLE]: Copy files one at a time. [COPY SELECTED]: Copy selected files (page 101). [COPY ALL]: Copy all the files. <If [COPY SINGLE] was selected> h Toggle the SET button left or right to select the file you wish to copy. h Proceed to step 3. <If [COPY ALL] was selected> h Press the SET button to begin copying. h When copying is completed, you are returned to the Playback Menu.
3 Select [COPY], and press the SET button. h Copying begins. h To continue copying files, toggle the SET button left or right to display
the desired file to copy, select [COPY], and press the SET button.

Copying selected files Copy multiple selected files.
1 Display Playback Menu 2, select [COPY], and press the SET button. h The Copy Screen appears.
2 Select [COPY SELECTED], and press the SET button. h The screen to select files appears.
3 Toggle the SET button left, right, up or down to move the yellow frame to a file you wish to copy, and press the SET button. h A checkmark is superimposed on the selected file. h To deselect a file, move the yellow frame to the file, and press the SET
button.
4 Press the [O] button or [@] button. h Copying begins. h When copying is completed, you are returned to the Playback Menu.
i To make optimum use of the capacity of the SD card or built-in memory,
you can select specific portions of videos to copy by using the video trimming feature (page 93).

You can check what the settings were when a file was recorded with your camera.
1 Set the camera to the playback mode (page 37).
2 Select the image for which you wish to display the information. h Toggle the SET button up, down, left or right to move the yellow frame
to the file you wish to play back.

3 Press the MENU button for at least 1 second. h The Information Screen
pressed again, the Information Screen is canceled. 1 Recording mode/ recorded pixels settings 2 Image or sound number 3 Protect setting 4 File size 5 Video or audio recording time 6 Exposure compensation setting 7 Aperture value 8 Shutter speed 9 Remaining battery charge 0 Date and time of image A ISO sensitivity setting B Indicates location of
<Audio file>

DISPLAY THE OPTION SETTING MENU

The camera settings are executed via the Option Setting Menu.
1 Turn on the camera, and press the MENU button.
1080-30p REC MODE PICTURE SIZE SCENE MODE COLOR MODE FLASH SELF TIMER
2 Select an Option tab (1, 2 or 3). h The Option Setting Menu
appears. h If you toggle the SET button to
the right, the screen to select a setting to change appears.
3 Toggle the SET button up or down to select the item you wish to set, and press the SET button. h The Setting Screen for the selected item appears. h To return to the Menu Screen, press the MENU button.

CLOCK SET ALERT SOUND DISPLAY ECONOMY BRIGHTNESS
OPTION SETTINGS
ENTER

1 CLOCK SET setting (page 34) h Set the camera’s clock. 2 ALERT SOUND setting h Settings for the types and
4 ECONOMY setting (page 33) h Specify the elapsed period of
inactivity before the sleep mode (to conserve battery power) is activated. BATTERY: REC:
volume of the camera’s operation sounds. TURN ON/OFF:
Set the elapsed time before the sleep mode is activated in the recording mode when using power from the battery. BATTERY: PLAY:
Mute or enable the sounds when the camera is turned on or off. SHUTTER:
Select the sound that is produced when the [O] button is pressed. KEY SW:
Set the elapsed time before the sleep mode is activated in the playback mode when using power from the battery. AC: REC/PLAY:
Select the sound that is produced when the SET button, MENU button, etc. are pressed. OPERATION VOL:
Set the elapsed time before the sleep mode is activated in the recording or playback mode when using power from the AC adaptor. 5 BRIGHTNESS setting h Adjust the brightness of the
Adjust the volume of the operation sounds. ALL OFF:
The operation sounds are disabled. OPERATION SOUNDS ON:
camera’s LCD monitor display. 6 Remaining battery charge display (page 121)
The operation sounds are enabled. 3 DISPLAY setting h Specify the information to
display on the LCD monitor. ON:
Display the capture date and playback time (videos). OFF:
Do not display the capture date or playback time.

LANGUAGE TV OUTPUT INITIAL SET FORMAT
ENTER
OPTION SETTINGS

1 LANGUAGE setting h Select the language in which
the LCD monitor messages are displayed. 2 TV OUTPUT setting (page 110) 3 INITIAL SET h Reset the camera settings to
the factory-preset settings. h The following settings do not
change with this procedure:
Date and time setting Language setting 4 FORMAT (page 118) FORMAT:
Logical format of the SD card or the built-in memory is executed. DELETE DATA:
Physical format of the SD card or the built-in memory is executed. 5 Remaining battery charge display (page 121)

REC FOLDER FILE NO. CONT'D
3 1,2
OPTION SETTINGS

1 REC FOLDER setting (page 114) (when the recording mode is active) h Select a folder to record to. 2 PLAYBACK FOLDER setting (page 115) (when the playback mode is active) h Select a folder to play back. 3 FILE NO. CONT’D setting (page 116) 4 Remaining battery charge display (page 121)

Specify the type of image signal that is output from your camera’s USB/AV terminal.
1 Select [TV OUTPUT], and press the SET button. TV SYSTEM: Set the type of TV signal that is output from the USB/AV terminal. TV ASPECT: Set the TV’s aspect ratio. HDMI: Set the signal that is output from the HDMI terminal. VIERA Link: Set the VIERA Link function.

2 Select the desired setting, and press the SET button. h The screen to change the parameter for the selected setting appears. <If [TV SYSTEM] is selected>
NTSC: Outputs NTSC video signals. PAL: Outputs PAL video signals.
<If [TV ASPECT] is selected>
16:9: Use this setting when a TV having an aspect ratio of 16:9 is connected. 4:3: Use this setting when a TV having an aspect ratio of 4:3 is connected.
<If [HDMI] is selected>
AUTO: The camera automatically determines the appropriate setting. 720p: Choose this setting if the video was recorded in the or mode. 1080i: Choose this setting if the video was recorded in the or mode. 480p: Choose this setting if the video was recorded in the mode. h Does not work with 480i connector.

<If [VIERA Link] is selected>
ON: Use the VIERA Link. OFF: Do not use the VIERA Link.
3 Toggle the SET button up or down to select the desired parameter.
4 Press the SET button.
5 Press the MENU button 2 times. h This completes the TV output setting.

Relation between [TV ASPECT] setting and TV display The tables below show the video signal that is output when the [TV ASPECT] setting is changed. However, note that for some TVs that have an auto-detect function, the output may not conform to the table, or the TV display may not change at all.


i If the appearance of the image on the TV monitor is not correct, you can
either change the camera’s [TV ASPECT] setting, or change the screen size setting on your TV. To change the screen size setting on your TV, please refer to the instruction manual for your TV. The aspect ratio of the output photo does not change to 16:9?
i The photo output will be 4:3 for images captured in the 4:3 photo mode.

Create or select a recording folder (a folder in which to store recorded files).
1 Set the camera to the recording mode, and display the Option Setting Menu.
2 Select [REC FOLDER], and press the SET button. <Create a new folder> h Select [CREATE NEW
CREATE NEW FOLDER
100CDPFP
FOLDER]. <Select an existing folder> h Select the desired folder
number.
ENTER
OPTION SETTINGS
3 Press the SET button. h This completes the create/select folder setting. h If you created a new folder, it automatically becomes the selected
recording folder.
i A folder cannot be selected if it was created using a different device, or if it
already contains the maximum number of files.

If the card contains multiple folders, you can select from which folder you would like to play back.
1 Set the camera to the playback mode, and display the Option Setting Menu.
2 Select [PLAYBACK FOLDER] and press the SET button.

3 Toggle the SET button up or down to select the desired playback folder, and press the SET button. h The files in the selected folder are displayed in the Playback Screen.

<File number continued function [OFF]> If a newly formatted card is used, the file name (image number) of the captured image automatically begins from 0001. If the card is subsequently reformatted, or if a different reformatted card is used, the file names again begin from 0001.
File name (image number) Card A 0001, 0002 0012, 0013
Card B 0001, 0002 0012, 0013
<File number continued function [ON]> By setting the file number continued function to [ON], even if the card is reformatted or the card is replaced with another card, the consecutive numbering of file names continues from the last number recorded by the camera.
File name (image number) Card A 0001, 0002 0012, 0013
Card B 0014, 0015 0025, 0026
Replace card · Replace card

i If Card B already has files in it when it replaces Card A, file names are
assigned as follows.
When the highest file number on Card B (before replacing) is lower than the highest file number on Card A: the file name of the next recorded image continues from last file name recorded on Card A.
Card A 0001, 0002 0012, 0013
Card B 0001, 0002, 0014, 0015 0025, 0026
When the highest file number on Card B (before replacing) is higher than the highest file number on Card A: the file name of the next recorded image continues from last file name recorded on Card B.
Card A 0001, 0002 0012, 0013
Card B 0020, 0021, 0022, 0023 0025, 0026
i If the file number continued function is [ON], file name numbering
continues just the same as when an SD card is used, even if the built-in memory is formatted or the medium is switched to the SD card. At the end of a photography session...
i Until the file number continued function is set to [OFF], consecutive file
names are assigned.

A card must be formatted with this camera:
i After purchasing, when used for the first time, or i If it was formatted using a personal computer or other device. The card cannot be formatted if the lock switch is set to the “LOCK” position. Proceed with the format procedure after setting the lock switch to the unlocked position (page 19).
i Do not turn off the power to the camera or eject the card during formatting. Formatting the card erases the files
i When a storage medium is formatted, all recorded files on the medium are
erased. Protected data (page 87) is also erased, so before formatting a card, any data you want to keep should be copied to your personal computer’s hard disk or other storage medium. When disposing of or transferring the SD card, execute the [DELETE DATA] procedure from the Format Menu
i If a card is reformatted or the data is erased from the card using the
camera or a computer, the card’s control data may be merely modified and the data itself may not be completely erased from the card. i In some cases it may be possible to recover the data from a reformatted
card using special software for that purpose. However, if the camera is used to erase data, it will be impossible to recover the data even by the use of data recovery software. i If you are disposing of a card, it is recommended that you physically
destroy it. If you are transferring the card to someone else to use, it is recommended that you use the camera to erase the data, or use commercially available software for erasing card data. Managing data is the responsibility of the user. Can’t select [DELETE DATA]?
i Use the AC adaptor to power the camera. [DELETE DATA] cannot be
selected when the battery is used to power the camera.

You can check how many images can be captured, how much video recording time and how much audio recording time is available on the card. For a table showing the recording capacities of SD cards, please see pages 181 to 184.
1 Set the camera to the recording mode (page 37). h The remaining number of images
Remaining number of images
appears in the upper left of the LCD monitor. h The remaining video recording
1080-30p 16M-S
374 000:16:51
time appears in the upper right of the LCD monitor. h The remaining number of images
and video recording time will differ depending on the resolution and compression settings.
Remaining video recording time

Check the available audio recording time 1 Set the camera to the audio recording mode (page 69). h The remaining audio recording
time is shown.
i When the remaining number of images or the remaining video recording
time is “0”, you cannot capture any more images. To capture more images, either install a new card, or save the images to a computer and then delete them (pages 46 and 63) from the card. i Even when the remaining number of images or the remaining video
recording time becomes “0”, it may be possible to continue recording by changing the recording size, recording mode, or recorded pixels setting (pages 40, 68 and 71). i The display of the remaining number of images, video recording time or
audio recording time may not be precise.
Remaining audio recording · time

When using the battery pack, the remaining battery pack charge can be checked on the LCD monitor. Make sure to check this indicator before capturing an image. For an indication of the possible length of time for battery pack operation, see page 23.
1 Display the Recording Menu or Playback Menu (page 38). h The battery pack remaining
RECORDING MENU 1 REC MODE PICTURE SIZE SCENE MODE COLOR MODE FLASH SELF TIMER
charge indicator appears in the lower right corner of the LCD monitor. h Due to the battery pack
characteristics, when the ambient temperature is low,
OPTION SETTINGS
may appear early for an incorrect indication of the remaining charge. Also, depending on the conditions of use of the camera or the ambient conditions (temperature, etc.), the indicated remaining charge may change. Therefore, this indication can only be used as a general approximation of the remaining charge. h When the battery charge is low,
Battery pack remaining charge indicator

1080-30p 2M 000:00:09
000:00:09 000:00:09
Battery pack remaining charge indicator
the battery pack remaining charge indicator also appears on the screen during recording.
1080-30p

Approx. full.
Power is low.
It will soon be impossible to capture or play back images.
Recharge the battery pack.
i If any file is present, you can also check the remaining battery pack charge
on the file information display (page 102). i Battery life may differ even among battery packs of the same type. i Depending on the usage of the camera (such as the number of times the
flash is used, the use of the LCD monitor, etc.) or the ambient temperature (temperatures below 10 °C [50 °F]), the number of images that can be saved on a fully charged battery pack will vary greatly. i It is recommended that you prepare an extra battery pack(s) when taking
pictures at a wedding or while traveling, for example, so you don’t miss capturing images of important moments due to the battery pack power running out. The same is recommended for taking photos in cold environments. (In a ski area, for example, the battery pack can be kept warm in your pocket until ready to use.)
Battery pack · remaining charge indicator · Battery remaining charge

CONNECTING TO A COMPUTER CONNECTING TO A COMPUTER SETTING THE CONNECTION MODE
1 Start your computer, and use the supplied USB cable to connect the camera to the computer. h Connect the camera’s USB/AV terminal to the computer’s USB
terminal.
2 Turn on the camera (page 32). h The screen to select the computer connection mode appears. CARD READER: Use the camera as an external drive of the computer (card reader mode). WEB CAMERA: Use your camera as a webcam (webcam mode).

i Do not use any other USB cables except the supplied one.
3 Select the desired connection mode, and press the SET button.

i Use only the supplied USB cable. Operation is not guaranteed if a different
USB cable is used. i When using the SDXC Memory Card with a computer, please visit the
support web site shown below.
http://panasonic.net/avc/sdcard/information/SDXC.html If the “Disconnect USB cable” message appears...
i Disconnect the USB cable once, then connect it again. Insert and pull out the cable carefully
i When connecting the cables, make sure that the cable plugs are correctly
oriented and that they match the shapes of the terminal sockets on the devices. Push the plugs in straight when connecting them. If undue force is used to connect a cable, it may permanently damage the connector pins in the terminal socket. i Do not use excessive force when connecting and disconnecting cables. i Please connect the USB cable to your computer’s USB terminal. Do not
connect it to the USB port on your monitor or keyboard, or to the USB hub. In some instances, it may not be possible to correctly install the driver software. Do not exchange data bi-directionally
i While copying data from the camera to the computer in the card reader
mode, do not perform any operation that would copy the computer data to the camera.

1 Set the camera to the card reader mode (page 123). h The message [Found New Hardware] appears in the task tray,
showing that the camera is recognized as a drive. h The card is recognized (mounted) as a disk, and the [CAM_SD (E:)]
icon appears in the [My Computer] window.
h The drive name (E:) may be different on your computer.
2 Select an action. h If the [CAM_SD (E:)] window appears automatically, select the desired
procedure from the window.
3 Copy the files from your camera to the computer.
HINT
i To disconnect your camera, be sure to follow the procedure below. Failure
to follow this procedure may cause faulty operation of your computer or loss of card data.
1 Left-click on the icon for safely removing hardware in the task tray. h A list appears showing the devices connected to the computer’s USB
terminal.
2 Left-click on the camera drive (E:).
3 Click on the [×] button. h The camera can now be disconnected.
h The drive name (E:) may be different on your computer.

IMGA0001.jpg
IMGA0002.jpg
IMGA0003.mp4
IMGA0004.m4a
Image or audio recording number
IMGA0001.jpg
IMGA0005.jpg
IMGA0002.jpg
IMGA0999.jpg
102CDPFP IMGA0001.jpg
IMGA0002.jpg
h Up to 999 files can be stored in folder 100CDPFP. If more files are made, a
folder named 101CDPFP is created, and they will be stored in there. New folders will then be named in sequence, i.e., 102CDPFP, 103CDPFP, etc.
File formats
The format of the files saved and the method in which the file names are determined are explained below.
Type of file File format File name structure
File name begins with IMGA. Extension is “.jpg”. IMGA****.jpg
File name begins with IMGA. Extension is “.mp4”. IMGA****.mp4
MPEG-4 Audio (AAC compression)
File name begins with IMGA. Extension is “.m4a”. IMGA****.m4a
* Consecutive numbers assigned in the order the files were saved.

i Do not alter files or folders in your camera in any way. Doing so may result
in your camera not recognizing that data. If you want to edit files, first copy them to your computer’s hard drive. i Cards formatted on your computer cannot be used by your camera. Format
all cards to be used by your camera with your camera.
i The volume name will be [CAM_SD] for a card that was formatted with the
camera and [Removable disc] for a card that was formatted with a computer. About videos recorded with this camera
i You can use Apple’s QuickTime to play back videos on a computer.
Playback may be possible using other software that supports the ISO standard MPEG-4 AVC/H.264 (AAC audio).
<Video playback operating environment>
Windows XP Windows Vista Windows 7
Mac OS X 10.6.6 or later
Core 2 Duo E4400 2.0 GHz or later Core Duo T2600 2.16 GHz or later Athlon X2 4600+ 2.4 GHz or later
Core 2 Duo or later
Memory 1 GB (Recommended 2 GB) or more Video memory 128 MB or more 256 MB or more
* Limited to models with preinstalled OS.
Windows Mac OS · Other USB terminal

About audio files recorded with this camera
i Files can be played back using QuickTime.
We recommend using HD Writer VE 1.0 to copy or write back video data. Using Windows Explorer or other programs on the PC to copy, move or rename files and folders recorded with this unit will result in them being unusable with HD Writer VE 1.0.
i The drive name for the built-in memory is “CAM_MEM(E:)”.
h The drive name (E:) may be different on your computer.

k Copying files from the camera’s built-in memory and/or the SD card
to your PC Card reader function (mass storage) (page 123) Files from the camera’s built-in memory and/or the SD card can be copied to the PC with Explorer or other programs.
1 Double click the folder that contains the still pictures. ([DCIM] _ [100CDPFP] etc.)
2 Drag and drop the files into the destination folder (on the PC’s HDD).
i Do not delete the SD card’s folders. Doing so may make the SD card
unusable in this unit. i When data not supported by this unit has been recorded on a PC, it will not
be recognized by this unit. i Always use this unit to format SD cards.

This camera can be used as a webcam.
Windows
PC IBM PC/AT compatible
OS Microsoft Windows XP (32 bit) Home Edition Service Pack 3 Microsoft Windows XP (32 bit) Professional Service Pack 3 Microsoft Windows Vista (32 bit) Home Basic Service Pack 1/Service Pack 2 Microsoft Windows Vista (32 bit) Home Premium Service Pack 1/Service Pack 2 Microsoft Windows Vista (32 bit) Business Service Pack 1/Service Pack 2 Microsoft Windows Vista (32 bit) Ultimate Service Pack 1/Service Pack 2 Microsoft Windows Vista (32 bit) Enterprise Service Pack 1/Service Pack 2 Microsoft Windows 7 (32 bit) Starter Microsoft Windows 7 (32 bit/64 bit) Home Basic Microsoft Windows 7 (32 bit/64 bit) Home Premium Microsoft Windows 7 (32 bit/64 bit) Professional Microsoft Windows 7 (32 bit/64 bit) Ultimate
CPU Intel® Pentium® 4 1.7 GHz or more
RAM Windows 7: 1 GB or more (32 bit), 2 GB or more (64 bit) Windows Vista Home Basic: 512 MB or more Windows Vista Ultimate/Business/Home Premium/ Enterprise: 1 GB or more Windows XP: 512 MB or more
Required Software Windows Live Messenger
Other High-speed broadband Internet connection
Interface USB port

* Operation is not guaranteed for all computers even if the recommended system requirements are fulfilled. * Operation is not guaranteed for NEC PC-98 series and their compatible devices * Windows 3.1, Windows 95, Windows 98/98SE, Windows Me, Windows 2000 and Windows NT are not supported. * Operation on an upgraded OS is not guaranteed.
OS Mac OS X 10.6.6
CPU Intel® Core™ Duo or better
RAM 512 MB or more
Other High-speed broadband Internet connection
* Operation is not guaranteed for all computers even if the recommended system requirements are fulfilled.
HINT
i Although your camera can shoot at a maximum rate of 30 frames per
second, the rate at which you can broadcast in the webcam mode may be less than this depending on the speed of your Internet connection.
1 Set the camera to the WEB CAMERA (webcam mode) (page 123).
Computer Mac · Required software iChat · Interface USB port

i The software cannot process audio files. i Videos that have been recorded on another device cannot be written
to the software supplied with this unit. i We cannot guarantee operation if you use software other than that
supplied to read/write videos. i Do not start the software supplied with this unit and other software at the
same time. Close any other software if you start the software supplied with this unit and close the software supplied with this unit if you start any other software.
Before opening the CD-ROM package, please read the following.
You (“Licensee”) are granted a license for the Software defined in this End User License Agreement (“Agreement”) on condition that you agree to the terms and conditions of this Agreement. If Licensee does not agree to the terms and conditions of this Agreement, promptly return the Software to Panasonic Corporation (“Panasonic”), its distributors or dealers from which you made the purchase.
Article 1 License Licensee is granted the right to use the software, including the information recorded or described on the CD-ROM, instruction manuals, and any other media provided to Licensee (collectively “Software”), but all applicable rights to patents, copyrights, trademarks and trade secrets in the Software are not transferred to Licensee.

Article 2 Use by a Third Party Licensee may not use, copy, modify, transfer or allow any third party, whether free of charge or not, to use, copy or modify the Software, except as expressly provided for in this Agreement.
Article 3 Restrictions on Copying the Software Licensee may make a single copy of the Software in whole or a part solely for backup purposes.
Article 4 Computer Licensee may use the Software only on one computer, and may not use it on more than one computer.
Article 5 Reverse Engineering, Decompiling or Disassembly Licensee may not reverse engineer, decompile, or disassemble the Software, except to the extent either of them is permitted under law or regulation of the country where Licensee resides. Panasonic and its distributors will not be responsible for any defects in the Software or damage to Licensee caused by Licensee’s reverse engineering, decompiling, or disassembly of the Software.
Article 6 Indemnification The Software is provided “AS-IS” without warranty of any kind, either expressed or implied, including, but not limited to, warranties of non- infringement, merchantability and/or fitness for a particular purpose. Further, Panasonic does not warrant that the operation of the Software will be uninterrupted or error free. Panasonic or any of its distributors will not be liable for any damage suffered by Licensee arising from or in connection with Licensee’s use of the Software.
Article 7 Export Control Licensee agrees not to export or re-export to any country the Software in any form without the appropriate export licenses under regulations of the country where Licensee resides, if necessary.
Article 8 Termination of License The right granted to Licensee hereunder will be automatically terminated if Licensee contravenes any of the terms and conditions of this Agreement. In this event, Licensee must destroy the Software and related documentation together with all the copies thereof at Licensee’s own expense.

i Even if the system requirements mentioned in this owner’s manual are
fulfilled, some computers cannot be used. i A CD-ROM drive is necessary to install the supplied software applications.
(A compatible DVD writer drive and media are necessary for writing to a DVD.) i Operation is not guaranteed in the following cases.
h When 2 or more USB devices are connected to a computer, or when
devices are connected through USB hubs or by using extension cables. h Operation on an upgraded OS. i This software is not compatible with Microsoft Windows 3.1, Windows 95,
Windows 98, Windows 98SE, Windows Me, Windows NT and Windows 2000.
Computer IBM PC/AT compatible device equipped with Intel Pentium 4 2.8 GHz or better CPU (including compatible CPU)
h If using the playback function, Intel Core 2 Duo 2.16
GHz or higher, or AMD Athlon64 X2 Dual-Core 5200+ or higher is recommended h If using the editing function, Intel Core 2 Quad 2.6
GHz or higher is recommended OS Microsoft Windows XP (32 bit) Home Edition Service Pack 3 Microsoft Windows XP (32 bit) Professional Service Pack 3 Microsoft Windows Vista (32 bit) Home Basic Service Pack 1/Service Pack 2 Microsoft Windows Vista (32 bit) Home Premium Service Pack 1/Service Pack 2 Microsoft Windows Vista (32 bit) Business Service Pack 1/Service Pack 2 Microsoft Windows Vista (32 bit) Ultimate Service Pack 1/Service Pack 2 Microsoft Windows 7 (32 bit) Starter Microsoft Windows 7 (32 bit/64 bit) Home Basic Microsoft Windows 7 (32 bit/64 bit) Home Premium Microsoft Windows 7 (32 bit/64 bit) Professional Microsoft Windows 7 (32 bit/64 bit) Ultimate

RAM Windows 7: 1 GB or more (32 bit)/2 GB or more (64 bit) Windows Vista: 1 GB or more Windows XP: 512 MB or more (1 GB or more recommended) Display High Color (16 bit) or more (32 bit or more recommended) Desktop resolution of 1024×768 pixels or more (1920×1080 pixels or more recommended) Windows Vista/Windows 7: DirectX 9.0c compatible video card (DirectX 10 recommended) Windows XP: DirectX 9.0c compatible video card Compatible with DirectDraw overlay support PCI Express™×16 compatible recommended Video memory 256 MB or more recommended Direct3D Acceleration: Enabled* * Checking the Direct3D Acceleration setting (when using Windows® XP) [Start] → [Run] → The [Run] window appears. Enter “dxdiag” in the text field and click the [OK] button. The [DirectX Diagnostic Tool] window appears. Select the [Display] tab and check [Direct3D Acceleration] under [DirectX Features]. Free hard disk drive space
Ultra DMA – 100 or more Available hard disk capacity of 450 MB or more for installation
i When writing to disk (DVD) or card, at least twice the
amount of free disk space as the disk or card being created is required. In addition, when exporting to multiple disks while automatically partitioning, 17 GB of free disk space is required. i If the compression setting is enabled, errors will occur
during recording. In the [Properties] for the hard disk drive, remove the check from the checkbox for [Compress this drive to save disk space]. Sound DirectSound Support Drive CD-ROM drive (for installation) When writing to DVD, a compatible drive and media are necessary. Interface USB port (high-speed USB [USB 2.0]) USB connectable model
A Panasonic video camera that this software is supplied with
Image data recorded on a Panasonic video camera that this software is supplied with
Applicable content

Other Mouse or equivalent pointing device, SD card reader/ writer (required for reading and recording to SD cards; performing these operations with SDHC memory cards or SDXC memory cards requires an SDHC-compatible or SDXC-compatible SD card reader/writer), an environment with Internet access (required for online functions “Online sharing”)
i Supplied CD-ROM is available for Windows only. i Input is not supported in languages other than English, German, French
and Simplified Chinese. i Operation cannot be guaranteed on all DVD drives. i Operation is not guaranteed on Microsoft Windows Vista Enterprise,
Windows XP Media Center Edition, Tablet PC Edition and Windows 7 Enterprise. i This software is not compatible with a multi-boot environment. i This software is not compatible with a multi-monitor environment. i Use the standard Windows fonts and display settings. Depending on the
settings, characters etc. may not display correctly in some cases. i If using Windows XP, an administrative account user only can use this
software. If using Windows Vista/Windows 7, administrative account and standard account users only can use this software. (An administrative account user should install and uninstall this software.) i Log on to the administrator account or a registered user account. A Guest
user account cannot be used. i Operation on Windows 7 Ultimate or Windows Vista Ultimate when the
multilingual user interface (MUI) function is used to change the language is not guaranteed. i This software cannot be used simultaneously with other time-shifting
motion picture editing software or video capture products. Note that other software running background processes, timer recording in particular, may cause this software to malfunction. i Unsupported files are not displayed. i Some files that are unusually large or particular kinds of image formats
may not be displayed. i When playing back MP4/iFrame videos, please check the following points
for your video card. In some cases images may not be correctly played back or displayed. Dropped frames or uneven video playback may occur. h Be sure to update your driver software to the latest version. h Please update the standard graphics modules such as OS and DirectX
to the latest version for your video card.

You will need a high performance computer depending on the functions to be used. It may not properly play back or properly operate depending on the environment of the computer used. Refer to the operating environment and notes.
i Operation during the playback may become slow if the CPU or memory is
not fulfilling the requirements of the operating environment. i Always use the most current driver for the video card. i Always make sure there is enough capacity on the HDD in the computer. It
may become inoperable or the operation may stop suddenly if the capacity gets low.

Computer IBM PC/AT compatible PC OS Microsoft Windows XP (32 bit) Home Edition Service Pack 3 Microsoft Windows XP (32 bit) Professional Service Pack 3 Microsoft Windows Vista (32 bit) Home Basic Service Pack 1/Service Pack 2 Microsoft Windows Vista (32 bit) Home Premium Service Pack 1/Service Pack 2 Microsoft Windows Vista (32 bit) Business Service Pack 1/Service Pack 2 Microsoft Windows Vista (32 bit) Ultimate Service Pack 1/Service Pack 2 Microsoft Windows Vista (32 bit) Enterprise Service Pack 1/Service Pack 2 Microsoft Windows 7 (32 bit) Starter Microsoft Windows 7 (32 bit/64 bit) Home Basic Microsoft Windows 7 (32 bit/64 bit) Home Premium Microsoft Windows 7 (32 bit/64 bit) Professional Microsoft Windows 7 (32 bit/64 bit) Ultimate CPU Windows Vista/Windows 7: 1.0 GHz or higher Windows XP: Intel Pentium III 450 MHz or higher or Intel Celeron 400 MHz or higher RAM Windows 7: 1 GB or more (32 bit)/2 GB or more (64 bit) Windows Vista Home Basic: 512 MB or more Windows Vista Home Premium/Business/Ultimate/ Enterprise: 1 GB or more Windows XP: 128 MB or more (256 MB or more recommended) Interface USB port Other requirements
Mouse or equivalent pointing device
i Operates with the OS standard driver.

When installing the software, log on to your computer as the Administrator or with a user name with equivalent authorization. (If you do not have authorization to do this, consult your manager.)
i Before starting the installation, close all applications that are running. i Do not perform any other operations on your computer while the software
is being installed. i Explanation of operations and screens is based on Windows Vista.
1 Insert the CD-ROM into the computer. h The following screen is displayed automatically. Click [Run setup.exe]
→ [Continue]. h If Windows 7 is in use, or the following screen is not displayed
automatically, select [Start] → [Computer] (or double-click on [Computer] on the desktop), and then double-click [Panasonic].


2 Click [Next].
3 Read the [End User License Agreement], then place a check beside [I accept the terms of the license agreement] if you agree to them and click [Next].
Click Click

4 Select the country or region where you live, then click [Next]. h If the country or region cannot be

selected, select [NTSC Area]. h When the confirmation message
appears, click [Yes].
5 Select where the application is to be installed, then click [Next].

6 Select [Yes] or [No] to create shortcut. h A message regarding the playback in the environment used may be
displayed depending on the performance of the computer used. Click [OK] after confirming.
7 Click [Next]. h When installation is complete, some notes will appear.
8 Check the contents, then close the window.
Click · Click

9 Select [Yes, I want to restart my computer now.], then click [Finish].

The computer must be rebooted for the application to work.
Click

Follow the steps below to uninstall any software applications that you no longer require.
1 Select [Start] →[Control Panel] →[Programs and Features].

2 Select [HD Writer VE 1.0], then click [Uninstall]. h Proceed with the uninstallation by following the on-screen instructions. h After uninstalling the software, be sure to reboot the computer.
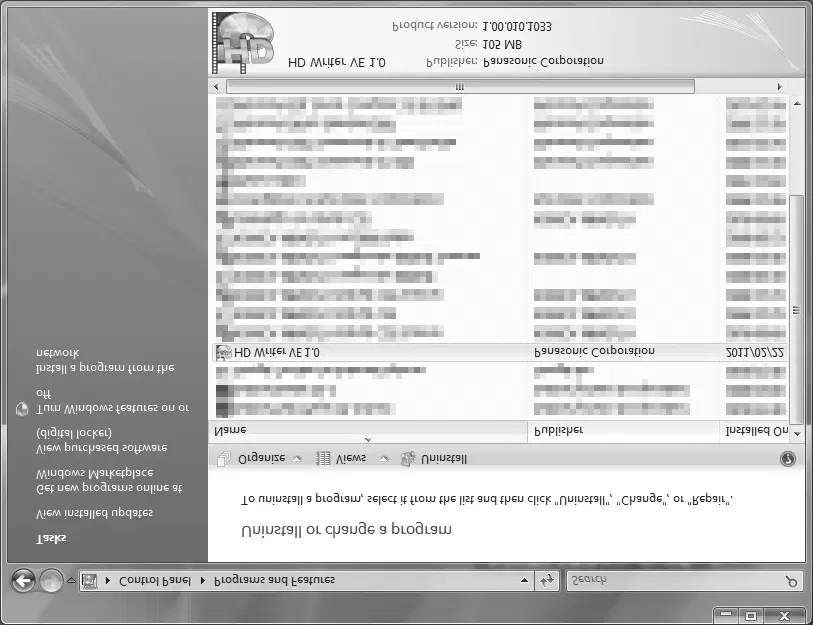
Click · Click

i When using HD Writer VE 1.0 on Windows XP, log on to your computer as
Administrator (or with a login name equally authorized). If you log on with a login name other than Administrator, you cannot use the applications. i When using HD Writer VE 1.0 on Windows Vista/Windows 7, log on to your
computer as Administrator (or with a login name equally authorized) or with the user name for a standard user account. If you log on with a user name for a guest user account, the software cannot be used.
(On the computer) Select [Start] → [All Programs] → [Panasonic] → [HD Writer VE 1.0] → [HD Writer VE].
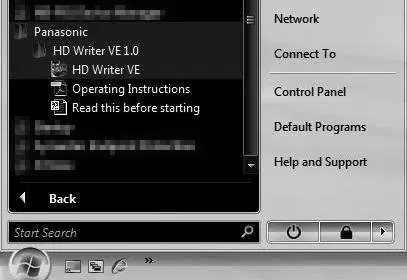
i For details on how to use the software applications, read the PDF owner’s
manual of the software.
Click

i You will need Adobe Acrobat Reader 5.0 or later or Adobe Reader 7.0 or
later to read the PDF owner’s manual.
Select [Start] → [All Programs] → [Panasonic] → [HD Writer VE 1.0] → [Operating Instructions].

i HD Writer VE 1.0 is not available for Mac. i iMovie ’11 is supported. For details about iMovie ’11, please contact Apple
Inc.
Computer Mac OS Mac OS X 10.6.6 CPU Intel Core Duo RAM 1 GB or more Interface USB port
i Even if the system requirements mentioned in this owner’s manual are
fulfilled, some computers cannot be used. i Operates with the OS standard driver. i Supplied CD-ROM is available for Windows only.
1 Connect this unit to a computer via the supplied USB cable. h The USB function selection screen will appear on the camera’s LCD
monitor. h Do not use any other USB cables except the supplied one.
2 On the camera’s LCD monitor, select [CARD READER] and press the SET button. h This unit is automatically recognized as an external drive of Mac.
3 Double-click [CAM_SD] or [CAM_MEM] displayed on the desktop. h Files are stored in the [100CDPFP] folder etc. in the [DCIM] folder.
4 Using a drag-and-drop operation, move the files you want to acquire or the folder storing those files to any different folder on the computer.

Drag [CAM_SD] or [CAM_MEM] on the Desktop to the [Trash], and then disconnect the USB cable.
i Use only the supplied USB cable. Operation is not guaranteed if a different
USB cable is used. i Do not remove the SD card from this unit when this unit is connected to the
computer using a USB cable.

CONNECTING TO A TV
By connecting the camera to a TV, you can play back files from the installed SD card or the built-in memory on the TV.
i When connecting the cables, make sure that the cable plugs are correctly
oriented and that they match the shapes of the terminal sockets on the devices. Push the plugs in straight when connecting them. If undue force is used to connect a cable, it may permanently damage the connector pins in the terminal socket. i Do not use excessive force when connecting and disconnecting cables.
About image output: The image output destination differs depending on the camera status (page 110).
HDMI mini cable (optional)
i HDMI, the HDMI logo and High-Definition Multimedia Interface are
trademarks or registered trademarks of HDMI Licensing, LLC.

Use the supplied AV cable to connect to a TV.

Insert the plugs as far as they will go.
i Do not use any other AV cables except the supplied one.
Connecting to the HDMI terminal
Use a separately sold HDMI mini cable to connect to a TV.
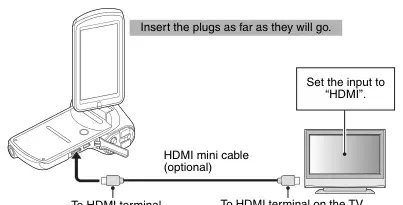
Insert the plugs as far as they will go.
To HDMI terminal To HDMI terminal on the TV
i Always use a genuine Panasonic HDMI mini cable (RP-CDHM15, RP-
CDHM30; optional).

i After connecting the camera to the television, switch the TV input to the
terminal to which the camera is connected. i The same playback procedure as when playing back with the camera is
used to play back audio recordings as well. i The playback method is the same as when viewing images on the
camera’s LCD monitor. (Use the TV controls to adjust the volume.)
What is the VIERA Link?
i This function allows you to use your remote control for the
Panasonic TV for easy operations when this unit is connected to a VIERA Link compatible device using an HDMI mini cable for automatic linked operations. (Not all operations are possible.) i VIERA Link is a unique Panasonic function built on a HDMI
control function using the standard HDMI CEC (Consumer Electronics Control) specification. Linked operations with HDMI CEC compatible devices made by other companies are not guaranteed. When using devices made by other companies that are compatible with VIERA Link, refer to the owner’s manual for the respective devices. i This unit is compatible with VIERA Link Ver.5. VIERA Link Ver.5
is the newest Panasonic version and is also compatible with existing Panasonic VIERA Link devices. (As of Dec 2010)
1 In the Option Setting Menu, for the TV OUTPUT setting, set “VIERA Link” to “ON”.
: [Option tab “2”] → [TV OUTPUT] → [VIERA Link] → [ON] i If you are not using VIERA Link, set to [OFF].
2 Use an HDMI mini cable to connect this unit to a Panasonic TV compatible with VIERA Link with a HDMI mini cable.
i It is recommended to connect this unit to an HDMI terminal other
than HDMI1 if there are 2 or more HDMI input terminals on the TV. i VIERA Link must be activated on the connected TV. (Read the
owner’s manual of the TV for how to set etc.) i Always use a genuine Panasonic HDMI mini cable (RP-CDHM15,
RP-CDHM30; optional).

3 Operate with the remote control for the TV.
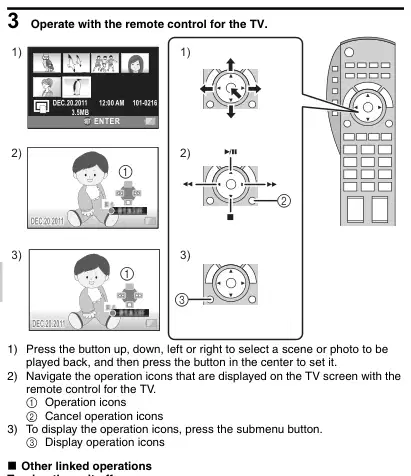
k Other linked operations Turning the unit off: If you use the remote control for the TV to turn off the power, this unit also turns off. Automatic input switching: If you connect with a HDMI mini cable and then turn on this unit, the input channel on the TV automatically switches to this unit’s screen. If the TV’s power is in standby status, it will turn on automatically (if [Set] has been selected for the TV’s [Power on link] setting).
i Depending on the HDMI terminal on the TV, the input channel may not
switch automatically. In this case, use the remote control for the TV to switch the input channel.

i If you are unsure whether or not the TV and AV amplifier you are using are
compatible with VIERA Link, read the owner’s manual for the devices. i Operation is not possible with a cable that is not based on the HDMI
standard.

COPYING/DUBBING
Dubbing in standard picture quality
Images played back on this unit can be dubbed onto a DVD recorder or video device.
i Images can be played back even on devices other than high-
definition compatible devices, so this is recommended when dubbing videos for distribution.

Change the video input on the video device and TV that this unit is connected to.
i The channel set will differ depending on the terminal to which the unit is
connected. i See the owner’s manual of the video device for details. i Insert the plugs as far as they will go. i Do not use any other AV cables except the supplied one.
1 Connect this unit to a video device and then change to the playback mode.
2 Start playback on this unit.
3 Start recording on the connected device. h To stop recording (dubbing), stop playback on this unit after stopping
recording on the recorder. h It is not possible to directly insert in the card slot an SD card recorded
with this camera and play back or dub from it.

h It is not possible to connect the camera to the USB connector and play
back or dub from it. h It is not possible to record in HD with a Blu-ray disc recorder. h It is not possible to directly insert an SD card recorded with this
camera in the card slot of a Panasonic TV and play back or dub from it (as of December 2010). h For information on how to display SD card images on your Panasonic
TV, please refer to the Users Manual for your TV.
i If the date and time display and function indication are not wanted, cancel
them before dubbing. (page 105) i If the dubbed images are played back on a widescreen TV, the images may
be stretched vertically. In this case, refer to the owner’s manual for the device you are connecting to or read the owner’s manual of the wide-screen TV and set the aspect ratio to 16:9.

COMMONLY ASKED QUESTIONS
If you have a question about the camera operation, you might find the answer in this compilation of commonly asked questions.
Why doesn’t the power turn on?
Due to cold temperatures, the battery pack temporarily lost its power.
Place the camera in your pocket to warm it up before using it.
Why is the battery pack consumed so quickly even after it was fully recharged?
The ambient temperature is very low.
Keep the battery pack in an environment of 10 to 35 °C (50 to 95 °F). The battery pack life has expired.
If a battery becomes depleted quickly even after it was sufficiently charged, it should be assumed that the battery has reached the end of its service life. Please replace it with a new battery. Why doesn’t recharging end?
The battery pack life has expired.
Replace with a new battery pack. If this is not effective, consult your dealer.
The remaining battery pack power is low.
Use the AC adaptor, or replace the battery pack with a fully charged one.
Why does the icon appear?
Why is the status indicator lit red?
A recorded file is being saved on the card or built-in memory.
Not a malfunction. Wait until the status indicator turns off.
Why doesn’t the flash operate?
The camera has determined that the image is bright enough and the flash is not necessary.
Not a malfunction. Capture the image; the camera will determine when the flash is necessary.
Question Answer Action · Power · Shooting

Are the settings retained even after the camera is turned off?
— Except for some settings, such as the exposure setting and exposure compensation, all the settings are retained even after the camera is turned off. Which resolution setting should I use?
— Select the resolution setting according to the intended use. Picture quality E or better: Appropriate for printing letter-size or larger, and for printing a close-up of part of a photo (trimming).
, G, t: For printing standard photo (photo service) sizes.
, [: For photos displayed on a web page, or sent as e- mail attachments. (Concerning the image quality of video recordings, please see page 181.)
Question Answer Action · Shooting

What is the difference between the digital zoom and the optical zoom?
— Because shooting with the optical zoom uses the optics of a physical lens, you can shoot without losing minute details in the image. The digital zoom, on the other hand, works by magnifying a portion of the image that hits the image sensor and may produce a coarser image. How can I get the distant view into focus?
— Set the scene mode function to the landscape mode when photographing. The video appears to freeze for an instant. (HX-DC1)
Not a malfunction. During the very brief span that the zoom lens is changing, the recording appears as a photo. The zoom range does not change when the ZOOM RANGE button is pressed. (HX-DC1)
The ZOOM RANGE button was pressed during video recording.
The ZOOM RANGE button was pressed while the digital zoom was engaged.
Not a malfunction. Use the optical zoom. The zoom range cannot be changed while the digital zoom is engaged.
Question Answer Action · Shooting

When used in cold weather, why does the image seem to leave traces as it moves?
Not a malfunction. Spots that appear in the LCD monitor only appear in the LCD monitor and will not be recorded with the images. Why does the displayed image contain some red, blue and green dots, or why are black spots visible?
Condition due to the LCD monitor characteristics.
Why is the image too bright?
When capturing an image, devise a way to compensate for a bright subject, for example, by changing the shooting angle. Why is the image out of focus?
The subject was too bright.
The focus is not locked properly.
Hold the camera correctly and slowly press the [O] button halfway to lock the focus. Then press the [O] button all the way to capture the image.

Why is there no image?
This may happen when trying to play back images stored on a card from a different digital camera.
Play back images that were recorded on a card using this camera.
Why is the playback image distorted?
If the subject moves or the camera is moved during recording, a distorted image may sometimes occur.
Not a malfunction. This is a characteristic of the MOS sensor.
Question Answer Action · Viewing · images

Why isn’t the magnified image clear?
Due to the characteristics of the camera, magnified images appear less clear.
Not a malfunction.
Why isn’t the captured image clear?
The image was captured using the digital zoom.
Not a malfunction.
— Please note playback of files that were processed using software other than HD Writer VE 1.0 cannot be guaranteed. Why is there a motor-like sound during video playback?
Can I play back image and sound files that I edited using my computer?
The sound of the camera’s mechanical action was recorded (the sound of the optical zoom movement or the autofocus sound).
Not a malfunction.
Round white spots that look like bubbles are appear in photos.
When the flash is used indoors or in dark surroundings, dust in the air may reflect the light from the flash and appear as round white dots.
Not a malfunction. It is characteristic that the position and number of round spots changes with each shot.
Why is there no sound?
The volume on the TV is set to the minimum.
Adjust the volume on the TV.

The “Cannot edit, differing settings exist.” message appears.
You have attempted to splice videos that were recorded in different recording modes.
Select videos that were recorded in the same recording mode.
Why is a noise heard from a nearby TV or radio during battery recharging?
Electromagnetic waves are emitted from the AC adaptor.
Move the AC adaptor further away from the TV or radio when recharging the battery pack.
Why does the “CARD FULL.” or “Built-in Memory full.” message appear?
There is no more available memory on the card or in the camera’s built- in memory.
Delete unnecessary files, or use a card that has more memory available.
Misc.
Why does the “Card is protected” message appear?
The lock switch on the card is in the locked (protect) position.
Move the lock switch to the unlocked position.
Why can’t the camera be operated?
Remove the AC adaptor and the battery pack from the camera, wait a few minutes, then reinstall the battery pack and try again. A problem such as inability to record or play back occurs.
A temporary internal circuitry problem may be the cause.
The card contains files that were saved using a device other than this camera.
After saving your files to a different medium, format the card.
Question Answer Action

— You can charge the battery and connect to a TV to view your recordings when abroad. Why does the “ERROR OCCURRED. PLEASE TURN UNIT OFF, THEN TURN ON AGAIN.” message appear?
Can I use my camera abroad?
A problem has occurred within the camera or card.
Check the following items: 1 Remove the card and then install it again. 2 Remove the battery pack and then install it again. 3 Install a different card. If “ERROR OCCURRED. PLEASE TURN UNIT OFF, THEN TURN ON AGAIN.” still appears after performing the above steps, then take the camera to the dealer for service.
Misc.
Question Answer Action

Before taking your camera to the repair shop, check the following table for a possible solution to the problem.
Camera
Problem Cause Action Reference
No power. The battery pack is dead.
Recharge the battery pack, or replace with a fully charged battery pack. Or connect the AC adaptor.
The battery pack has not been inserted correctly.
Insert the battery pack correctly.
A blinking temperature warning icon is
The battery pack is too hot.
Wait for the battery pack to cool down.
shown, and the camera does not turn on.
The camera turns off by itself.
The camera has switched to the sleep mode.
Turn on the camera again. 33
page · Power

Problem Cause Action Reference
An image is not captured when the [O] button or [@] button is pressed.
The power is not turned on.
If the camera has switched to the sleep mode, turn on the camera before shooting. If the camera was turned off, press the power button to turn it on.
The maximum number of images that can be captured or the maximum video recording time has been reached.
Install a new card. 30
Delete the images that are not necessary.
The flash does not operate.
The flash mode is set to
Set the flash mode to k or m.
The battery pack is dead.
Recharge the battery pack, or replace with a fully charged battery pack. Or connect the AC adaptor.
page · 32, 33 · Shooting

Problem Cause Action Reference
The digital zoom does not work.
The digital zoom setting is set to .
Set the digital zoom setting to
There is noise in the captured image.
The ISO sensitivity setting is too high.
Set the ISO sensitivity to a lower setting. 43, 76
The icon appears, and shooting is not possible.
The camera’s internal temperature is high.
Discontinue shooting, and wait for the camera to cool down before using it again.
page · 45, 57 · Shooting

Problem Cause Action Reference
No playback image appears.
The camera is not set to the playback mode.
Set the camera to the playback mode. 37
The image is too dark.
The flash was blocked by a finger or other object.
Hold the camera correctly, and make sure the flash is not obstructed.
The subject was too far away.
Capture the image in the range of operation of the flash.
The subject was lit from behind.
Set the flash mode to m. 41
Use the exposure compensation function.
Use the spot Y light- measuring mode.
There is not enough light.
Adjust the ISO sensitivity setting.

Problem Cause Action Reference
The image is too bright.
The flash mode is set to m.
Select a flash mode other than m.
The subject was too bright.
Use the exposure compensation function.
The ISO sensitivity setting is incorrect.
Set the ISO sensitivity to =. 43, 76
The image is not in focus.
The subject is too close to the camera.
Capture the image with the subject within the appropriate distance/range. Select the correct focus setting for your needs.
43, 75 The focus setting is not correct.
The camera moved when the [O] button was pressed. (camera shake)
Hold the camera correctly and slowly press the [O] button halfway to lock the focus. Then press the [O] button all the way to capture the image.
The focus is not locked properly.
The lens is dirty.
Clean the lens. —

Problem Cause Action Reference
The colors of the images captured indoors are not correct.
This is due to ambient lighting.
Set the flash mode to . 41
The white balance setting is incorrect.
Set the white balance setting correctly.
A part of the image is missing.
The handstrap or a finger was blocking the lens.
Hold the camera correctly, and make sure the lens is not obstructed.
“No image” is shown.
There is no file in the built-in memory or in the installed card.
Play back after capturing images or making audio recordings.
During audio playback, there is no sound.
The play volume setting on the camera is too low.
Adjust the play volume. 46, 60, 70, 151
There is no color in the image. The image is distorted.
The TV output setting is not correct.
Select the correct TV output setting. 107, 110

Problem Cause Action Reference
No image or sound.
The camera is not correctly connected to the TV.
Follow the instructions to make the connection correctly. 149, 151
Set the TV input to the correct setting. The edge of the image is cut off.
The TV input setting is not correct.
This is a characteristic of the TV.
Not a malfunction. —
You cannot edit or rotate an image.
The protect mode is set.
Cancel the protect mode. 46, 87
The battery pack is not charging.
The AC adaptor is not connected properly.
Connect the AC adaptor correctly. 27
The “This file is protected” message appears and the file cannot be deleted.
You have attempted to delete a file that is protected from accidental erasure.
Set the protect setting for the file to UNLOCK.
The recording capacity is less than that shown in the tables on pages 181 to 184.
The recording capacity is less than the value specified for the card.
Depending on the card, the capacity may be less than the specified value. Please refer to the instructions that accompanied the card.
Misc.

Scene Mode restrictions

Color mode: Fixed at . Focus: Fixed at *. Exposure setting (HX-DC10): Fixed at @.
Color mode: Fixed at . Focus: Fixed at *. Exposure setting (HX-DC10): Fixed at @. White balance: Fixed at >.
Color mode: Fixed at . Focus: Fixed at *. Flash: Fixed at . ISO sensitivity: Fixed at =. Subject tracking: Fixed at . Exposure compensation: Fixed at ±0.0. Exposure (HX-DC10): Fixed at @. White balance: Fixed at >.
Color mode: Fixed at . Focus: Fixed at *. Subject tracking: Fixed at . Exposure (HX-DC10): Fixed at @.

Color mode: Fixed at . Flash: Fixed at . Focus: Fixed at *. Subject tracking: Fixed at . Exposure (HX-DC10): Fixed at @.
Night portrait Color mode: Fixed at . Focus: Fixed at *. Exposure (HX-DC10): Fixed at @.
Color mode: fixed at . Focus: Fixed at *. Flash: Fixed at . ISO sensitivity: Fixed at =. Exposure (HX-DC10): Fixed at @.
* In some cases, the shutter speed may decrease to 1/15 sec.
i The shutter speed will be faster than 1/30 sec. When recording a video...
i Even if the shutter speed is set to slower than 1/29 sec, the shutter speed

i The scene mode changes to when the focus is set to or -. i Even if the focus is set to or -, it changes to * when the scene mode is set to any setting other than .
About the status indicator when charging the battery pack When the status indicator is flashing fast or slow, it may indicate one of the following conditions.
Flashing at about 4-second intervals (2 seconds on, 2 seconds off): slower
i This may indicate that the battery has been fully discharged, or when the
battery temperature is high or low. The battery can be charged, but in some cases it may take several hours to fully charge it. i During normal charging, the status indicator flashes at about 2-second
intervals. However, even in this case, depending on the ambient conditions, the status indicator may flash at 4-second intervals until the battery is fully charged.
Flashing at about 0.5-second intervals (0.25 seconds on, 0.25 seconds off): faster
i The battery pack cannot be charged. Remove the battery pack from the
camera once and reinsert it, then begin charging it again. i Check to see that there is no dust, grime or foreign matter adhering to the
camera or battery, and make sure that the battery pack is correctly inserted. Turn off the camera before cleaning it of dust, grime or other foreign matter. i The battery pack or the ambient temperature is very high or very low. Try
charging the battery pack again after it has returned to a suitable temperature. If the battery pack still cannot be charged, it is possible that the camera, the battery pack or the AC adaptor may be defective.
Off:
i Charging is complete. i If the status indicator turns off even though charging is not completed, it is
possible that the camera, the battery pack or the AC adaptor may be defective.

k Carefully observe copyright laws Whatever you have recorded and created can be used for your personal entertainment only. Under copyright laws, other materials cannot be used without obtaining permission from the holders of the copyrights.
It is forbidden to copy the software accompanying this unit, or to reproduce it on a network, without permission. k Licenses
i SDXC Logo is a trademark of SD-3C, LLC. i HDMI, the HDMI Logo, and High-Definition Multimedia Interface are
trademarks or registered trademarks of HDMI Licensing LLC in the United States and other countries. i VIERA Link™ is a trademark of Panasonic Corporation. i Microsoft®, Windows® and Windows Vista® are either registered
trademarks or trademarks of Microsoft Corporation in the United States and/or other countries. i Microsoft product screen shot(s) reprinted with permission from Microsoft
Corporation. i IBM and PC/AT are registered trademarks of International Business
Machines Corporation of the U.S. i Intel®, Core™, Pentium® and Celeron® are the registered trademarks or
trademarks of Intel Corporation in the United States and other countries. i AMD Athlon™ is a trademark of Advanced Micro Devices, Inc. i iMovie and Mac are trademarks of Apple Inc., registered in the U.S. and
other countries. i PowerPC is a trademark of International Business Machines Corporation. i Other names of systems and products mentioned in these instructions are
usually the registered trademarks or trademarks of the manufacturers who developed the system or product concerned.
This product is licensed under the AVC patent portfolio license for the personal and non-commercial use of a consumer to (i) encode video in compliance with the AVC Standard (“AVC Video”) and/or (ii) decode AVC Video that was encoded by a consumer engaged in a personal and non- commercial activity and/or was obtained from a video provider licensed to provide AVC Video. No license is granted or shall be implied for any other use. Additional information may be obtained from MPEG LA, LLC. See http://www.mpegla.com

Do not use this unit near radio transmitters or high-voltage lines.
i If you record near radio
transmitters or high-voltage lines, the recorded pictures and/or sound may be adversely affected.
The camera and the SD card become warm during use. This is normal and is not a malfunction.
Make sure to use the supplied cords and cables. If you use optional accessories, use the cords and the cables supplied with them. Do not extend the cords and the cables.
Keep this unit as far away as possible from electromagnetic equipment (such as microwave ovens, TVs, video games etc.).
i If you use this unit on top of or
near a TV, the pictures and/or sound on this unit may be disrupted by electromagnetic wave radiation. i Do not use this unit near cell
Do not use insecticides or volatile chemicals near or on the camera.
i If the camera is sprayed with
such chemicals, its body may be marred and the surface finish may peel off. i Do not allow prolonged contact
phones because doing so may result in noise adversely affecting the pictures and/or sound. i Recorded data may be damaged,
with rubber or plastic products.
or pictures may be distorted, by strong magnetic fields created by speakers or large motors. i Electromagnetic wave radiation
When you use the camera in a sandy or dusty place such as a beach, do not let sand or fine dust get into the body and terminals of the camera, and keep the camera away from sea water.
generated by microprocessors may adversely affect this unit, disturbing the pictures and/or sound. i If this unit is adversely affected by
i Sand or dust may damage the
camera. (Care should be taken when inserting or removing the SD card.) i If sea water splashes on the
electromagnetic equipment and stops functioning properly, turn this unit off and remove the battery or disconnect AC adaptor. Then reinsert the battery or reconnect AC adaptor and turn this unit on.
camera, wipe off the water with a well-wrung cloth. Then wipe the camera again with a dry cloth.
About the camera

When carrying the camera, do not drop or bump it.
When disposing of or transferring the camera
i A strong impact can break the
i Using this camera's [FORMAT] or
camera’s casing, causing it to malfunction.
[DELETE] function only changes the file management information and does not completely delete the built-in memory data. It may be possible to recover (restore) data using commercially available software for that purpose. i When disposing of the camera or
Cleaning Before cleaning the camera, remove the battery and disconnect the power cord from the power outlet, and then wipe the camera with a soft dry cloth.
giving it to someone else, it is recommended that you physically format the built-in memory. To physically format the built-in memory, connect the AC adaptor to the camera, eject the card from the camera, select [FORMAT] from Option Setting Menu 2, and press the SET button. When the display to delete the built-in memory appears, select [DELETE DATA], press the SET button, and then follow the on- screen instructions. i Managing the data in the built-in
i For stubborn dirt, soak a cloth in
water, wring it out well, and use it to wipe the dirty surfaces. Then dry the surfaces with a dry cloth. i Use of benzine, paint thinner,
alcohol, or dishwashing liquid may alter the camera body or peel the surface finish. Do not use these solvents. i When using a chemical dust
cloth, use in accordance with the instructions that came with the cloth.
Do not use the camera for business purposes, such as for surveillance.
memory is the responsibility of the user. Panasonic does not accept any responsibility in the event that personal data is leaked.
i Continuous use could cause the
camera to overheat and break. i This camera is not for
commercial use.
When you are not going to use the camera for an extended time
i When storing the camera in a
cupboard or cabinet, it is recommended that you place a desiccant (silica gel) in with it.

Prepare spare batteries when going out.
The battery used in this camera is a rechargeable lithium-ion battery. It is affected by humidity and temperature, and the effect increases the more the temperature rises or falls. In high temperatures, the protection function may be triggered, preventing use.
i Prepare enough batteries to last
for 3 to 4 times the period you are planning to record for. Cold places such as a ski resort can shorten recording time.
If you drop the battery accidentally, check to see if the terminals are damaged.
i Installing a battery with damaged
Be sure to remove and store the battery after use.
terminals can damage the camera.
i If left inside the camera, a minute
amount of current continues to flow even if the camera is off. Keeping the camera in this state may cause the battery to over- discharge, making it impossible to use the battery even after it has been charged. i The battery should be stored in a
Do not throw an old battery into fire.
i Heating a battery or throwing it
into a fire may cause it to burst or explode.
If the battery does not last long even after charging, it has reached the end of its service life. Please purchase a new battery.
vinyl bag to prevent metal from contacting the terminals. i The battery should be stored in a
cool place free from humidity, with as constant a temperature as possible. (Recommended temperature: 0 °C to 30 °C (32 °F to 86 °F); recommended humidity: 40 %RH to 60 %RH) i Extremely high or low
About the AC adaptor
i If the temperature of the battery
is extremely high or extremely low, charging may take time or the battery may not be charged. i If the AC adaptor is used near a
temperatures will shorten the life of the battery. i Environments that are hot, humid
radio (especially during AM reception), it may generate noise in the radio. Keep the AC adaptor at least 1 meter (3.3 feet) from the radio. i When using the AC adaptor, it
or oily can rust the terminals and damage the battery. i If storing the battery for an
extended period of time, it is recommended that you charge it once a year, use it until it is depleted, and store it again. Remove any dust adhering to the battery terminals.
may generate an oscillating sound. This is normal.
About the battery

i When not using the AC adaptor,
be sure to disconnect it from the AC power outlet. i Do not allow the terminal
i Using this camera or a computer
to format an SD card only changes the file management information and does not completely delete the card data. i It is recommended that the SD
contacts in the battery compartment or the battery terminals to become dirty.
Connect the AC adaptor to a nearby AC power outlet where the power plug is easily accessible.
card be physically destroyed, or that this camera be used to physically format the card if giving it to someone else. To physically format the SD card, connect the AC adaptor to the camera and proceed as follows. Insert the SD card in the camera, select [FORMAT] from Option Setting Menu 2, and press the SET button. Next select [DELETE DATA], and press the SET button. When the display to delete data from the SD card appears, select [YES], and then follow the on- screen instructions. i Managing the data in the SD card
About the SD card
i The memory capacity indicated
on the SD card label is the total of the capacity for copyright protection and management, and that ordinarily used by the camera, computers, etc. i Do not subject the SD card to a
strong impact. Do not bend or drop it. i SD card data may be corrupted
or lost due to electrical noise or static electricity, or damage to the camera or the card. i When used for an extended
is the responsibility of the user.
i Do not allow grime, water or
period of time, the camera surface and the SD card may become rather warm, but this is not a malfunction.
foreign matter to adhere to the terminals on the back of the SD card. i Do not leave cards in the
Do not perform any of the following operations while the SD card is being accessed (the status indicator is lit red).
temperatures, such as under direct sunlight or near a heater h Humid or dusty places h Where exposed to extreme
h Remove the SD card h Turn the camera off h Insert or remove the USB
temperature changes (condensation may occur) h Where exposed to static
cable h Expose the camera to
electricity or electromagnetic waves i When not using, store the SD
vibrations or shock.
card in its case.

About the LCD monitor
i If the LCD monitor is dirty, wipe it
If you take a cold drink bottle from the refrigerator on a hot summer day and leave it for a while, you will find that water droplets have formed on the surface of the bottle. This is called “condensation”. If condensation forms on the camera, the lens will fog up and the camera may not work properly. Make every effort to ensure that condensation does not form, or if it does form, take appropriate action.
clean with a soft cloth such as an eyeglass cleaning cloth. i Do not scratch or press the LCD
monitor with strong force. i If you affix a screen protector
sheet to the LCD monitor, it may become difficult to see. i In an environment with extreme
temperature changes, condensation may form on the LCD monitor. Wipe it with a soft cloth such as an eyeglass cleaning cloth. i When the camera has become
i Condensation occurs when the
very cold, for example in cold surroundings, the LCD monitor will be slightly darker than usual immediately after the camera is turned on. Normal brightness will be restored when the camera's internal temperature rises.
ambient temperature or humidity has changed, as in the following: h When the camera is brought
inside from the cold (for example, a ski slope) to a warm room h When the camera is moved
from an air-conditioned car to outside h When a cold room has been
The LCD monitor is manufactured using high- precision technology; however, black spots may appear on the screen or some pixels (red, blue or green) may stay lit. This is normal and is not a malfunction. The effective pixel rate of the LCD monitor is maintained at a very accurate 99.99%, and dead or stuck pixels may occur in at most 0.01% of the pixels. Note that these pixel defects are not recorded with the captured images and are not a cause for concern.
warmed up quickly h When cool wind from an air
conditioner blows directly on the camera h After summer rain showers h When the camera is in a very
humid place where the air is thick with steam (for example, a heated swimming pool)
About condensation · Causes of condensation

Hint for using in extreme temperature changes For example, if you bring the camera into a heated room after using it on a ski slope, place the camera in a plastic bag, remove as much air as possible from the bag, then seal the bag. Leave the camera for about an hour to allow the temperature of camera to adjust to the ambient temperature of the room before using it.
Treating a foggy lens Remove the battery and AC adaptor, and leave the camera for about 1 hour. The cloudiness will dissipate naturally when the camera adjusts to the ambient temperature.

For SD cards, only the principal memory capacities are listed. The times indicated are rough approximations of possible continuous recording times.
When using a Mac for playback/ editing
Recording mode *1 *2
Picture size 1920× 1080 1920× 1080 1280× 720 1280× 720 640× 480 960× 540 Voice memo
4 GB 20 min 30 min 30 min 50 min 2 h 20 min 20 min 32 h
16 GB 1 h 50 min 2 h 10 min 2 h 10 min 3 h 30 min 9 h 50 min 1 h 20 min 131 h
64 GB 7 h 30 min 8 h 30 min 8 h 30 min 13 h 30 min 32 h 5 h 20 min 532 h
Approx.
25 sec 30 sec 30 sec 50 sec 2 min 15 sec 30 min
Approx.
25 sec 30 sec 30 sec 50 sec 2 min 15 sec 30 min
1 Favors image quality 2 Favors recording time * 1: HD image quality * 2: Conventional standard image quality i If recording for long periods, prepare batteries for 3 or 4 times the period
you wish to record for. (page 23) i The default recording mode is . i If a recording with a lot of action is recorded, the recordable time is less. i The recordable time may be less if recording mostly short videos.
SD card · Built-in memory

i When the recording mode setting is set to audio recording
recording exceeds about 5 hours, the recorded file is saved and the audio recording ends. For other recording mode settings, when the file size exceeds 4 GB, the recorded file is saved once, and the recording continues in a new file. (These 4 GB segments are automatically created. The recording session continues until you stop recording.) i For model HX-DC1, about 30 seconds before the 4 GB capacity is
reached, the countdown indication appears. When the countdown indication reaches “0”, the “SAVING” message appears and the file is saved, and then video recording continues in a new file. i Even with cards of the same capacity, the amount of data that can actually
be stored may differ depending on the card brand or type, recording conditions, etc. i The continuous recording time may differ depending, for example, on the
card type, capacity, efficiency, etc.

For SD cards, only the principal memory capacities are listed. The times indicated are rough approximations of possible continuous recording times.
k Photo recording (single-shot)
Recording pixels A 4608×3456 B 4608×3456 4608×2592
4 GB 400 700 900 16 GB 1900 2900 3900 64 GB 7900 12000 15900 Built-in memory
Approx.
HX-DC1
Recording pixels 6 4352×3264 7 4352×3264 4352×2448
4 GB 500 800 1000 16 GB 2200 3300 4300 64 GB 8900 13300 17600 Built-in memory
Approx.
SD card · SD card

1920×1080 G 1600×1200 1280×720 [ 640×480
4 GB 5200 5400 9900 23900 16 GB 21200 22100 40600 97600 64 GB 82300 82300 164700 247100
Approx.
110 110 200 500
Approx.
110 110 200 500
HX-DC1 C 4608×3456 : 4352×3264 t 1600×1200
4 GB 700 800 5400 16 GB 2900 3300 22100 64 GB 12000 13300 82300
Approx.
Approx.

Specifications may change without prior notice.
Power source: DC 5.0 V (when using AC adaptor) 3.7 V (when using battery) Power consumption: (When recording)
Video: Approx. 16 Mpx (4:3), Approx. 11.9 Mpx (16:9) Photo: Approx. 16 Mpx (4:3), Approx. 11.9 Mpx (16:9)
<HX-DC1> 1/2.33” MOS image sensor Total: Approx. 14,400,000 pixels (14.4 megapixels) Effective pixels
Video: Approx. 14.3 Mpx (4:3), Approx. 11.9 Mpx (16:9) Photo: Approx. 14.3 Mpx (4:3), Approx. 11.9 Mpx (16:9)
Digital Movie Camera

Lens: <HX-DC10> Auto iris, 5× power zoom Macro F3.5 to F3.7 (f=6.8 mm to 34.0 mm) 35mm equivalent: Video: 38.1 mm to 457.2 mm (4:3) 41.5 mm to 249.0 mm (60i/60p, 16:9) 41.5 mm to 498.0 mm (30p, 16:9) Photo: 38.1 mm to 190.5 mm (4:3) 41.5 mm to 207.5 mm (16:9) Minimum focus distance:
Normal: Approx. 10 cm (3.9”) (Wide)/Approx. 80 cm (31”) (Tele) Intelligent Auto macro: Approx. 1 cm (0.4”) (Wide)/Approx. 80 cm (31”)
<HX-DC1> Auto iris, 5× power zoom Macro F3.5 to F3.7 (f=6.8 mm to 34.0 mm) 35 mm equivalent Video (Wide): 39.2 mm to 235.2 mm (4:3) 40.1 mm to 240.6 mm (16:9) (Tele): 80.9 mm to 485.4 mm (4:3) 82.4 mm to 494.4 mm (16:9) Photo: 38.6 mm to 193.0 mm (4:3) 39.9 mm to 199.5 mm (16:9) Minimum focus distance:
Normal: Approx. 10 cm (3.9”) (Wide)/Approx. 80 cm (31”) (Tele) Macro: Approx. 1 cm (0.4”) (Wide)/Approx. 80 cm (31”) (Tele)
Zoom: <HX-DC10> (Photo) 5× optical zoom; (Video) 12× (30p)/6× (60i/60p) advanced zoom Digital zoom; 120× (video mode, 30p mode), 60× (video mode, 60i/60p mode), 50× (photo mode) <HX-DC1> (Photo) 5× optical zoom; (Video)12× double-range zoom Digital zoom; 60× (video mode), 50× (photo mode)
(Tele)

Minimum required subject illumination: <HX-DC10> Approx. 3 lx (1/15 sec in the scene mode low light setting), Approx. 9 lx (1/30 sec in the scene mode OFF setting) <HX-DC1> Approx. 5 lx (1/15 sec in the scene mode low light setting), Approx. 17 lx (1/30 sec in the scene mode OFF setting)

SD card: Read/Write (No copyright protection support) Built-in memory: Read/Write Hi-Speed USB (USB 2.0), micro USB terminal Webcam
Mass (weight): <HX-DC10> Approx. 161 g (Approx. 0.355 lbs.) (without battery and SD card) <HX-DC1> Approx. 163 g (Approx. 0.360 lbs.) (without battery and SD card)
Mass (weight) in operation: <HX-DC10> Approx. 179 g (Approx. 0.395 lbs.) (with battery and SD card) <HX-DC1> Approx. 181 g (Approx. 0.399 lbs.) (with battery and SD card)

Recording media: SD Memory Card (FAT12 and FAT16 system compliant) SDHC Memory Card (FAT32 system compliant) SDXC Memory Card (exFAT system compliant) Refer to page 18 for details concerning SD cards that can be used in this unit. Built-in memory: Approx. 80 MB (HX-DC10) Approx. 80 MB (HX-DC1)

: Approx. 17 Mbps (VBR) : Approx. 15 Mbps (VBR) : Approx. 15 Mbps (VBR) : Approx. 9 Mbps (VBR) : Approx. 3 Mbps (VBR) : Approx. 24 Mbps (VBR) Refer to page 181 for recordable times.

: 1920×1080/60i : 1920×1080/30p : 1280×720/60p : 1280×720/30p : 640×480/30p : 960×540/30p
k Video

Recording media: SD Memory Card (FAT12 and FAT16 system compliant) SDHC Memory Card (FAT32 system compliant) SDXC Memory Card (exFAT system compliant) Refer to page 18 for details concerning SD cards that can be used in this unit. Built-in memory: Approx. 80 MB (HX-DC10) Approx. 80 MB (HX-DC1)
: 4608×2592 pixels <HX-DC1> 6: 4352×3264 pixels 7: 4352×3264 pixels : 4352×2448 pixels <HX-DC10/HX-DC1>
: 1920×1080 pixels G: 1600×1200 pixels
: 1280×720 pixels [: 640×480 pixels Hi-Speed Burst
<HX-DC10> C: 4608×3456 pixels <HX-DC1>:: 4352×3264 pixels <HX-DC10/HX-DC1> t: 1600×1200 pixels Refer to page 183 for the number of recordable images.
Power source: AC 100 V to 240 V, 50/60 Hz AC input: 130 mA DC output: 5.0 V, 1.0 A
k Photo · AC adaptor

Accessory No. Figure Description
RP-SDN16GU1A RP-SDN08GU1A RP-SDN04GU1A RP-SDN02GU1A
Class 4 16 GB SDHC Memory Card Class 4 8 GB SDHC Memory Card Class 4 4 GB SDHC Memory Card Class 4 2 GB SD Memory Card
Class 10 64 GB SDXC Memory Card Class 10 48 GB SDXC Memory Card Class 10 32 GB SDHC Memory Card Class 10 16 GB SDHC Memory Card Class 10 8 GB SDHC Memory Card Class 10 4 GB SDHC Memory Card
VW-VBX070 Battery pack · HDMI mini cable

Please photocopy this form when placing an order.
Quantity Accessory # Price Each Description Total Price
Your State & Local Sales Tax
Check of Money Order enclosed (NO C.O.D.SHIPMENTS)
Make Check or Money Order Payable to: PANASONIC ACCESSORIES
(Please do not send cash)
Ship To: Mr. Mrs. Ms.
Phone#:
TO OBTAIN ANY OF OUR ACCESSORIES YOU CAN DO ANY OF
OR CALL PANASONIC’S ACCESSORY ORDER LINE AT 1-800-332-5368
[6 AM-6 PM M-F, PACIFIC TIME]
ACCESSORY ORDER OFFICE 20421 84th Avenue South Kent, WA. 98032

Panasonic Consumer Electronics Company, Division of Panasonic Corporation of North America One Panasonic Way, Secaucus, New Jersey 07094
Limited Warranty Limited Warranty Coverage (For USA and Puerto Rico Only) If your product does not work properly because of a defect in materials or workmanship, Panasonic Consumer Electronics Company (referred to as “the warrantor”) will, for the length of the period indicated on the chart below, which starts with the date of original purchase (“warranty period”), at its option either (a) repair your product with new or refurbished parts, (b) replace it with a new or a refurbished equivalent value product, or (c) refund your purchase price. The decision to repair, replace or refund will be made by the warrantor.
Product or Part Name Parts Labor
Camcorder 1 year 90 days
Rechargeable Batteries (defective exchange) 10 days Not Applicable
SD Memory Cards (defective exchange) 90 days Not Applicable
During the “Labor” warranty period there will be no charge for labor. During the “Parts” warranty period, there will be no charge for parts. This Limited Warranty excludes both parts and labor for non-rechargeable batteries, antennas, and cosmetic parts (cabinet). This warranty only applies to products purchased and serviced in the United States or Puerto Rico. This warranty is extended only to the original purchaser of a new product which was not sold “as is”. Carry-In or Mail-In Service To find a service center please visit http://www.panasonic.com/help or call 1-800-211-PANA (7262). When shipping the unit, carefully pack, include all supplied accessories listed in the Owners Manual, and send it prepaid, adequately insured and packed well in a carton box. When shipping Lithium Ion batteries please visit our Web Site at www.panasonic.com/BatteryHandling as Panasonic is committed to providing the most up to date information. Include a letter detailing the complaint, a return address and provide a daytime phone number where you can be reached. A valid registered receipt is required under the Limited Warranty.

IF REPAIR IS NEEDED DURING THE WARRANTY PERIOD, THE PURCHASER WILL BE REQUIRED TO FURNISH A SALES RECEIPT/ PROOF OF PURCHASE INDICATING DATE OF PURCHASE, AMOUNT PAID AND PLACE OF PURCHASE. CUSTOMER WILL BE CHARGED FOR THE REPAIR OF ANY UNIT RECEIVED WITHOUT SUCH PROOF OF PURCHASE. Limited Warranty Limits And Exclusions This warranty ONLY COVERS failures due to defects in materials or workmanship, and DOES NOT COVER normal wear and tear or cosmetic damage. The warranty ALSO DOES NOT COVER damages which occurred in shipment, or failures which are caused by products not supplied by the warrantor, or failures which result from accidents, misuse, abuse, neglect, mishandling, misapplication, alteration, faulty installation, set-up adjustments, misadjustment of consumer controls, improper maintenance, power line surge, lightning damage, modification, introduction of sand, humidity or liquids, commercial use such as hotel, office, restaurant, or other business or rental use of the product, or service by anyone other than a Factory Service Center or other Authorized Servicer, or damage that is attributable to acts of God. THERE ARE NO EXPRESS WARRANTIES EXCEPT AS LISTED UNDER “LIMITED WARRANTY COVERAGE”. THE WARRANTOR IS NOT LIABLE FOR INCIDENTAL OR CONSEQUENTIAL DAMAGES RESULTING FROM THE USE OF THIS PRODUCT, OR ARISING OUT OF ANY BREACH OF THIS WARRANTY. (As examples, this excludes damages for lost time, travel to and from the servicer, loss of or damage to media or images, data or other memory or recorded content. The items listed are not exclusive, but for illustration only.) ALL EXPRESS AND IMPLIED WARRANTIES, INCLUDING THE WARRANTY OF MERCHANTABILITY, ARE LIMITED TO THE PERIOD OF THE LIMITED WARRANTY. Some states do not allow the exclusion or limitation of incidental or consequential damages, or limitations on how long an implied warranty lasts, so the exclusions may not apply to you. This warranty gives you specific legal rights and you may also have other rights which vary from state to state. If a problem with this product develops during or after the warranty period, you may contact your dealer or Service Center. If the problem is not handled to your satisfaction, then write to the warrantor’s Consumer Affairs Department at the addresses listed for the warrantor. PARTS AND SERIVCE, WHICH ARE NOT COVERED BY THIS LIMITED WARRANTY, ARE YOUR RESPONSIBILITY.

Customer Services Directory (United States and Puerto Rico)
Obtain Product Information and Operating Assistance; locate your nearest Dealer or Service Center; purchase Parts and Accessories; or make Customer Service and Literature requests by visiting our Web Site at: http://www.panasonic.com/help or, contact us via the web at: http://www.panasonic.com/contactinfo You may also contact us directly at: 1-800-211-PANA (7262) Monday-Friday 9am-9pm, Saturday-Sunday 10am-7pm EST
For hearing or speech impaired TTY users, TTY: 1-877-833-8855
Accessory Purchases (United States and Puerto Rico)
Purchase Parts, Accessories and Instruction Books online for all Panasonic Products by visiting our Web Site at: http://www.pstc.panasonic.com Or, send your request by E-mail to: npcparts@us.panasonic.com You may also contact us directly at: 1-800-332-5368 (Phone) 1-800-237-9080 (Fax Only) (Monday-Friday 9am-9pm EST) Panasonic Service and Technology Company 20421 84th Avenue South, Kent, WA 98032 (We accept Visa, MasterCard, Discover Card, American Express, and Personal Checks)
For hearing or speech impaired TTY users, TTY: 1-866-605-1277
As of (March 2011)
Pages referenced in this manual — manufacturer, support and downloads.
What the fault codes shown on the display mean and how to clear them.
| Code | Meaning | Fix | |
|---|---|---|---|
| DC1 | Approx. 80 MB). When using this component, pay attention to the | p.8 |
Common problems, likely causes, and what to do.
| Problem | Possible cause | Remedy | |
|---|---|---|---|
| No power. | The battery pack is dead. | Recharge the battery pack, or replace with a fully charged battery pack. Or connect the AC adaptor. | p.164 |
| No power. | The battery pack has not been inserted correctly. | Insert the battery pack correctly. | p.164 |
| A blinking temperature warning icon is shown, and the camera does not turn on. | The battery pack is too hot. | Wait for the battery pack to cool down. | p.164 |
| The camera turns off by itself. | The camera has switched to the sleep mode. | Turn on the camera again. | p.164 |
| An image is not captured when the [O] button or [@] button is pressed. | The power is not turned on. | If the camera has switched to the sleep mode, turn on the camera before shooting. If the camera was turned off, press the power button to turn it on. | p.165 |
| An image is not captured when the [O] button or [@] button is pressed. | The maximum number of images that can be captured or the maximum video recording time has been reached. | Install a new card. | p.165 |
| An image is not captured when the [O] button or [@] button is pressed. | Delete the images that are not necessary. | p.165 | |
| The flash does not operate. | The flash mode is set to . | Set the flash mode to k or m. | p.165 |
| The flash does not operate. | The battery pack is dead. | Recharge the battery pack, or replace with a fully charged battery pack. Or connect the AC adaptor. | p.165 |
| The digital zoom does not | The digital zoom setting is | Set the digital zoom setting to | p.166 |
| work. There is noise in the captured image. | set to . The ISO sensitivity setting is too high. | . Set the ISO sensitivity to a lower setting. | p.166 |
| The icon appears, and shooting is not possible. | The camera’s internal temperature is high. | Discontinue shooting, and wait for the camera to cool down before using it again. | p.166 |
| No playback image appears. | The camera is not set to the playback mode. | Set the camera to the playback mode. | p.167 |
| The image is too dark. | The flash was blocked by a finger or other object. | Hold the camera correctly, and make sure the flash is not obstructed. | p.167 |
| The image is too dark. | The subject was too far away. | Capture the image in the range of operation of the flash. | p.167 |
| The image is too dark. | The subject was lit from behind. | Set the flash mode to m. | p.167 |
| The image is too dark. | Use the exposure compensation function. | p.167 | |
| The image is too dark. | Use the spot Y light- measuring mode. | p.167 | |
| The image is too dark. | There is not enough light. | Adjust the ISO sensitivity setting. | p.167 |
| The image is too bright. | The flash mode is set to m. | Select a flash mode other than m. | p.168 |
| The image is too bright. | The subject was too bright. | Use the exposure compensation function. | p.168 |
| The image is too bright. | The ISO sensitivity setting is incorrect. | Set the ISO sensitivity to =. | p.168 |
| The image is not in focus. | The subject is too close to the camera. | Capture the image with the subject within the appropriate distance/range. Select the correct focus setting for your needs. | p.168 |
| The image is not in focus. | The focus setting is not correct. | p.168 | |
| The image is not in focus. | The camera moved when the [O] button was pressed. (camera shake) | Hold the camera correctly and slowly press the [O] button halfway to lock the focus. Then press the [O] button all the way to capture the image. | p.168 |
| The image is not in focus. | The focus is not locked properly. | p.168 | |
| The image is not in focus. | The lens is dirty. | Clean the lens. | p.168 |
| The colors of the images captured indoors are not correct. | This is due to ambient lighting. | Set the flash mode to . | p.169 |
| The colors of the images captured indoors are not correct. | The white balance setting is incorrect. | Set the white balance setting correctly. | p.169 |
| A part of the image is missing. | The handstrap or a finger was blocking the lens. | Hold the camera correctly, and make sure the lens is not obstructed. | p.169 |
| “No image” is shown. | There is no file in the built-in memory or in the installed card. | Play back after capturing images or making audio recordings. | p.169 |
| During audio playback, there is no sound. | The play volume setting on the camera is too low. | Adjust the play volume. | p.169 |
| There is no color in the image. The image is distorted. | The TV output setting is not correct. | Select the correct TV output setting. | p.169 |
| No image or sound. | The camera is not correctly connected to the TV. | Follow the instructions to make the connection correctly. | p.170 |
| No image or sound. | The TV input setting is not correct. | Set the TV input to the correct setting. | p.170 |
| The edge of the image is cut off. | This is a characteristic of the TV. | Not a malfunction. | p.170 |
| You cannot edit or rotate an image. | The protect mode is set. | Cancel the protect mode. | p.170 |
| The battery pack is not charging. | The AC adaptor is not connected properly. | Connect the AC adaptor correctly. | p.170 |
| The “This file is protected” message appears and the file cannot be deleted. | You have attempted to delete a file that is protected from accidental erasure. | Set the protect setting for the file to UNLOCK. | p.170 |
| The recording capacity is less than that shown in the tables on pages 181 to 184. | The recording capacity is less than the value specified for the card. | Depending on the card, the capacity may be less than the specified value. Please refer to the instructions that accompanied the card. | p.170 |
Owners and our team usually reply within a day — and your question helps the next person too.
Be the first to ask — other owners or our team will answer.


