


Operating Instructions
Model No. SV-PT1PP

Before attempting to connect, operate or adjust this product, please read these instructions thoroughly.

Dear Customer, We would like to take this opportunity to thank you for purchasing this Panasonic SD Media Storage. Please read these Operating Instructions carefully and keep them handy for future reference.
THE SOCKET OUTLET SHOULD BE INSTALLED NEAR THE EQUIPMENT AND SHOULD BE EASILY ACCESSIBLE.
Carefully observe copyright laws. Recording of pre-recorded tapes or discs or other published or broadcast material for purposes other than your own private use may infringe copyright laws. Even for the purpose of private use, recording of certain material may be restricted.

Matsushita Electric Corporation of America One Panasonic Way, Secaucus, NJ 07094 Support Contact: Panasonic
Consumer Electronics Company 1-800- 272-7033
This device complies with Part 15 of the FCC Rules. Operation is subject to the following two conditions: (1) This device may not cause harmful interference, and (2) this device must accept any interference received, including interference that may cause undesired operation.
This Class [B] digital apparatus complies with Canadian ICES-003. Cet appareil numérique de la classe [B] est conforme à la norme NMB-003 du Canada.

FCC Caution: To assure continued compliance, follow the attached installation instructions and use only shielded interface cables with ferrite cores when connecting to computer or peripheral devices. Any changes or modifications not expressly approved by the party responsible for compliance could void the user’s authority to operate this equipment.

Before opening the CD-ROM package, please read the following.
End User License Agreement You (“licensee”) are granted a license for the Software defined in this End User License Agreement (“Agreement”) on condition that you agree to the terms and conditions of this Agreement. If Licensee does not agree to the terms and conditions of this Agreement, promptly return the Software to Matsushita Electric Industrial Co., Ltd. (“Matsushita”), its distributors or dealers from which you made the purchase.
Article 1 License Licensee is granted the right to use the software, including the information recorded or described on the CD-ROM, instruction manuals, and any other media provided to Licensee (collectively “software”), but all applicable rights to patents, copyrights, trademarks and trade secrets in the Software are not transferred to Licensee.
Article 2 Use by a Third Party Licensee may not use, copy, modify, transfer or allow any third party, whether free of charge or not, to use, copy or modify the Software, except as expressly provided for in this Agreement.
Article 3 Restrictions on Copying the Software Licensee may make a single copy of the Software in whole or in part, in machine- readable form, solely for back-up purpose. Licensee must include, in such copy of the software, the same copyright notice as included in the software.
Article 4 Computer Licensee may use the Software only on one computer, and may not use it on more than one computer. The Software may not be transferred or transmitted to, or shared with, or accessed by other computers over or through computer networks and/or by other means.
Article 5 Reverse Engineering, Decompiling or Disassembly Licensee may not reverse engineer, decompile, or disassemble the Software, except to the extent either of them is permitted under law or regulation of the country where Licensee resides. Matsushita, or its distributors or dealers will not be responsible for any defects in the Software or damage to Licensee caused by Licensee’s reverse engineering, decompiling, or disassembly of the Software.
Article 6 Indemnification The Software is provided “AS-IS” without warranty of any kind, either expressed or implied, including, but not limited to, warranties of non-infringement, merchantability and/or fitness for a particular purpose. Further, Matsushita does not warrant that the operation of the Software will be uninterrupted or error free. Matsushita or any of its distributors or dealers will not be liable for any damage suffered by Licensee arising from or in connection with Licensee’s use of the Software.
Article 7 Export Control Licensee agrees not to export or re-export to any country the Software in any form without the appropriate export licenses under regulations of the country where Licensee resides, if necessary.
Article 8 Termination of License The right granted to Licensee hereunder will be automatically terminated if Licensee contravenes any of the terms and conditions of this Agreement. In this event, Licensee must destroy the Software and related documentation together with all the copies thereof at Licensee’s own expense.


G This unit is a compact, lightweight portable media storage unit. G The generous 5 GB HDD allows ample storage for your still images. G Stored images can be viewed and edited (delete, copy, etc.)
on a TV at home or elsewhere. G This unit can serve as an external drive by connecting the USB
port to your PC. G Still images can be played back from a variety of cards *1 and copied
*1 Each type of card requires a compatible adaptor.
PC Card HDD (RP-PH005A)
PC Card HDD Case (LSFC0020)

A lithium ion/polymer battery that is recyclable powers the product you have purchased. Please call 1-800-8-BATTERY for information on how to recycle this battery.

ScanDisk (“CheckDisk” for Windows 2000/XP users) • Do not subject the PC Card HDD to excessive vibration or strong impacts. Also, do not turn off the power supply or remove the card from the unit while it is in operation, otherwise data may be corrupted. If a problem occurs, immediately use the computer’s ScanDisk/CheckDisk function to check the media contents. (It takes several hours for ScanDisk/CheckDisk to finish checking the PC Card HDD.) It is recommended that you then make a backup of the data on the media. See page 42 on how to connect the unit to a computer. Refer to your computer manual regarding ScanDisk/CheckDisk function.

The following types of card can be used in this unit : PC Card Slot
Digital cameras that are compliant with DCF specifications use folders with a specific structure. The following diagram shows an example of the folder structure. If these folders are deleted, or if a folder name or file name is changed, the data may no longer be readable by a digital camera.
DCIM Folder The digital camera creates this folder automatically. 100_PANA Folder Folder names consist of a 3-digit folder number which is followed by five arbitrary characters. Digital camera images are stored within these folders. P1000001.JPG: DCF File File names consist of four arbitrary characters followed by a 4-digit file number. DCF files are image files (normally JPEG files) that have been taken by a digital camera. (Other file extensions such as TIF or THM may also be used.) MISC Folder The MISC folder contains the DPOF configuration files that add print/slide information to the images.
100_PANA P1000001. JPG P1000002. JPG P1000003. JPG
101_PANA
P1010001. JPG P1010002. JPG
MISC
SD Memory Card

Before Use
Copying: Memory Card -> PC Card HDD When copying from a Memory Card to the PC Card HDD, create a folder entitled “CARD****” for each copy and save Memory Card data into this folder. When BACKUP is ON, the “CARD****” folder mentioned above is created in the “BACKUP” folder of the PC Card HDD, and Memory Card data is copied into this folder. Thus, normal PC Card HDD available space is reduced by half. See page 20 on how to turn the BACKUP function ON and OFF.
Memory Card PC Card HDD
ROOT
CARDA001
MISC
MISC
DCIM
DCIM
ROOT
CARDA002
PHOTO
PHOTO
ROOT
CARDA003
MISC
MISC
Delete * Even after deletion, the data will be retained in the [BACKUP] folder.
DCIM
AAA. JPG BBB. TXT CCC. EXE
AAA. JPG BBB. TXT CCC. EXE
BACKUP
CARDA001
CARDA002
CARDA003
See next page on how to copy from PC Card HDD to a Memory Card.

Copying: PC Card HDD -> Memory Card The folder entitled “CARD****” will disappear and data will be copied according to the file structure rules.
Memory Card PC Card HDD
CARDA001
ROOT
MISC
MISC
DCIM
DCIM
CARDA002
ROOT
PHOTO
PHOTO
CARDA003
ROOT
MISC
MISC
DCIM AAA. JPG BBB. TXT CCC. EXE
DCIM
AAA. JPG BBB. TXT CCC. EXE
CARDA001
CARDA002
CARDA003 Data files will not be copied.
Copying: Memory Card <-> PC Card When copying from a PC Card to a Memory Card or vice versa, the data can be copied directly.
ROOT
MISC
MISC
DCIM
DCIM
Memory Card · PC Card

Before Use
Copy mode is used to copy data from the inserted card to another card. In addition, you can press MENU to carry out operations such as checking the card storage capacity, making backup and TV format settings and formatting cards.

TV Mode (pp. 24~41) In TV mode, you can connect the unit to a TV and then carry out playback and edit operations (such as copying, deleting, protecting, zooming, rotating and enhancing colors) for the data stored on a card while viewing the data on a TV screen. * Only JPG, TIF, and MOV type files can be displayed. Other files require the unit to be in PC Mode.

Video Cable Memory Card PC Card HDD (Or other card)
In PC mode, the unit is connected to a computer using a supplied USB cable, allowing the unit to function as an external disk drive. The data on the card inside the unit can then be edited (copied and deleted, etc.), and the accessory software application can be used to create files for presentations.


1 Insert strap end loop into gap of Attachment Pin.
2 Thread opposite end through the end loop and pull strap tight in the direction of arrow.

1 Open the carrying case.

2 Insert this unit into the lower compartment.
3 Insert the PC Card HDD case into the upper compartment with the “PC Card HDD” mark facing upward.
4 Close the carrying case.

The battery pack can be recharged right inside this unit using the supplied AC adaptor. Unit power must be turned OFF before recharging. Charging will stop if unit power is turned on. 1 Slide the battery cover slightly to the right and swing open.
2 Insert the battery (labeled side up) all the way into the battery compartment.
3 Close the cover.
4 Connect the DC plug of the AC adaptor to unit’s DC IN terminal, then the AC adaptor into a wall outlet. • The POWER Lamp flashes during recharging.
5 Recharge is complete when POWER Lamp goes out. • A fully charged battery, given a temperature of 20 °C with 60 % humidity, will give about 80 minutes of operating time. (Operating time may depend on the conditions of usage.)
Catch

Set STANDBY to OFF when inserting or removing a Card.
SD Memory Card Slot
To remove Card : Open card door. Press in lightly on card then release.
1 Push up slightly on card door to swing open.
2 Insert the Memory Card (labeled side up, cropped corner right) and hold in place until you hear a click.
3 Close the lid.
1 Slide the lever to open the cover.
To remove Card : Press EJECT TAB twice.
2 Insert the PC Card HDD or PC Card all the way into the slot.
3 Close the cover.
cropped corner

In case of a power outage, the unit utilizes the supplied battery as a backup in order to protect the unit and the card data. If you are using the AC adaptor, insert a sufficiently charged battery before turning on the power. The unit cannot be used if only the AC adaptor is used.
To turn this unit off : Press STANDBY for approx. 2 seconds.
HDD SAFETY (ON/OFF)
COPY TV MODE
USB S/V OUT DC IN
HDD stops and all operations are interrupted.
COPY MODE BATT.
COPY MODE BATT.
When the BATT. and the battery icon start flashing, all buttons, except power off, are inoperable. Connect the AC adaptor or recharge the battery. If the battery completely runs down during copying, the copying is stopped and power is shut off. It may not be possible to play back the data that was being copied at this time. It is advisable to fully charge the battery before using the unit. (p. 16)
HDD SAFETY Detection

In Copy mode, data can be copied from one card to another. You can also check card storage capacity, make backups, set TV formats, and format cards. If unit is on battery power only, power shuts off automatically if you perform no operation for 5 minutes to conserve battery.
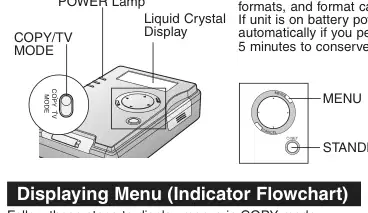
Follow these steps to display menus in COPY mode.
1 Set COPY/TV MODE to “COPY”. 2 Insert a Card. (p. 17) 3 Turn on this unit. (p. 18)
When using battery When using AC adaptor

If a button is not pressed within 10 seconds.
(When a PC Card and SD Memory Card are inserted)
* When HDD SAFETY is ON and is activated (p. 18), the PC Card HDD cannot be verified, so always place unit on flat, level surface.
– Note – • Any cards that utilize adaptors other than the accessory PC Card HDD adaptor are displayed as “PC CARD”.
POWER Lamp


M
E
N
U
MENU
CANCEL
CA
N C
E
/SET
STANDBY/ SET
PC Card HDD (PC Card) Slot

To make other settings: Press MENU to return to Step 2.
Liquid Crystal Display · Memory Card Slot · (Example)

All the data can be copied from a Memory Card to the PC Card HDD (PC Card) in a single operation. Also, data within specific folders can be copied from the PC Card HDD (PC Card) to a Memory Card by selecting the desired folders to be copied. Be sure both a PC Card HDD (PC Card) and a Memory Card are inserted.
1 Display the Copy menu. (p. 19) • Press MENU to display the menu. (p. 20)
(When a PC Card HDD and SD Memory Card are inserted)
2 Press to select the desired menu item, then press SET.
If “HDD -> SD”, press , then SET to select a folder.
3 Press to select “YES”, then press SET. • After menu selection is made, card capacity is checked. If “NO CAPACITY” is displayed, Copy menu will reappear. Replace card with one containing sufficient space, then repeat these steps from the beginning.
Copy completed! • Press any button redisplays Copy menu in Step 1.
To cancel copy in progress: 1. Press CANCEL.

Normally you need not format (initialize) the SD Memory Card and PC Card HDD. An SD Memory Card that has been formatted to FAT32* specifications cannot be used, so transfer any important data to a PC, then format the card on this unit.
Format the SD Memory Card 1 Display the menu. (p. 19) • See page 20 for menu details.

4 Press to select “YES”, then press SET. • To cancel format, select “NO”.
* If an SD Memory Card formatted to FAT 32 specifications is inserted, “CAN’T USE FAT32 SDCARD” will be displayed followed by a format confirmation message.

* SD Memory Cards formatted under Windows XP may be FAT 32 format because FAT 32 is the default format selected for this OS. This unit and many digital camera types do not support FAT 32. A FAT 32 formatted SD Memory Card should be reformatted on this unit or a digital camera.

1 Display the menu. (p. 19) • See page 20 for menu details.
2 Press to select “HDD-FORMAT”, then press SET.
4 Press to select “YES”, then press SET. • To cancel format, select “NO”.
Caution regarding PC Card HDD Formats

You can view DSC photos and PC presentation files on a TV when it is connected to this unit. Refer to next page for available functions in TV Mode.
5 Insert the battery and connect the AC adaptor. (p. 16) 6 Turn on this unit. (p. 18) • If unit is on battery power only, power shuts off automatically if no operation is done for 5 minutes to conserve battery.
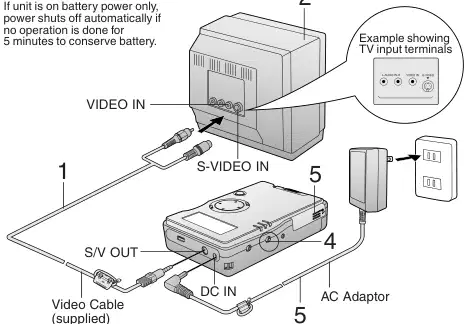

Initial Screen The screen below is displayed when a card is inserted. If “NO CARD” appears, confirm that a card is correctly inserted.
Folder Hierarchy Indicator • When folders are opened within the index, the number of these icons will increase to indicate the level within the hierarchy.
Card Selection Choose card type, HDD/PC Card • SD Memory Card. Press to select card for display, then press SET.
IMAGE DISPLAY Image files stored on the card are displayed in the Index Area. They can be searched by image date. (p. 27) Images can be shown full screen, and you can use the zoom, rotate, add color effects, image information, and delete functions. (pp. 38~41)
ALBUM Index area images can be displayed in a 6 or 9-image album screen. (p. 28) Also, when a single image is selected, you can use the functions as described in IMAGE DISPLAY, above.
SLIDE SHOW You can set screen transition effects and speeds for a Slide Show. (pp. 29~31)
Folder/File Name Area • Names of selected files and folders are displayed here.
PRESENTATION This function allows presentations to be performed. (pp. 32, 33) Using the included JPEG Addin Software, PowerPoint data created on a PC can be converted into JPEG files and used for presentations. (pp. 46, 47)
Message Area • Operation prompts are displayed here.
Index Area • Folders and files are displayed here.
EDIT You can delete, copy, and protect image files. (pp. 34~37)
Page Number


E
N
U
MENU
CA
N C
E
/SET
SET
Folders and files that are displayed in the Index Area (p. 25) are described in the table below. Refer to page 10 for details on the folder structure.

TIFF files take longer to be displayed in full screen and Slide Show. In some cases, only TIFF icons appear in index or album displays. Some files may not be displayed, or may be displayed on a smaller scale.
These are files with moving images or still images with audio content. Only the first frame of a moving image is displayed. Rotated images cannot be saved.
Protected folders and files (p. 36) cannot be deleted.

Viewing Images in the Index 1 Press to select the card used, then press SET. 2 Select “IMAGE DISPLAY”, then press SET. • Index Area is displayed with cursor at first position. 3 Press to scroll to other index pages if necessary.
To view folder contents: Press to move cursor to a folder, then press SET.
Using the Sub Menu 1 Move cursor over the Index Area and press MENU. 2 Press to select the item (refer to the section below), then press SET.
SEARCH (DATE) This searches through the folders and files in the Index Area by date. To search for files within folders, display the images within the folder and then start the search.
EXIT Returns the index display to the first level of the hierarchy and moves the cursor to the Main Menu.
START DATE JAN / 01 / 2002
: SELECT
[SET] : GO
RETURN Returns the display back one step in the hierarchy.
a Press to select the year, then press to move the cursor to the next item. Now repeat to select month and day. b Press SET.
RETURN TO MENU Returns the cursor to the Main Menu.


Images in the index can be displayed on a TV screen in groups of 6 or 9 at a time, like a photo album.

To go to next or previous pages: Press for next page. Press for previous page.
To return to Index Area:
a Press MENU.
press SET. • To display an image in full screen, select “FILE SELECT,” then move cursor over the image and press SET. (p. 38)
(When “6 IMAGES” is selected.)
When viewing images in Album, Full Screen (p. 38) or Slide Show (p. 29) mode on an HDTV monitor, the monitors “Fill-Mode” may affect the image. If brightness is compromised, follow the steps below.
1 Select Album display, then press MENU. 2 Press to select “WALL BRIGHTNESS”, then press . 3 Press to select “GRAY 1”, “GRAY 2” or “GRAY 3”, and then press SET. • If using a normal TV, use the “BLACK” setting.


You can display selected images as a Slide Show in a variety of transition effects and speeds.

E
N
U
MENU
CANCEL
CA
N C
E
/SET
SET


To stop the Slide Show: Press CANCEL.


The SLIDE SETUP setting allows you to specify which images to display in a Slide Show. (p. 29)

E
N
U
MENU
CA
N C
E
/SET
SET
Specify the images in the index to be included in the Slide Show. If you wish to include all images in the index, this procedure is not necessary.


blind fashion. 4 Press to return to “SLIDE SETUP”.
Setting Screen Transition Speed
1 Do Steps 1~3 on page 29. In Step 3, press to select “SELECT”. 2 Press to select “SPEED”, then press SET. 3 Press for desired transition speed, then press SET. • FAST: images change every
10 seconds. * If larger file size images are included, display takes longer and transition time may exceed the selected setting. 4 Press to return to “SLIDE SETUP”.

Microsoft PowerPoint data created on a PC can be converted into JPEG files using the supplied JPEG Addin Software and then presented on the TV. See pages 46 and 47 on how to create presentation files.

E
N
U
MENU
CA
CANCEL
N C
E
/SET
SET

To display the next slide: Press . • Pressing displays previous slide.
To exit presentation: Press CANCEL.

Selecting Presentation Content You can select specific slides from the index to be displayed. If you wish to include all images in the index, this procedure is not necessary.


to menu. To unselect images: Press to select “RELEASE”, then press SET. • The selected images are returned to the their original state.


You can delete images from a card, copy data from one card to another, and protect data from being deleted accidentally.

E
N
U
MENU
CA
N C
E
/SET
SET
Deleting Images (DELETE)
1 Press to select “EDIT”, then press SET.
2 Press MENU. • The Menu screen will be displayed.
For “select delete”, follow “How to Select Images” instructions on page 37.

Copy data from one card to another. A card to receive copied data must be inserted.
1 Press to select “EDIT”, then press SET.

2 Press MENU. • The Menu screen will be displayed.
3 Press to select “COPY”, then press to move the cursor to the right.
displayed in the index. * When a folder is copied, all contents including non-image files are copied. • To select a file within a folder, it must first be displayed in the index. (p. 27)
For “select copy”, follow “How to Select Images” instructions on page 37.

Protecting Images (PROTECT) Important file data can be protected from accidental deletion.
1 Press to select “EDIT”, then press SET.

2 Press MENU. • The Menu screen will be displayed.
3 Press to select “PROTECT”, then press to move the cursor to the right.
displayed in the index. * When a folder is protected, all contents, including non-image files, are protected.
For “select protect”, follow “How to Select Images” instructions on page 37.


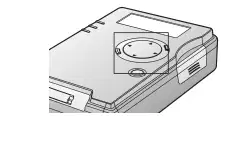
E
N
U
MENU
CA
N C
E
/SET
SET
How to Select Images
Select image files for the DELETE, COPY, and PROTECT functions. The example screens below depict deleting an image.
2 Press MENU when image selection is finished. • Pressing MENU again resumes selecting operation.
return to menu.

When in image display or album mode, you can view an image full screen. Also, you can use zoom, rotate, add color effects, display image information, and delete the image.

2 Press to select a file, then press SET. • Image is displayed in full screen.
To display the next image: Press to display next image in the current index. • Press for previous image.

3 Press to select “FILE SELECT” then press SET.
To display the next image: Press to display next image in the current album. • Press for previous image.

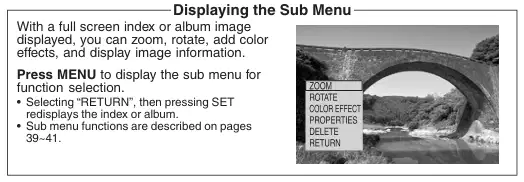
With a full screen index or album image displayed, you can zoom, rotate, add color effects, and display image information.
Before operating any function, press MENU for Sub Menu.
Images can be displayed 2 or 4 times their normal size.

To return image to normal size: Select “RETURN” from the zoom menu, then press SET. • Repeat above if image is X4.
menu, then press SET. b Press to select “YES”, then
press SET.


E
N
U
MENU
CA
N C
E
/SET
SET
Rotating an Image (ROTATE)
1 Press to select “ROTATE” from the sub menu, then press SET. (p. 39)

2 Press to select “LEFT” or “RIGHT”, then press SET. • LEFT: image is rotated 90°
counterclockwise. • RIGHT: image is rotated 90° clockwise.
To save rotated images: Select “SAVE” from the rotate menu, then press SET. • Image will hereafter be displayed in the saved form.

(When “LEFT” is selected)

You can change the image color.

1 Press to select “COLOR EFFECT” from the sub menu, then press SET. (p. 39)
TV Mode
File name, date, and size are always displayed on all full screen images.

To cancel properties display: Repeat the above procedure.

By connecting this unit to a PC via the supplied USB cable, it can be utilized as an external drive.

Setup (Connections)


If using Windows Me: Depending on the PC, a message window, such as the one on the right, may appear during automatic recognition. If so, click [Browse], select the c:\windows\options\install folder from the drop down list, then click [OK]. Afterwards, confirm that path “c:\windows\options\install” appears in the “Copy to (C)” box in the top window, then click [OK].


When this unit is connected to a PC using the USB Cable provided (p. 42), it will be recognized as a Removable Disk. You can then copy, move, delete, and display files on this unit the same as with a normal disk drive.

E
N
U
CA
N C
E
/SET
SET
File Operations
1 Make connections following “Setup (Connections)” steps on page 42.
2 Select and change to another card. • With a USB cable connected, selecting another card will terminate communication with the PC. Do Steps 1~4 of “Disconnecting Unit from PC” on page 45, then proceed with the following operation.
Press to select “SD” or “HDD (PC Card)”, then press SET. • While the SD or HDD lamp is flashing, “CANNOT CHANGE SLOT” is displayed and operation is not possible. After the lamp goes out, press SET again.


1 Confirm SD and HDD Lamps are out and card is not being accessed. 2 Click on
4 Click on [OK]. • The USB cable can now be safely disconnected and the unit removed.
5 Disconnect the USB Cable from the PC.
To change the Card: Do Steps 1~4 of “Disconnecting Unit from PC” above, then change the card following step 2 on page 44.
To replace the Card: Do Steps 1~5 of “Disconnecting Unit from PC” above. Then, after first turning unit power off, replace the card following the procedure on page 17.
To turn unit power off while PC is connected: Do Steps 1~5 of “Disconnecting Unit from PC” above, then turn unit power off.

The included CD-ROM contains a “JPEG Addin Software” application which converts Microsoft PowerPoint data created on a PC into JPEG files and creates a presentation folder (p. 47) for TV screen presentation (pp. 32, 33).
1 Turn on the PC and start Windows.
2 Load included CD-ROM into PC CD-ROM drive. • CD-ROM folder opens automatically. If not, open from [My Computer].


4 Click on [Next].
5 Confirm installation destination, then click on [Next]. • To install into another folder, click on [Browse] and select a folder.

8 Start PowerPoint confirming that the icon, right, is added.


For Windows XP, log in with the same username used when software was installed.
If the unit device cannot be found on the PC, it may be due to incorrect device driver installation. Reinstall the driver as follows.

1 Right-click the My Computer icon, and then select “Properties”. • The “System Properties” screen will be displayed.
2 Click the “Device Manager” tab.
3 Select “Panasonic SD Media Storage USB”, then click [Remove].

4 Click on [OK].

5 Click on [Refresh]. • The Add New Hardware Wizard will start. Refer to page 43 for details on installing the driver.

When using a USB connection, place the unit device on a flat, level surface. If the HDD SAFETY switch is activated, carry out the following remedies. G For Windows 98SE/Me If the HDD SAFETY Detection Switch is activated while a PC Card HDD is being accessed, the PC screen goes blue and the following message appears.
Error Reading Disk in Drive**:
Please Insert Disk *** With Serial Number *** in Drive *:
Press ENTER for OK or ESC to Cancel : OK
a “SAFETY MODE PUT IT DOWN” appears on the unit LCD. Make sure that the
unit is always placed on a flat, level surface. b When the unit LCD changes to “SD” or “HDD” selection screen, and the HDD Lamp
G For Windows 2000/XP If the HDD SAFETY Detection Switch is activated while the PC Card HDD is being accessed in PC mode, the following message may appear. [ For Windows 2000 ] [ For Windows XP ]
Place the unit on a flat, level surface, and then click [OK], [Cancel], [Try Again] or [Continue]. • Processing will be interrupted, so repeat the operation.

Indications Condition
PLEASE INSERT BATT.
Insert battery. Power will not turn on without battery inserted.
Insert the card.
No data is stored on the card.
An error has occurred during initialization of the HDD/PC Card. Turn off the power, then reinsert the card. If error occurs again, format the card (p. 23), then reinsert it. If error still occurs, card may be damaged.
An error occurred during card formatting. Re-insert card and format again. (pp. 22, 23)
Insufficient free space on the copy destination disk. Delete unnecessary files, or insert a card with sufficient free space.
The card is protected. Cancel the protection to resume operation. Refer to documentation provided with the card.
An error occurred during copying. Press any key, then reset the unit (p. 52), or turn the power off, then back on again and repeat copying operation.
HIT ANY KEY
The HDD SAFETY Detection Switch has activated and the HDD has stopped for protection. Place the unit on a flat, level surface.
PUT IT DOWN
CAN’T USE FAT32 SDCARD
SD Memory Cards formatted to FAT32 specifications cannot be used. “Format?” will be displayed. Transfer desired files to PC, then format the card. (pp. 22, 23)
Secure data files (audio files that include copyright restrictions) cannot be copied.
The battery is spent. Copy operation will stop and power will turn off. Recharge the battery.
COPY CANCEL
The battery is spent. The copy operation will be canceled and the power will turn off. Then recharge the battery.
PC CARD CAN’T FORMAT
The PC Card cannot be formatted.

Indications Condition
CONNECT AC
Connect the AC adaptor.
Selection cannot be changed between a PC Card HDD/PC Card and an SD Memory Card during data transfer between the unit and a PC. Wait for transfer to finish, then make your selection.
INSERT BATT.
Insert the battery.
Data transmission was interrupted. Disconnect the USB cable. Check that the battery and AC adaptor are connected correctly, then reconnect the USB cable.
MODE CHANGE
The mode is being changed. Please wait a moment.
POWER OFF PLEASE WAIT
After processing is finished, the power will turn off.
The HDD SAFETY Detection Switch has activated and the HDD has stopped for protection. Place the unit on a flat, level surface.
PUT IT DOWN
TV Mode (TV Screen Display)
Indications Condition
NO CARD
Insert a card.
There is no data on the card or in the folder.
An error has occurred during HDD/PC Card initialization. Turn power off, then reinsert the card. If error is repeated, format the card (p. 23) and reinsert it. If error persists, card may be damaged.
For Your Information
FORMAT ERROR
An error occurred during formatting of the card. Re- insert the card and then reformat it. (pp. 22, 23)
There are no JPEG or TIFF files in the folder that can be displayed.
Insufficient free space on the copy destination disk. Delete unnecessary files, or insert a card with sufficient free space.
COPIED EXCEPT
Secure data files (audio files that include copyright restrictions) cannot be copied.
(Continued on next page.)

Indications Condition
COPY ERROR DELETE ERROR PROTECT ERROR
The specified operation did not execute correctly. Reset the unit (see below), or turn power off, then back on and repeat the operation.
An image file could not be displayed. The file is corrupt or the format is incompatible.
The HDD SAFETY Detection Switch has activated and the HDD has stopped for protection. Place the unit on a flat, level surface.
PUT UNIT DOWN
THIS FILE ISN’T EXIF CAN’T SAVE THIS FILE
Rotated images cannot be saved.
SD Memory Cards that have been formatted to FAT32 specifications cannot be used.
Folders cannot be selected for Slide Show. Open a folder, then select files.
The battery is spent. Operation will be canceled and power will turn off. Recharge the battery.
COPY CANCEL
The battery is spent. Copy operation will stop and power will turn off. Recharge the battery.
The operation timed out due to no selection during a Slide Show, presentation, copying, deleting or file protecting operation. Repeat the selection.
Battery level is getting low. Turn off the power and recharge the battery.
DELETE EXCEPT PROTECT AND CAN’T
Protected files and files that cannot be displayed cannot be deleted.
CARD IS WRITE
Card or file is protected. To continue the operation, remove the protection.
CANCEL
Reset Function

If an error occurs during an operation and the unit no longer works, reset the unit as follows. Press CANCEL and STANDBY simultaneously for 5 seconds. • Unit is reset. Try operation again.

If a problem should arise, you may be able to correct it yourself using the corrections listed below. If the problem persists, contact your nearest Servicenter.
Unit does not power up...
Power is on, but unit turns off after a short period...
Power turns off automatically...
Unit will not turn off...
Copying cannot be performed...
Files and folders cannot be located...
(Continued on next page.)

No images are displayed, even though this unit is connected to a TV...
Images cannot be displayed...
Video images cannot be played back...
Data cannot be read or written using USB connection...
PC Card HDD data cannot be read or written...
Insufficient free space on card...
No presentation folders can be found...
Computer does not start up...

Power Supply: DC 4.8 V (AC Adaptor) / DC 3.7 V (Battery) Power Consumption: 2.2 W (AC Adaptor) (peak 3.4 W) 2.2 W (Battery) (peak 2.9 W) Compatible Memory Cards SD Card Slot: SD Memory Card, MultiMediaCard PC Card Slot: PC Card HDD (2 GB, 5 GB) SD Memory Card * MultiMediaCard * CF Card* Smart Media* Memory Stick* Microdrive (340 MB, 1 GB)* * Each type of Memory Card requires a compatible adaptor. Copyable Data: All files and folders except secure files (audio files that include copyright restrictions) Image Playback Formats: Baseline JPEG, TIFF (RGB 8 bit non-compressed) and the first screen of Motion JPEG files (QuickTime) Image Sizes: 80 x 60 ~ 5120 x 3840 pixels Copy Functions Copy Mode: Copying of all data from SD Memory Card (MultiMediaCard) -> PC Card HDD (PC Card) Copying of selected folders from PC Card HDD (PC Card) -> SD Memory Card (MultiMediaCard) TV Mode: Copying of all data and selected files and folders from SD Memory Card (MultiMediaCard) -> PC Card HDD (PC Card) Copying of all data and selected folders from PC Card HDD (PC Card) -> SD Memory Card (MultiMediaCard) Playback Functions: Image Playback Thumbnail display (4 x 6 display) Album display (6 images or 9 images display) Slide Show (automatic display) Rotation, enlargement (x2, x4) Presentation Delete Functions: Selective deletion of files or folders, and deletion of all files and folders Protection Functions: PC card HDD protection using HDD SAFETY Detection
Switch File backup protection File protection against accidental deletion

Video Output: Composite Output : NTSC format / PAL format, 1 V p-p, 75 ohm S-Output : Y and C signals, NTSC format / PAL format, 1 V p-p, 75 ohm Dimensions: 73 (W) x 25.8 (H) x 107.5 (D) mm 2-14/16 (W) x 1 (H) x 4-4/16 (D) inch Weight: 5.63 oz / 160 g (Not including PC Card HDD and battery pack) Operating Weight: 8.8 oz / 250 g Operating Temperature: 32 F ~ 95 F (0 °C ~ 35 °C) Operating Humidity: 10 % ~ 80 % Battery Life: Continuous use Approx. 80 minutes in Copy mode Approx. 80 minutes in TV mode PC Interface: USB1.1 OS Compatibility: Windows 98SE, Windows 2000, Windows Me, Windows XP Compatible PC Models: IBM PC / AT compatible models
Power Supply: 110 - 240 V AC 50 / 60 Hz Input Capacity: 0.12 A Output: 4.8 V DC
Weight: 2.11 oz / 60 g Dimensions: 50 (W) x 26 (H) x 70 (D) mm 1-15/16 (W) x 1 (H) x 2-12/16 (D) inch
Weight: 0.98 oz / 28 g Dimensions: 35 (W) x 7 (H) x 53 (D) mm 1-6/16 (W) x 2-12/16 (H) x 2-1/16 (D) inch
PC Card HDD (RP-PH005A)
Weight: 1.93 oz / 55 g Dimensions: 54 (W) x 5 (H) x 86 (D) mm 2-2/16 (W) x 1-15/16 (H) x 3-6/16 (D) inch
AC Adaptor (VSK0626C) · Battery Pack (CGA-S301A1)

Please photocopy this form when placing an order.
Quantity Accessory # Price Each Description Total Price
Your State & Local Sales Tax
Ship To: Mr. Mrs. Ms.
Phone #:
TO OBTAIN ANY OF OUR SD MEDIA STORAGE ACCESSORIES YOU CAN DO ANY OF
OR CALL PANASONIC’S ACCESSORY ORDER LINE AT 1-800-332-5368
[6 AM-5 PM M-F, 6 AM-10:30 AM SAT, PACIFIC TIME]
ORDER OFFICE 20421 84th Avenue South Kent, WA. 98032

Please photocopy this form when making a request for service notice.
In the unlikely event this product needs service.
Mail this completed form and your Proof of Purchase along with your unit to:
1705 N. Randall Road Elgin, IL. 60123-7847 Attn: SD Media Storage Repair
Panasonic Services Company

For Product Information, Operating Assistance, Literature Request, Dealer Locations, and all Customer Service inquiries please contact: 1-800-272-7033, Monday-Friday 8:30am-8pm EST.
Web Site: http://www.panasonic.com You can purchase parts, accessories or locate your nearest servicenter by visiting our Web Site.
1-800-332-5368 (Customer Orders Only) Panasonic Services Company 20421 84th Avenue South, Kent, WA 98032 (6 am to 5 pm Monday - Friday; 6 am to 10:30 am Saturday; PST) (Visa, MasterCard, Discover Card, American Express, Check)
1705 N. Randall Road, Elgin, IL 60123-7847 Attention: SD Media Storage Repair Please carefully pack and ship, prepaid and insured, to the Elgin Centralized Factory Servicenter. Customer’s in Puerto Rico, please ship or carry in to location below (“Service in Puerto Rico”).
Service in Puerto Rico
Matsushita Electric of Puerto Rico, Inc. Panasonic Sales Company/ Factory Servicenter:
Ave. 65 de Infanteria, Km. 9.5, San Gabriel Industrial Park, Carolina, Puerto Rico 00985
Phone (787) 750-4300 Fax (787) 768-2910
As of August 2002
Panasonic Services Company

PANASONIC CONSUMER ELECTRONICS COMPANY, DIVISION OF MATSUSHITA ELECTRIC CORPORATION OF AMERICA, One Panasonic Way Secaucus, New Jersey 07094
PANASONIC SALES COMPANY, DIVISION OF MATSUSHITA ELECTRIC OF PUERTO RICO INC. Ave. 65 de Infanteria, Km. 9.5 San Gabriel Industrial Park Carolina, Puerto Rico 00985
Limited Warranty
Limited Warranty Coverage If your product does not work properly because of a defect in materials or workmanship, Panasonic Consumer Electronics Company or Panasonic Sales Company (collectively referred to as “the warrantor”) will, for the length of the period indicated on the chart below, which starts with the date of original purchase (“warranty period”), at its option either (a) repair your product with new or refurbished parts, or (b) replace it with a new or a refurbished product. The decision to repair or replace will be made by the warrantor.
Product or Part Name SD Multi A/V Device, SD Printer, SD Media Storage (Except items listed below) CMOS Camera Assembly Rechargeable Battery Pack, SD Memory Card, AC Adaptor, USB Reader-Writer (in exchange for defective item)
Parts Ninety (90) days
Six (6) months Ninety (90) days
Ninety (90) days
N/A
During the “Labor” warranty period there will be no charge for labor. During the “Parts” warranty period, there will be no charge for parts. You must carry- in or mail-in your product during the warranty period. If non-rechargeable batteries are included, they are not warranted. This warranty only applies to products purchased and serviced in the United States or Puerto Rico. This warranty is extended only to the original purchaser of a new product which was not sold “as is”. A purchase receipt or other proof of the original purchase date is required for warranty service.

Carry-In or Mail-In Service For Carry-In or Mail-In Service in the United States call 1-800-272-7033. For assistance in Puerto Rico call Panasonic Sales Company (787)-750-4300 or fax (787)-768-2910.
Limited Warranty Limits And Exclusions This warranty ONLY COVERS failures due to defects in materials or workmanship, and DOES NOT COVER normal wear and tear or cosmetic damage. The warranty ALSO DOES NOT COVER damages which occurred in shipment, or failures which are caused by products not supplied by the warrantor, or failures which result from accidents, misuse, abuse, neglect, mishandling, misapplication, alteration, faulty installation, set-up adjustments, misadjustment of consumer controls, improper maintenance, power line surge, lightning damage, modification, or commercial use (such as in a hotel, office, restaurant, or other business), rental use of the product, service by anyone other than a Factory Servicenter or other Authorized Servicer, or damage that is attributable to acts of God.
NOT LIABLE FOR INCIDENTAL OR CONSEQUENTIAL DAMAGES RESULTING FROM THE USE OF THIS PRODUCT, OR ARISING OUT OF ANY BREACH OF THIS WARRANTY. (As examples, this excludes damages for lost time, travel to and from the servicer, or loss of images, data or other memory content) The items listed are not exclusive, but are for illustration only.) ALL EXPRESS AND IMPLIED WARRANTIES, INCLUDING THE WARRANTY OF MERCHANTABILITY, ARE LIMITED TO THE PERIOD OF THE LIMITED WARRANTY.
Some states do not allow the exclusion or limitation of incidental or consequential damages, or limitations on how long an implied warranty lasts, so the exclusions may not apply to you. This warranty gives you specific legal rights and you may also have others rights which vary from state to state. If a problem with this product develops during or after the warranty period, you may contact your dealer or Servicenter. If the problem is not handled to your satisfaction, then write to the warrantor’s Consumer Affairs Department at the addresses listed for the warrantor.
PARTS AND SERVICE WHICH ARE NOT COVERED BY THIS LIMITED WARRANTY ARE YOUR RESPONSIBILITY.

Panasonic Consumer Electronics Company, Division of Matsushita Electric Corporation of America One Panasonic Way Secaucus, New Jersey 07094
Panasonic Sales Company (“PSC”), Division of Matsushita Electric of Puerto Rico, Inc. Ave. 65 de Infanteria, Km. 9.5 San Gabriel Industrial Park Carolina, Puerto Rico 00985
Panasonic Canada Inc. 5770 Ambler Drive, Mississauga, ON, L4W 2T3
S0103A0
Printed in Japan
Common problems, likely causes, and what to do.
| Problem | Possible cause | Remedy | |
|---|---|---|---|
| Unit does not power up... | • Be sure the battery and AC adaptor are connected properly. • Use a fully recharged battery. • Press STANDBY for at least 2 seconds. | p.53 | |
| Power is on, but unit turns off after a short period... | • Use a fully recharged battery. • Always recharge battery within specified temperature range. Battery will not recharge at low temperatures under 23 F (-5 °C). | p.53 | |
| Power turns off automatically... | • If powering unit with battery only, power will shut off if no operation is performed for 5 minutes. Turn unit back on. | p.53 | |
| Unit will not turn off... | • Power will not turn off while files are being read or copied. Turn unit off after SD/HDD access Lamp goes out. • Power will not turn off when HDD SAFETY Detection Switch is activated. Place unit on flat, level surface, then turn off the power. | p.53 | |
| Copying cannot be performed... | • Insert card correctly. • Be sure copy destination has sufficient free space. Delete unnecessary data to free up space. • If HDD SAFETY Detection Switch was activated, place unit on flat, level surface. • Secure data files (audio files that include copyright restrictions) cannot be copied. • If the SD Memory Card write-protect switch is set to “LOCK”, data cannot be overwritten. | p.53 | |
| Files and folders cannot be located... | • In Copy or TV mode, when an SD Memory Card is copied to a PC Card HDD, copied data will be placed in a folder entitled, “CARD****”. Open this folder and confirm data was copied. • If all or selected data in a “CARD****” folder is copied to an SD Memory Card, the “CARD****” folder disappears and data is copied according to file structure rules. See “Copying and Backup” section on page 12. | p.53 | |
| No images are displayed, even though this unit is connected to a TV... | • Set COPY/TV MODE to “TV.” • Connect video cable properly. • Set TV input to Video. See TV manual. • The USB cable must be disconnected to view images on a TV. • Confirm that TV format is NTSC from Copy mode. | p.54 | |
| Images cannot be displayed... | • Insert card correctly. • Files with extensions other than .JPG, .TIF and .MOV, and files that contain corrupt data, cannot be displayed. • To view images within folders, open a folder, then select .JPG, .TIF, and .MOV files. • Some files take longer to display. | p.54 | |
| Video images cannot be played back... | • Only the first frame of QuickTime format data can be displayed. | p.54 | |
| Data cannot be read or written using USB connection... | • When the USB cable is connected, ensure that the battery has been installed then connect the AC adapter. • Connect USB cable properly. • Select a read or write destination card. | p.54 | |
| PC Card HDD data cannot be read or written... | • Correctly install PC Card HDD in this unit. • If HDD SAFETY Detection Switch was activated, place unit on flat, level surface. • The PC Card HDD is a precision hard disk drive. If it is dropped or receives a strong impact, malfunction, damage, and loss of stored data could occur. If read/write errors occur or operation is abnormal, a backup should be performed immediately, using the ScanDisk/ CheckDisk function. | p.54 | |
| Insufficient free space on card... | • Confirm card capacity on a PC as some data on the card cannot be displayed using this unit. • If Backup is set to on, available space is reduced by half. | p.54 | |
| No presentation folders can be found... | • For a PC Card HDD, be sure specified saving destination name is in the form of “CARD****”. • Do not change folders to unrecognizable names. | p.54 | |
| Computer does not start up... | • Be sure USB cable is not connected to the unit. | p.54 |
Owners and our team usually reply within a day — and your question helps the next person too.
Be the first to ask — other owners or our team will answer.