


SAMSUNG ELECTRONICS CANADA, INC.
SERVICE DIVISION 55 Standish Court Mississauga, Ontario L5R 4B2 Canada 1-800-SAMSUNG (1-800-726-7864)
AH68-01720S

Instruction Manual

COMPACT
DIGITAL AUDIO
DIGITAL VIDEO


CLASS 1 LASER PRODUCT KLASSE 1 LASER PRODUKT LUOKAN 1 LASER LAITE KLASS 1 LASER APPARAT PRODUCTO LASER CLASE 1

This Compact Disc player is classified as a CLASS 1 LASER product.
Use of controls, adjustments or performance of procedures other than those specified herein may result in hazardous radiation exposure.
AND INTERLOCKS DEFEATED, AVOID EXPOSURE TO BEAM.
This symbol indicates that dangerous voltage which can cause electric shock is present inside this unit.
This symbol alerts you to important operating and maintenance instructions accompanying the unit.
INSERT.


Ensure that the AC power supply in your house complies with the identification sticker located on the back of your player. Install your play- er horizontally, on a suitable base (furniture), with enough space around it for ventilation (3~4inches). Make sure the ventilation slots are not covered. Do not stack anything on top of the player. Do not place the player on amplifiers or other equipment which may become hot. Before moving the player, ensure the disc tray is empty. This player is designed for continuous use. Switching off the Home Theater to the stand-by mode does not disconnect the electrical supply. In order to disconnect the player completely from the power supply, remove the main plug from the wall outlet, especially when left unused for a long period of time.


During thunderstorms, disconnect AC main plug from the wall outlet. Voltage peaks due to lightning could damage the unit.
Do not expose the unit to direct sunlight or other heat sources. This could lead to overheating and malfunction of the unit.
Protect the player from moisture(i.e. vases) , and excess heat (e.g.fireplace) or equipment creating strong magnetic or electric fields (i.e.speakers...). Disconnect the power cable from the AC supply if the player malfunctions. Your player is not intended for industrial use.
The batteries used with this product contain chemicals
that are harmful to the environment.
Do not dispose of batteries in the general household
trash.
Use of this product is for personal use only.
Condensation may occur if your player or disc has been stored in cold temperatures.
If transporting the player during the winter, wait approximately 2 hours until the unit has reached room temperature before using.


Multi-Disc Playback & FM Tuner The HT-P1200 combines the convenience of multi-disc playback capability, including DVD-AUDIO, DVD-VIDEO, VCD, SACD, CD, MP3-CD, WMA-CD, DivX, CD-R/RW, and DVD-R/RW, with a sophisticated FM tuner, all in a single player.
DVD-Audio compatible Experience the super high-quality audio performance of DVD-Audio. The on-board 24-bit/192kHz DAC enables this player to deliver exceptional sound quality in terms of dynamic range, low-level resolution and high-frequency detail.
USB Host Play You can enjoy media files such as pictures, movies and tunes saved in an MP3 player, digital camera, or USB memory by connecting the storage device to the USB port of the home theater.
SACD Play You can listen to high quality multi-channel sound that exceeds regular CD playback.
SDSM-EX (360 Degree Surround Sound) SDSM-EX is a proprietary audio technology that provides 360-degree surround technology.
Logo Sound When you turn on the power, a ‘sound logo’ will be heard.
TV Screen Saver Function The HT-P1200 automatically brightens and darkens the brightness of the TV screen after 3 minutes in the stop mode. The HT-P1200 automatically switches itself into the power saving mode after 20 minutes in the screen saver mode.
Samsung AV Device Operation using Anynet You can conveniently operate Samsung DVD and AV devices with your Samsung TV remote with Anynet.
AV SYNC Function Video may lag behind the audio if the unit is connected to a digital TV. To compensate for this, you can adjust the audio delay time to sync up with the video.
HDMI HDMI transmits DVD video and audio signals simultaneously, and provides a clearer picture.


DVD (Digital Versatile Disc) offers fantastic audio and video, thanks to Dolby Digital surround sound and MPEG-2 video compression technology. Now you can enjoy these realistic effects in the home, as if you were in a movie theater or concert hall.
Home Theaters and the discs are coded by region. These regional codes must match in order for the disc to play. If the codes do not match, the disc will not play. The Region Number for this player is given on the rear panel of the player. (Your Home Theater will only play DVDs that are labeled with identical region codes.)

1 6 ~

Disc Recording Format
CD-R Discs • Some CD-R discs may not be playable depending on the disc recording device (CD-Recorder or PC) and the
you may not be able to fully play the disc.

—Front Panel—

Open/Close ( ) button Tuning Up & Skip ( ) button
PRO LOGIC II indicator DTS Disc indicator DVD AUDIO indicator
DSP Display RADIO FREQUENCY indicator REPEAT indicator SACD indicator MPEG indicator


1 FM Antenna Connector
3 HDMI Output Connector
4 COMPONENT VIDEO OUTPUT jacks
5 Video Output Connector
6 External Audio Input Connector
7 Anynet Input/Output Connector
8 External Digital Optical Input Connectors
9 Audio Output Connector
11 ASC Input Connector

2 USB Connector · 10 Wire Hanger · 12 Headphone Jack

—Remote Control—

TV, DVD POWER button
STEP button HDMI AUDIO SELECT button
Number(0~9) buttons


1 Insert two 1.5V AAA batteries, paying attention to the correct polarities (+ and –).
Remove the battery cover on the back of the remote by pressing down and sliding the cover in the direction of the arrow.
The remote control can be used up to approximately 23 feet/7 meters in a straight line. It can also be operated at a horizontal angle of up to 30° from the remote control sensor.


Combine the round board and the stand with the screws (4).
Insert two screws in the top holes, but only screw them in 1/2 way.
Fully tighten the screws to secure the stand to the DVD player.


Push the cables connected to the HDMI OUT, Component OUT, Video OUT ports into the groove shown in figure 1 using the Wire Hanger.
Rear Side of the Main Unit
Push the cables connected to the Audio IN, Anynet IN/OUT, Optical Digital Audio IN and Audio OUT ports into the groove shown in figure 2.
Open the holder cover of the round board on the bottom of the stand and pass the cables through the holder.
4 Squeeze the cables into the groove on the holder of the round board.
Wire Hanger · Round Board Holder


Please confirm that all the following contents are included in the package. Speaker Packages


1 Set the front speaker on the front stand.
Connect the front speaker cable to the rear side of the front stand.
3 Fix the speaker and the stand with the screws.

Drive screws (2) into the wall for each speaker and then hook the front and rear speakers over them.

Before moving or installing the product, be sure to turn off the power and disconnect the power cord.

Position of the Home Theater • Place it on a stand, cabinet shelf, or under the TV stand.
The listening position should be located about 2.5 to 3 times the distance of the TV's screen size away from the TV. Example: For 32" TVs 2~2.4m (6~8 feet)
For 55" TVs 3.5~4m (11~13 feet)
* Unlike the front and center speakers, the rear speakers are used to handle mainly sound effects and sound will not come from them all the time.
Subwoofer • The position of the subwoofer is not so critical. Place it anywhere you like.


Press down the terminal tab on the back of the speaker. 1 Insert the black wire into the black terminal (–) and the gray wire into the gray (+) terminal, and then release the tab.
2 Connect the correct color speaker cable to the same color speaker output terminal on the rear of the subwoofer, according to the polarity markings (+/–). Example: Connect the green center speaker cable
to the green center speaker output terminal on the rear of the subwoofer according to the polarity markings (+/–).
Black · Gray

Connect the DIN Audio Out of the main unit and the DIN Audio In of the sub woofer with the DIN audio cable.

Press the power button of the sub woofer to turn it on.

Subwoofer: With the built-in, dedicated 150W amplifier, the subwoofer generates rich bass sounds.

Choose one of the three methods for connecting to a TV.

- Connect the supplied video cable from the VIDEO OUT jack on the back panel of the system
to the VIDEO IN jack on your TV.
- If your television is equipped with Component Video inputs, connect a component video cable
(not supplied) from the Pr, Pb and Y jacks on the back panel of the system to the corresponding jacks on your TV.
- Connect the HDMI out to the HDMI input on your TV.

This device transmits DVD video signal digitally without the process of converting to analog. You can get sharper digital pictures by connecting the video to your TV using an HDMI connection cable.

HDMI Audio ON/OFF function • The audio signals transmitted over the HDMI Cable can be toggled ON/OFF.

Converts the interlace signal to progressive to prevent flickering and to remove distortion or noise on the edge of screen.
Press and hold DCDi button on the remote control for over 3 seconds. • Each time the button is pressed, the selection alternates between DCDi ON and DCDi OFF.

Resolution Selection • This function allows the user to select screen resolution for HDMI output.
In Stop mode, press and hold the SD/HD (Standard Definition/High Definition)button on the remote control.

Example: Digital signal components such as a Set-top Box or CD Recorder. Connecting an External Digital Component

Connect the Digital In 1 or 2 (OPTICAL) on the main unit to the Digital Output on the external digital component. 1
Press AUX on the remote control to select ‘D.IN 1 or D.IN 2’. • Each time the button is pressed, the selection changes as follows: USB ➝D.IN 1 ➝D.IN 2
➝AUX. • You can also use the FUNCTION button on the main unit. The mode switches as follows: DVD/CD ➝ D.IN 1 ➝D.IN 2 ➝ AUX ➝ USB ➝ FM.

Example: Analog signal components such as a VCR or TV.

Audio Cable (not supplied) If the external analog component has only one Audio Out, connect either left or right.
Connect Audio In on the Home Theater to Audio Out on the external analog component. • Be sure to match connector colors. 1

Using a Samsung Anynet-enabled TV, you can control the DVD Home Theater System and any other Samsung Anynet-enabled AV device. For detailed operation instructions and connection diagram, refer to the user's manual of your Samsung Anynet-enabled TV.

Connect the Anynet input terminal on the back of this unit to your Samsung TV's Anynet output terminal. 1
Connect the Anynet Out Terminal on the back of this unit to the Anynet input of Samsung external AV devices. 2
Refer to the user's manual of your Anynet-enabled TV and activate the Anynet function. 3 * This function is available only with Samsung Anynet-enabled TVs.


Connect the FM antenna supplied to the FM 75ΩCOAXIAL terminal.
Slowly move the antenna wire around until you find a location where reception is good, then fasten it to a wall or other rigid surface.

Your Home Theater is capable of playing DVD, CD, MP3, DivX and JPEG discs.Depending on the disc you are using, these instructions may vary slightly. Read the instructions carefully before using.
To Operate your Samsung TV and the Home Theater with the HT-P1200's Remote Control


Plug the main unit's power cord into the AC power supply.


2 3 Press MODE button until the TV indicator lights.
Press the POWER button to turn on the TV.
Press FUNCTION button on the main unit or DVD on the remote to select DVD/CD mode.
Press the MODE button until the DVD RECEIVER indicator lights.


1 Press OPEN/CLOSE button to open the disc tray.
Insert the disc so that the printed side faces out.
To stop playback, press STOP during playback.
To temporarily pause playback, press PLAY/PAUSE during playback.

Groups and tracks (DVD-AUDIO) • DVD-audio is divided into several large sections called "groups" and smaller sections called "tracks". Numbers are allotted to these sections. These numbers are called "group numbers" and "track numbers".
TRACK 1 TRACK 2 TRACK 1 TRACK 2 TRACK 3
Titles and chapters (DVD-VIDEO) • DVD-video is divided into several large sections called "titles" and smaller sections called "chapters". Numbers are allotted to these sections. These numbers are called "title numbers" and "chapter numbers".
CHAPTER 1 CHAPTER 2 CHAPTER 1 CHAPTER 2 CHAPTER 3
Tracks (SACD, Video and music CDs) • Video and music CDs are divided into sections called "tracks". Numbers are allotted to these sections. These numbers are called "track numbers".
TRACK 1 TRACK 2 TRACK 4 TRACK 5 TRACK 3
Files (DivX) • DivX is divided into sections called "files". Numbers are allotted to these sections. These numbers are called "file numbers".
DVD Note

You can listen to high quality multi-channel sound that exceeds regular CD playback.

When the play is stopped, select a track using the button and press the ENTER button. 1
Open the disk tray by using the OPEN/ CLOSE button and then insert SACD.

2 Channels: 70 Minutes 2 Channels: 110 Minutes 5.1 Channels: 81 Minutes 2 Channels: 120 Minutes 5.1 Channels: 89 Minutes Number of Channels and

Data CDs (CD-ROM, CD-R, CD-RW) encoded in MP3 format can be played.
Press the OPEN/CLOSE button to open the disc tray, and then load the MP3 disc.
to select the album, and then press the ENTER button.
To change the album, use to select another album and then press the ENTER button.
4 Press the STOP button to stop playback.

Images captured with a digital camera or camcorder, or JPEG files on a PC can be stored on a CD and then played back with this unit.
Press the OPEN/CLOSE button to open the disc windows, and then load the JPEG disc. • Playback will start automatically and each image will show for 5 seconds before moving to the next image.

The maximum resolution is 5120 x 3840 (or 19.0 MPixel) for baseline images, and 2048 x 1536 (3.0 MPixel) for progressive images. There is no filesize limitation. The decoder is device independent, thus above applies to USB and other devices as well.
☞Progressive JPEG images — those that appear gradually as the image is being downloaded.
JPEG limitation


Press the REMAIN button. • For checking the total and remaining time of a title or chapter being played.


To play back the disc at a faster speed, press and hold or during playback. • Each time you press and hold either button, the playback speed will change as follows: 2x ➞4x ➞8x ➞32x ➞Normal.
, buttons to move to the area you want to enlarge. 1 Press ZOOM button.

Press the SUBTITLE button.
Press the AUDIO button.
DivX(Digital internet video eXpress) DivX is a video file format developed by Microsoft and is based on MPEG4 compression technology to provide audio and video data over the Internet in real-time. MPEG4 is used for video encoding and MP3 for audio encoding so that the users can watch a movie at near DVD-quality video and audio.
Format AVI WMV Supported Versions DivX3.11 ~ 5.1 V1/V2/V3/V7
Format MP3 WMA AC3 DTS Bit Rate 80~384kbps 56~128kbps 128~384kbps 1.5Mbps

You can enjoy media files such as pictures, movies and music saved in an MP3 player, USB memory or digital camera in high quality video with 5.1 channel home theater sound by connecting the storage device to the USB port of the home theater.

1 Connect the USB device to the USB port on the rear of the unit.
To stop playback, press the STOP ( ) button.
To prevent damage to the memory stored in the USB device, perform safe removal
(1) Press the stop button twice in a row.
(2) When the main unit is powered off, or in a different

To play back the disc at a faster speed, press and hold or during playback. • Each time you press and hold either button, the playback speed will change as follows: 2x ➞4x ➞8x ➞32x ➞Normal.
File name File Bit rate Version Pixel Sampling extension Frequency
Still Picture JPG .JPG .JPEG – – 640*480 –
Music MP3 .MP3 80~384kbps – – 44.1kHz
WMA .WMA 56~128kbps V8 – 44.1kHz

You can view disc playback information on the TV screen.
Press INFO button. • Each time the button is pressed, the display changes as follows:
VCD CD MP3 DivX JPEG


Display disappears Display disappears
If this symbol appears on the TV screen while buttons are being operated, that operation is not possible with the disc currently being played.
information display may appear different. • Depending on the disc, you can also
select DTS, DOLBY DIGITAL, or PRO
LOGIC.
DVD-AUDIO display DVD AUDIO


Press and hold . • Each time the button is held down during playback, the playback speed changes as follows:
Press SLOW button. • Each time the button is pressed during playback, the playback speed changes as follows:


is pressed, playback will skip back or forward 5 minutes.

Repeat playback allows you to repeatedly play a chapter, title, track (song), or directory (MP3 file).
Press REPEAT button.
DVDAUDIO
Repeat Playback Options
CHAPTER Repeatedly plays the selected chapter.
TITLE Repeatedly plays the selected title.
GROUP Repeatedly plays the selected group.
RANDOM Plays tracks in random order. (A track that has already been played may be played again.)
TRACK Repeatedly plays the selected track.
DIR Repeatedly plays all tracks in the selected folder.
DISC Repeatedly plays the entire disc.
OFF Cancels Repeat Playback.
Press INFO button twice. 1
Press Cursor button to move to REPEAT PLAYBACK ( ) display. 2
Press Cursor button to select the desired Repeat Playback mode. 3
VCD CD
Press ENTER button. 4
* For MP3 and JPEG discs, you cannot select Repeat Play from the information display screen.


You can repeatedly play back a designated section of a DVD.
Press Cursor button to move to REPEAT PLAYBACK ( ) display.


Press Cursor , buttons to select ‘A-’ and then press ENTER button at the beginning of the desired segment.
Press ENTER button at the end of the desired segment.
To return to normal playback, press Cursor , buttons to select OFF.


This function allows you to view the same scene in different angles.

Press Cursor button to move to ANGLE ( ) display. 1 Press INFO button.


This function allows you to enlarge a particular area of the displayed image.


, buttons to move to the area you want to enlarge. 1 Press ZOOM button.


Bonus Group

Some DVD-Audio discs have an extra ‘bonus’ group that requires a 4-digit key number to access. See the disc packaging for details and the-key number.

When you play a DVD-Audio disc that has a bonus group, the key number input screen appears automatically.

During playback, press the TUNING/CH button on the remote control.


Press Cursor , buttons or numeric buttons to select the desired audio language. 1 Press INFO button twice.

Press Cursor button to move to SUBTITLE ( ) display. 1 Press INFO button twice.
Press Cursor button or numeric buttons to select the desired subtitle.

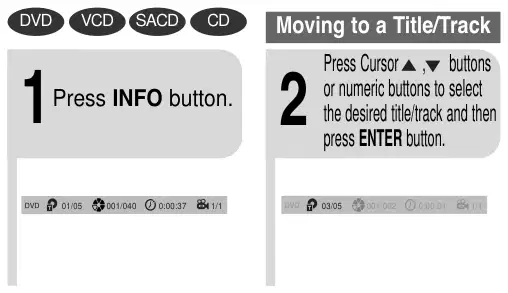

Press Cursor , buttons or numeric buttons to select the desired title/track and then press ENTER button. 1Press INFO button.
Press Cursor , buttons to move to Chapter ( ) display.
01/05 001/040 0:00:37 1/1 03/05 001/002 0:00:01 1/1 01/05 001/040 0:00:01 1/1


Press Cursor , buttons or numeric buttons to select the desired chapter and then press ENTER button.
Press the numeric buttons to select the desired time and then press ENTER button.
Press Cursor , buttons to move to time display.


You can use the menus for the audio language, subtitle language, profile, etc. DVD menu contents differ from disc to disc.


Press Cursor , buttons to move to ‘DISC MENU’ and then press ENTER button.
PBC (Playback Control) Function Press the MENU button while VCD 2.0 version disk is played. Each time you press the button, "PBC ON" and "PBC OFF" will be repetitively selected in the TV screen.

For DVDs containing multiple titles, you can view the title of each movie. Depending on the disc, the availability of this feature may vary.

Press Cursor , button to move to ‘Title Menu’.
Press MENU button to exit the setup screen.

OSD (On-Screen Display) language is set to English by default.


Press Cursor button to move to ‘Setup’ and then press ENTER button.

Press Cursor , button to select ‘OSD Language’ and then press ENTER button.
button to select the
desired language and then
press ENTER button.


Press RETURN button to return to the previous level.
Press MENU button to exit the setup screen.

Selecting the OSD Language
Selecting the Audio Language (recorded on the disc)
Selecting the Subtitle Language (recorded on the disc)
Selecting the Disc Menu Language (recorded on the disc)
* If the language you selected is not recorded on the disc, menu language will not change even if you set it to your desired language.
Press Cursor ,

Depending on your TV type (Wide Screen or conventional 4:3), you can select the TV's aspect ratio.


Press Cursor button to move to ‘Setup’ and then press ENTER button.

Press Cursor button to move to ‘TV DISPLAY’ and then press ENTER button.
Press Cursor , button to select the desired item and then press ENTER button.
Press RETURN button to return to the previous level.
Press MENU button to exit the setup screen.

The horizontal to vertical screen size ratio of conventional TVs is 4:3, while that of widescreen and high definition TVs is 16:9. This ratio is called the aspect ratio. When playing DVDs recorded in different screen sizes, you should adjust the aspect ratio to fit your TV or monitor.

: Select this to view a 16:9 picture in the full-screen
mode on your widescreen TV. • You can enjoy the widescreen aspect.
: Select this to play a 16:9 picture in the letter box
mode on a conventional TV. • Black bars will appear at the top and bottom of the screen.
: Select this to play a 16:9 picture in the pan & scan
SETUP
mode on a conventional TV. • You can see the central portion of the screen only (with the sides of the 16:9 picture cut off).

Use this to restrict playback of adult or violent DVDs you do not want children to view.

Press Cursor button to move to ‘Setup’ and then press ENTER button.
Press Cursor button to move to ‘PARENTAL’ and then press ENTER button.
Press Cursor , button to select the desired rating level and then press ENTER button.
Press RETURN button to return to the previous level.
Press MENU button to exit the setup screen.


You can set the password for the Parental (rating level) setting.
Press Cursor button to move to ‘Setup’ and then press ENTER button.
Press Cursor button to move to ‘PASSWORD’ and then press ENTER button.

While watching a DVD, VCD or JPEG CD, you can set the image you like as background wallpaper.


During playback, press PLAY/PAUSE button when an image you like appears.
The power will turn off and then back on.

Select this to set the Samsung Logo image as your wallpaper.
Select this to set the desired image as your wallpaper.

Press Cursor button to move to ‘Setup’ and then press ENTER button.
Press Cursor button to move to ‘LOGO’ and then press ENTER button.
In Stop mode, press MENU button.


Press to select the desired ‘USER’, and then press ENTER.
Press MENU button to exit the setup screen.

Press RETURN button to return to the previous level.
Press MENU button to exit the setup screen.

Some DVD-Audio discs contain DVD-Video as well as DVD-Audio. To play back the DVD-Video portion of the DVD-Audio disc, set the unit to DVD-Video mode.


Press Cursor button to move to ‘Setup’ and then press ENTER button.
Press the MENU button while the disc tray is open.
Press Cursor button to move to ‘DVD TYPE’ and then press ENTER button.
Press Cursor , button to move to ‘DVD VIDEO’ and then press ENTER button.


If the SACD is created in HYBRID disc format, you can play the disc in CDDA MODE as well.


Press the MENU button while the disc tray is open.
Press Cursor button to move to ‘Setup’ and then press ENTER button.
Press Cursor button to move to ‘SACD TYPE’ and then press ENTER button.
Press Cursor , button to move to ‘SACD MODE’ and then press ENTER button.


Signal outputs and frequency responses from the speakers will automatically be adjusted according to your speaker configuration and whether certain speakers are used or not.


Press Cursor button to move to ‘Audio’ and then press ENTER button.
In the Speaker Setup, press the ENTER button again.
, buttons to move to the desired speaker and then press ENTER button.
SMALL: Select this when using the speakers. NONE: Select this when no speakers are connected.


Use the Test Tone feature to check the speaker connections.


Press Cursor button to move to ‘Audio’ and then press ENTER button.
Press Cursor button to move to ‘TEST TONE’ and then press ENTER button.
Press RETURN button to return to the previous level.
Press MENU button to exit the setup screen.

L: Front Speaker (L) C: Center Speaker SW: Subwoofer R: Front Speaker (R) SL: Rear Speaker (L) SR: Rear Speaker (R)
Alternate method: press the TEST TONE button on the remote.
To end the test tone, press TEST TONE button again.

If the speakers cannot be placed at equal distances from the listening position, you can adjust the delay time of the audio signals from the center and rear speakers.


Press Cursor button to move to ‘Audio’ and then press ENTER button.
When 5.1CH Surround Sound is played, you can enjoy the best sound if the distance between you and each speaker is the same. Since the sounds arrive at the listening position at different times depending on the placement of speakers, you can adjust this difference by adding a delay effect to the sound of the Center Speaker and Surround Speakers.

Press Cursor button to move to ‘DELAY TIME’ and then press ENTER button.
, buttons to move to the desired speaker and then press ENTER button.
Press Cursor , to set the Delay time.


Ideal CENTER SPEAKER placement
Distance between Df and Dc Delay Time
0 inch 13.6 inches 27.2 inches 40.8 inches 4.5 feet 5.6 feet
0 ms 1 ms 2 ms 3 ms 4 ms 5 ms
Ideal SURROUND SPEAKER placement
It is desirable to place all speakers within this circle.
Df: The distance from FRONT SPEAKER Dc: The distance from CENTER SPEAKER Ds: The distance from SURROUND SPEAKER
Distance between Df and Ds
0 inch 40.8 inches 6.7 feet 10.0 feet 13.4 feet 16.7 feet
0 ms 3 ms 6 ms 9 ms 12 ms 15 ms
Delay Time

You can adjust the balance and level for each speaker.


Press Cursor button to move to ‘Audio’ and then press ENTER button.


Press Cursor button to move to ‘SOUND EDIT’ and then press ENTER button.
Press Cursor , buttons to select and adjust the desired item. Press the , buttons to adjust the settings.
Press RETURN button to return to the previous level.
Press MENU button to exit the setup screen.


You can use this function to enjoy Dolby Digital sound when watching movies at low volume at night.


Press Cursor button to move to ‘Audio’ and then press ENTER button.

Press Cursor button to move to ‘DRC’ and then press ENTER button.
Press RETURN button to return to the previous level.
Press MENU button to exit the setup screen.

Video may look slower than the audio if it is connected to a digital TV. If this occurs, adjust the audio delay time to to match the video.


Press Cursor , buttons to move to ‘Audio’ and then press ENTER button.

Press Cursor , buttons to select the Delay Time of AV-SYNC and then press the ENTER button.
Press Cursor , buttons to move to ‘AV-SYNC’ and then press ENTER button.
Press RETURN button to return to the previous level.
Press MENU button to exit the setup screen.

You can select the desired Dolby Pro Logic II audio mode.


speakers, while using just the front left and right speakers. • MATRIX: You will hear silmulated 5.1 channel surround sound.

This function works only in Dolby Pro Logic MUSIC mode.


Press PL II EFFECT button to select Panorama, then press Cursor , buttons to select the desired effect setting.
Press PL II MODE button to select ‘MUSIC’ mode.


Press PL II EFFECT button to select C-Width, then press Cursor , buttons to select the desired effect setting.
Press PL II EFFECT button to select Dimension, then press the Cursor , buttons to select the desired setting.

* This function is available only for DVD/CD playback.
Auto Sound Calibration By setting the auto sound calibration function just once when you relocate or install the unit, you can have the unit automatically recognize the distance between speakers, levels between channels, and frequency characteristics to create a 5.1-channel sound field optimized for the listener's environment.

* The following images are for illustrative purposes only and may differ from the actual product.
L: Front Speaker (L) R: Front Speaker (R) C: Center Speaker SW: Subwoofer SL: Rear Speaker (L) SR: Rear Speaker (R)
When you turn on the power, the unit produces a sound logo after the disc is read to notify that the unit is optimized for playback.
Press and hold ASC button twice.
Press and hold ASC button.

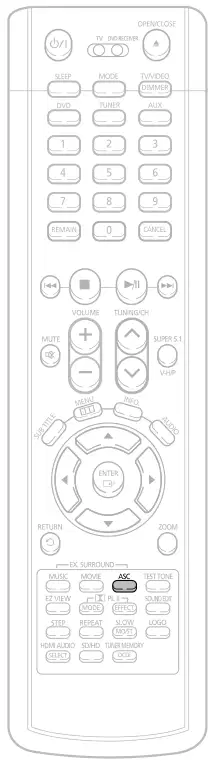
Plug the auto sound calibration microphone into the auto sound calibration input jack. 2 Place the auto sound calibration microphone at the listener's position.
Press ASC button.


A bell sounds and the setup finishes.
A tone is output. A result for each speaker is displayed.
When the message "REMOVE MIC" appears in the display, unplug the auto sound calibration microphone.
To cancel the auto sound calibration setup, press ASC button.
To listen in the auto sound calibration mode, briefly press ASC button.

MUSIC
MOVIE
You can reproduce a 2-channel sound source, such as CD, and radio broadcast, in 5.1-channel surround sound.
If you press the MUSIC button when listening to a 2-channel sound source, it will be reproduced in 4.1-channel surround sound so that you can enjoy a dynamic sound with a sense of presence.
You can select from 4 different sound field modes for movies.


Use headphones (not supplied) for private listening pleasure. You can enjoy dynamic sound effects similar to that of 5.1 channel surround sound using conventional stereo headphones.


2 1 Tune in to the desired station. Press TUNER button.
When is pressed, a preset broadcast station is selected.
Press and hold TUNING/CH button to automatically search for active broadcasting stations.
Briefly press TUNING/CH button to increase or decrease the frequency incrementally.
Press the Function button to select the desired band (FM).
Press the STOP ( ) button to select PRESET and then press button to select the preset station.
Press the STOP ( ) button to select "MANUAL" and then press and hold button to automatically search the band.
Press STOP ( ) to select MANUAL and then briefly press to tune in to a lower or higher frequency.
Press MO/ST button to listen in Mono/Stereo.


Press the TUNER button and select the FM band.


To preset another station, repeat steps 2 to 5.
To tune in to a preset station, press on the remote control to select a channel.

Sleep Timer Function

You can set the time that the DVD player will shut itself off.

To confirm the sleep timer setting, press SLEEP button.
To cancel the sleep timer, press SLEEP button until OFF appears on the display.


You can adjust the brightness of the display on the main unit so it won't interfere with your movie viewing.

This is useful when answering the door or a telephone call.


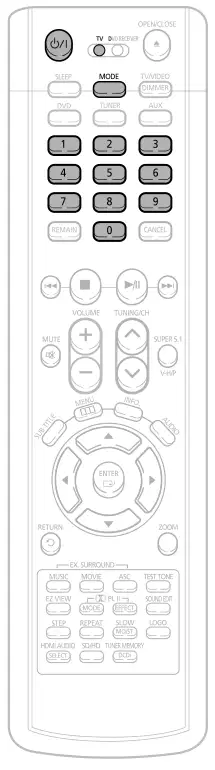

Press the MODE button to make the TV indicator on the remote control flash.
2 Press POWER button to turn on the TV.
4 While holding down POWER, enter the code corresponding to your brand of TV.

Point the remote control toward the TV and press POWER. If the TV turns off or on, the setting is complete.

No. Brand Code
No. Brand Code
00(Initial Value), 01, 02, 03, 04, 05, 73
ANAM
FERGUSON
DAEWOO
PIONEER
LG
05, 20, 21, 22, 53
HITACHI
23, 40, 41, 49
JVC
FISHER
SHARP
27, 33, 34, 35, 54
SONY
YOKO
TOSHIBA
27, 37, 42, 43, 44, 46
SANYO
27, 30, 31, 32
MITSUBISHI
SCHNEIDER
MATSUSHITA
NEWSAN
TELEFUNKEN
41, 49, 51, 57
RCA
SALORA
PANASONIC
07, 09, 26, 48, 49, 50
SABA
40, 41, 47, 48, 49
PHILIPS
05, 45, 47, 64, 65, 66, 67, 68, 69
GRUNDIG
39, 42, 46, 70, 71, 72
ZENITH
IMPERIAL
MIVAL
CGE
NOBLEX
BANG & OLUFSEN
EMERSON
BRIONVEGA
MAGNAVOX
FORMENTI
LOEWE
METZ
THOMSON
40, 41, 49, 62, 63
NORDMENDE
RADIOMARELLI
MISCELLANEOUS
LOEWE OPTA
SINGER
BLAUPUNKT
SINUDYNE
SIEMENS

Refer to the chart below when this unit does not function properly. If the problem you are experiencing is not listed below or if the instruction below does not help, turn off the unit, disconnect the power cord, and contact the nearest authorized dealer or Samsung Electronics Service Center.
Disc tray does not open.
Playback does not start.
Playback does not start immediately when the Play/Pause button is pressed.
Sound is not produced.
Sound can be heard only from a few speakers and not all six.
Picture does not appear, sound is not produced, or the disc tray opens 2 to 5 seconds later.
Dolby Digital 5.1 CH Surround Sound is not produced.

The remote control does not work.
Aspect ratio cannot be changed.
Using the RESET function will erase all stored settings. Do not use this unless necessary.
The password for rating level has been forgotten.

Small scratches on the disc may reduce sound and picture quality or cause skipping. Be especially careful not to scratch discs when handling them.
Do not touch the playback side of the disc. Hold the disc by the edges so that fingerprints will not get on the surface. Do not stick paper or tape on the disc.


When you get fingerprints or dirt on the disc, clean it with a mild detergent diluted in water and wipe with a soft cloth. • When cleaning, wipe gently from the inside to the outside of the disc.

Enter the appropriate code number for the initial settings “Disc Audio”, “Disc Subtitle” and/or “Disc Menu” (See page 49).
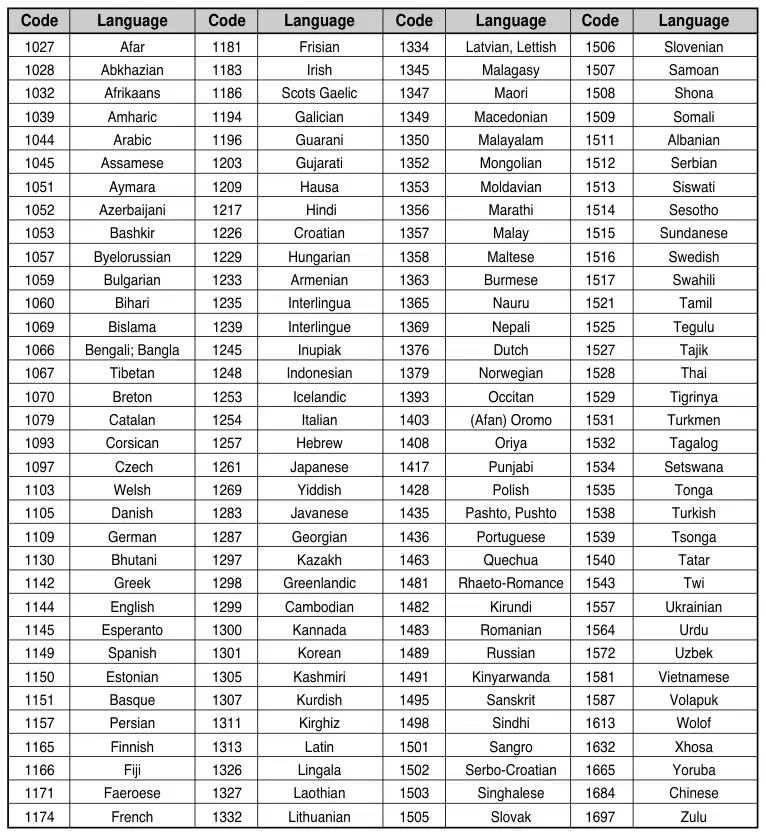
1027 Afar 1181 Frisian 1334 Latvian, Lettish 1506 Slovenian
1032 Afrikaans 1186 Scots Gaelic 1347 Maori 1508 Shona
1066 Bengali; Bangla 1245 Inupiak 1376 Dutch 1527 Tajik
1079 Catalan 1254 Italian 1403 (Afan) Oromo 1531 Turkmen
1105 Danish 1283 Javanese 1435 Pashto, Pushto 1538 Turkish


Multi Card Reader
UNICORN Unicorn USB 2.0 7 IN 1 CARD READER UC-601R
Cruzer Micro SanDisk USB2.0 USB Flash Drive 128M
Cruzer Mini SanDisk USB2.0 128M
USB2.0 Card Reader Billionton(Taiwan) USB 2.0 Card Reader for SD/MMC/RS-MMC(3-in-1)
Cruzer Mini SanDisk USB2.0 256M
SONY Micro Vault SONY USB2.0 64MB
FLEX DRIVE serotech USB2.0 32MB
AnyDrive A.L tech USB2.0 128MB
Micro Mini IOMEGA USB2.0 128M
iFlash Imation USB2.0 64M
RiDATA EZDrive USB2.0 64M
USB External HDD
CUTIE serotech POCKET HARD DISK DRIVE
Creative MuVo NX128M Creative 128 MB MP3 Player
Iriver H320 Iriver 20G HDD MP3 player
yepp YH-920 samusung 20G HDD MP3 player
yepp YH-925 samusung 20G HDD MP3 player
I-pod apple HDD MP3 player(40G)
I-pod mini Apple HDD MP3 Player(20G)
yepp (YP-T7) samsung MP3 Player
yepp(YP-MT6) samsung MP3 Player
yepp(YP-T6) samsung MP3 Player
yepp(YP-53) samsung MP3 Player
yepp(YP-ST5) samsung MP3 Player
yepp(YP-T5) samsung MP3 Player
yepp(YP-60) samsung MP3 Player
yepp(YP-780) samsung MP3 Player
yepp(YP-35) samsung MP3 Player
yepp(YP-55) samsung MP3 Player
iAUDIO U2 COWON(Korea) MP3 Player
iAUDIO G3 COWON(Korea) MP3 Player
iAudio M3 COWON(Korea) HDD MP3 player
SI-M500L SHARP(Japan) 256MB MP3Player
YEPP YP-T5 VB Samsung(Korea) MP3Player
YEPP YP-53 Samsung(Korea) 256MB MP3Player


Samsung Electronics Canada Inc. (SECA), warrants that this product is free from defective material and workmanship.
SECA further warrants that if this product fails to operate properly within the specified warranty period and the failure is due to improper workmanship or defective material SECA will repair or replace the product at its option.
All warranty repairs must be performed by a SECA authorized service centre. (The name and address of the location nearest you can be obtained by calling toll free 1-800-726-7864 or visiting our web site at www.samsung.ca)
On carry-in models, transportation to and from the service centre is the customer’s responsibility.
The original dated sales receipt must be retained by the customer and is the only acceptable proof of purchase. It must be presented to the authorized service centre at the time service is requested.
This warranty does not cover damage due to accident, fire flood and/or other acts of God; misuse, incorrect line voltage, improper installation, improper or unauthorized repairs, commercial use, or damage that occurs in shipping. Exterior and interior finish, lamps and glass are not covered under this warranty. Customer adjustments which are explained in the instruction manual are not covered under the terms of this warranty. This warranty will automatically be voided for any unit found with a missing or altered serial number. This warranty is valid only on products purchased and used in Canada.

Contact SAMSUNG WORLD WIDE If you have any questions or comments relating to Samsung products, please contact the SAMSUNG customer care centre.
Contactez SAMSUNG WORLD WIDE Si vous avez des commentaires our des questions concernant les produits Samsung, contactez le centre de service à la clientèle SAMSUNG.
CANADA 1-800-SAMSUNG (7267864) www.samsung.com/ca MEXICO 01-800-SAMSUNG (7267864) www.samsung.com/mx U.S.A 1-800-SAMSUNG (7267864) www.samsung.com ARGENTINE 0800-333-3733 www.samsung.com/ar BRAZIL 0800-124-421 www.samsung.com/br CHILE 800-726-7864(SAMSUNG) www.samsung.com/cl COSTA RICA 0-800-507-7267 www.samsung.com/latin ECUADOR 1-800-10-7267 www.samsung.com/latin EL SALVADOR 800-6225 www.samsung.com/latin GUATEMALA 1-800-299-0013 www.samsung.com/latin JAMAICA 1-800-234-7267 www.samsung.com/latin PANAMA 800-7267 www.samsung.com/latin PUERTO RICO 1-800-682-3180 www.samsung.com/latin REP. DOMINICA 1-800-751-2676 www.samsung.com/latin TRINIDAD & TOBAGO 1-800-7267-864 www.samsung.com/latin VENEZUELA 1-800-100-5303 www.samsung.com/latin BELGIUM 02 201 2418 www.samsung.com/be CZECH REPUBLIC 844 000 844 www.samsung.com/cz DENMARK 38 322 887 www.samsung.com/dk FINLAND 09 693 79 554 www.samsung.com/fi FRANCE 08 25 08 65 65 (0,15€/Min) www.samsung.com/fr GERMANY 01805 - 121213 (€ 0,12/Min) www.samsung.de HUNGARY 06 40 985 985 www.samsung.com/hu ITALIA 199 153 153 www.samsung.com/it LUXEMBURG 02 261 03 710 www.samsung.lu NETHERLANDS 0900 20 200 88 (€ 0.10/Min) www.samsung.com/nl NORWAY 231 627 22 www.samsung.com/no POLAND 0 801 801 881 www.samsung.com/pl PORTUGAL 80 8 200 128 www.samsung.com/pt SLOVAKIA 0850 123 989 www.samsung.com/sk SPAIN 902 10 11 30 www.samsung.com/es SWEDEN 08 585 367 87 www.samsung.com/se U.K 0870 242 0303 www.samsung.com/uk RUSSIA 8-800-200-0400 www.samsung.ru UKRAINE 8-800-502-0000 www.samsung.com/ur AUSTRALIA 1300 362 603 www.samsung.com/au CHINA 800-810-5858, 010- 6475 1880 www.samsung.com.cn HONG KONG 2862 6001 www.samsung.com/hk
INDIA 3030 8282 www.samsung.com/in 1600 1100 11 INDONESIA 0800-112-8888 www.samsung.com/id JAPAN 0120-327-527 www.samsung.com/jp MALAYSIA 1800-88-9999 www.samsung.com/my PHILIPPINES 1800-10-SAMSUNG (7267864) www.samsung.com/ph SINGAPORE 1800-SAMSUNG (7267864) www.samsung.com/sg
THAILAND 1800-29-3232 www.samsung.com/th 02-689-3232 TAIWAN 0800-329-999 www.samsung.com/tw VIETNAM 1 800 588 889 www.samsung.com/vn SOUTH AFRICA 0860 7267864 (SAMSUNG) www.samsung.com/za U.A.E 800SAMSUNG (7267864) www.samsung.com/mea
Middle East & Africa
Pages referenced in this manual — manufacturer, support and downloads.
Owners and our team usually reply within a day — and your question helps the next person too.
Be the first to ask — other owners or our team will answer.