


To drag and drop
While holding down the center of the pointer control, press the rim and release the center.
Use the supplied remote control pointing it at the connected REMOTE MOUSE RECEIVER.
ON/STANDBY
KEYSTONE
MARKER LASER
Pointer control POINTER/PJ selector
PJ
R-CLICK L-CLICK
R-CLICK
MENU ENTER
VIDEO CAMERA RGB
L-CLICK
RESET FREEZE RESIZE
Preparation Set the POINTER/PJ selector to “POINTER”.
To move the pointer
Press the pointer control. The pointer moves to the pressed direction. To left-click
Press L-CLICK. To right-click
Press R-CLICK.

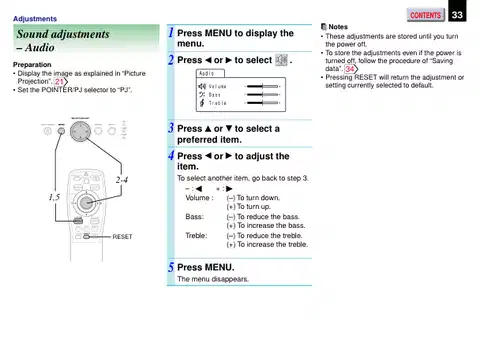
Bass : To adjust the bass of the sound output. Treble : To adjust the treble of the sound output.
vertically. Clock : To adjust the clock frequency.
Most of adjustments and settings are made on the menu. To display the menu, press MENU.

Contrast : To adjust the contrast. Brightness : To adjust the brightness. Color : To adjust the color depth. Tint : To adjust the tint. Sharpness : To adjust the sharpness. R-level : To adjust the amount of red in the picture. G-level : To adjust the amount of green in the picture. B-level : To adjust the amount of blue in the picture.
according to the way of installation.
The followings are adjustments and settings on the menu. For details, see page in 29 . When using this projector for the first time, see “Default”. 28
input.
input.
displays.
Save
document imaging camera. (For document imaging camera model only)
Auto set : To correct the keystone distortion automatically. Adjust : To make the correction of keystone distortion beyond the automatic correction.
settings on the menu. All preset : To restore the adjustments and
setings on the menu to the factory set.
Volume : To adjust the sound volume of the speaker.
Auto sync. : To adjust the image automatically. Phase : To adjust the phase.

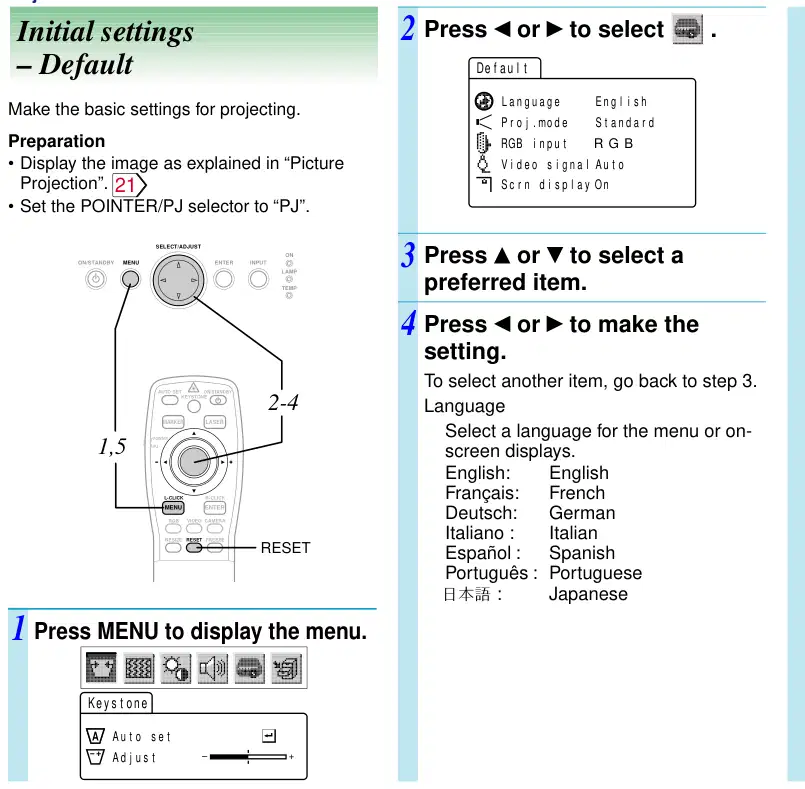
Proj. mode
Confirm your installation type on the chart on page 18 . Standard: Floor-mounted front projection Rear: Floor-mounted rear projection Ceiling: Ceiling-mounted front projection R. ceil.: Ceiling-mounted rear projection
V i d e o s i g n a l
y S c r n d i s p l a
To set the signal type of RGB input. RGB: RGB signal Y/Pb/Pr: Color difference (Component) video signal from the DVD video player, etc.
To select another item, go back to step 3. Language
Select a language for the menu or on- screen displays. English: English Français: French Deutsch: German Italiano : Italian Español : Spanish Português : Portuguese
To set the signal type of video input. Auto: Automatic signal detection works on video input. If it does not properly, set the signal type of the source from the followings. NTSC M: NTSC M signal NTSC443A: NTSC4.43A signal NTSC J: NTSC J signal NTSC N: NTSC N signal NTSC443B: NTSC4.43B signal PAL: PAL signal PAL N: PAL N signal SECAM: SECAM signal PAL443: PAL4.43 signal PAL M: PAL M signal
RGB input · Video signal
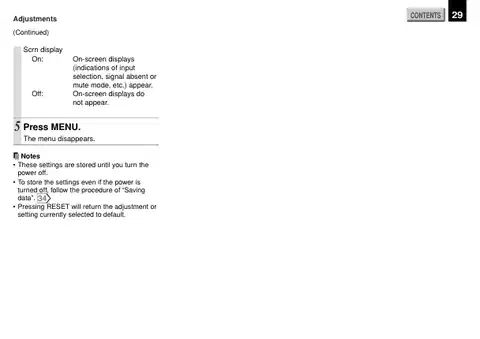
On: On-screen displays (indications of input selection, signal absent or mute mode, etc.) appear. Off: On-screen displays do not appear.
Press MENU.
The menu disappears.
Scrn display

Press MENU to display the menu.
Press or to select .
Ke y s t o n e
A u t o s e t
A d j u s t – +
SELECT/ADJUST
ON
ON/STANDBY MENU ENTER
INPUT
Press to select “Auto set”.
TEMP
Depending on the operating condition such as vibration, the distortion may be beyond the automatic keystone correction. The horizontal condition setting (0 degrees setting) may be disordered. In such a case, perform the following 0 degrees setting to correct the distortion. 1) Place the projector on a level surface. 2) On the menu, select “Auto set” in “Keystone”. 3) Press RESET.
Press ENTER.
The keystone distortion is corrected automatically. For further correction, follow the below steps.
ON/STANDBY
KEYSTONE
KEYSTONE
MARKER LASER
2,3,5,6
1,7 4
POINTER
Press .
R-CLICK L-CLICK
MENU ENTER
Press or to correct the distortion.
FREEZE RESIZE RESET
RESET
(–): To reduce the upper width. (+): To reduce the lower width.
Press MENU.
The menu disappears.

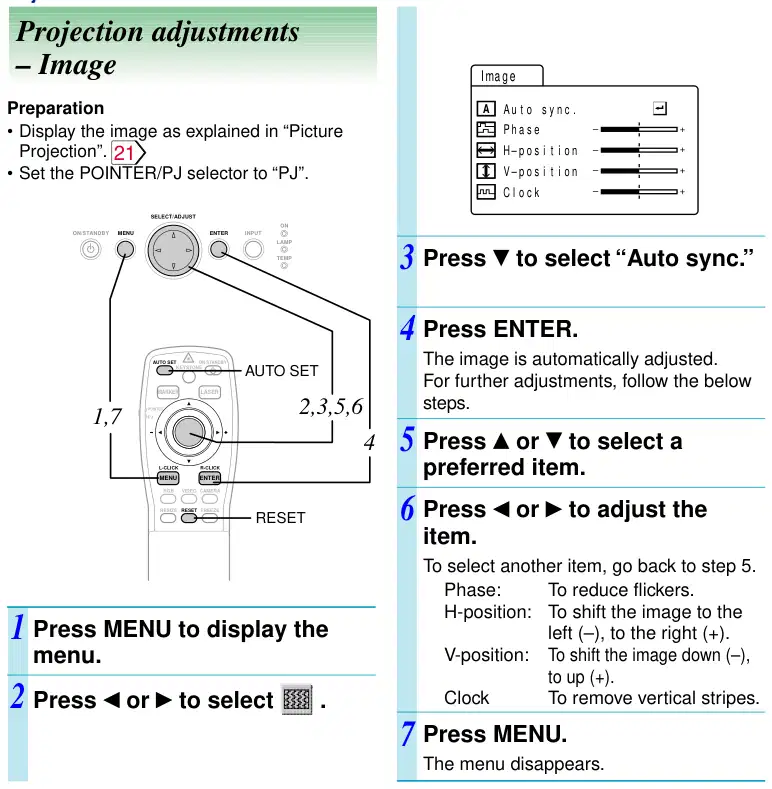
H– p o s i t i o n
V – p o s i t i o n
The image is automatically adjusted. For further adjustments, follow the below steps.
To select another item, go back to step 5.
Phase: To reduce flickers. H-position: To shift the image to the left (–), to the right (+). V-position: To shift the image down (–), to up (+). Clock To remove vertical stripes.
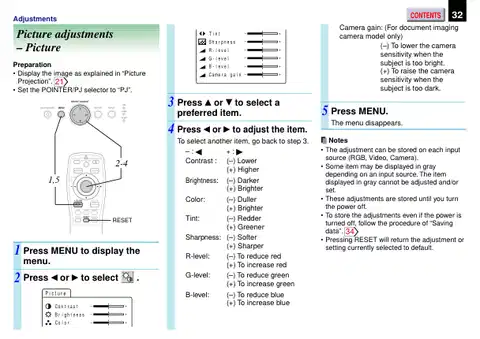
T i n t
S h a r p n e s s
(–) To lower the camera sensitivity when the subject is too bright. (+) To raise the camera sensitivity when the subject is too dark.
R - l e v e l – +
G - l e v e l – +
B - l e v e l – +
Came r a g a i n – +
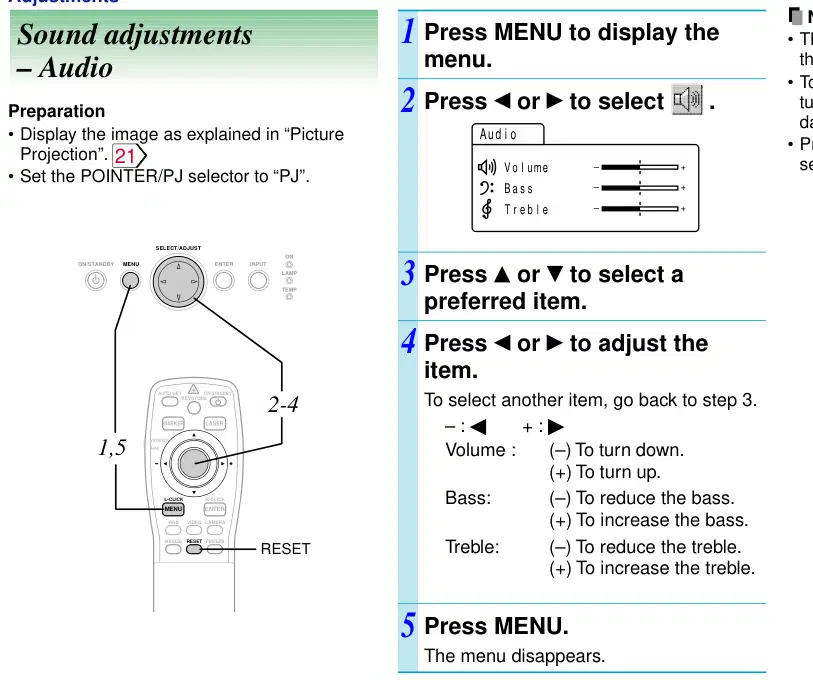
Press or to select a preferred item.
ON
Press MENU.
INPUT
LAMP
TEMP
The menu disappears.
Press or to adjust the item.
To select another item, go back to step 3.
KEYSTONE
ON/STANDBY
MARKER LASER
1,5
Brightness: (–) Darker (+) Brighter Color: (–) Duller (+) Brighter Tint: (–) Redder (+) Greener Sharpness: (–) Softer
PJ
MENU ENTER
R-CLICK L-CLICK
VIDEO CAMERA RGB
RESET FREEZE RESIZE RESET
(+) Sharper R-level: (–) To reduce red (+) To increase red G-level: (–) To reduce green (+) To increase green B-level: (–) To reduce blue (+) To increase blue
Press MENU to display the menu.
Press or to select .
P i c t u r e
Co n t r a s t
B r i g h t n e s s
Co l o r
To select another item, go back to step 3.
– : + : Volume : (–) To turn down. (+) To turn up. Bass: (–) To reduce the bass. (+) To increase the bass. Treble: (–) To reduce the treble. (+) To increase the treble.

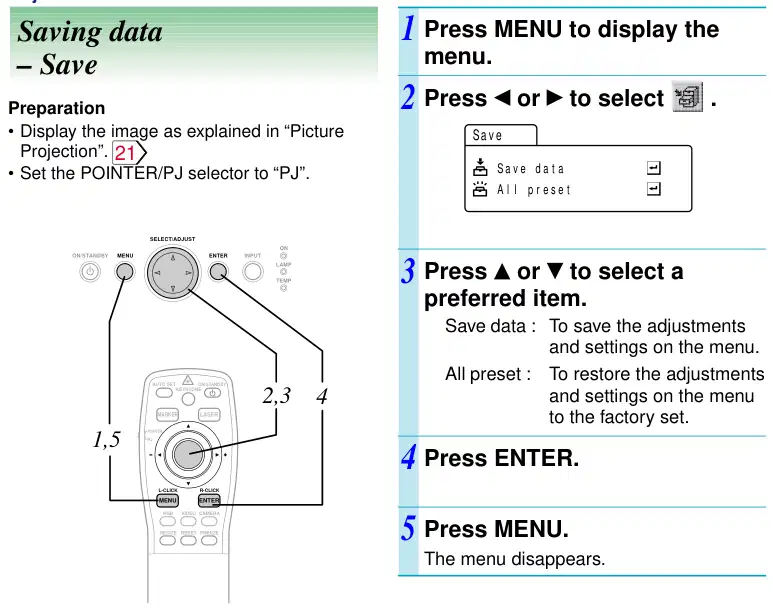
A l l p r e s e t
and settings on the menu. All preset : To restore the adjustments and settings on the menu to the factory set.

Part names and functions of document imaging camera
OVERLAY button 39 To activate the overlaying projection.
PHOTO/TEXT button 38 To switch modes between text and photo.
ARM LIGHT button 37 To turn on or off the light.
LOCK (W.BALANCE) indicator 38 Lights when the white balance is locked.
On the document imaging camera model, you can project pictures using the document imaging camera. The document imaging camera can directly project any materials (documents, illustrations, etc.) without using an OHP film.
W.BALANCE button 38 To switch white balance settings between automatic adjustment and lock.
CAMERA button 37 To select the camera source. Press again to return to the previous input source.

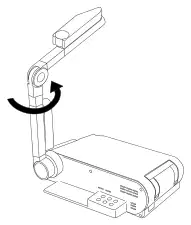
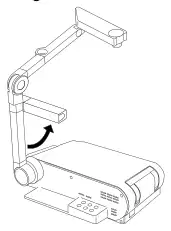
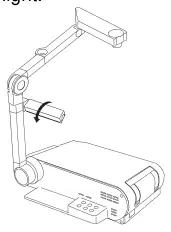
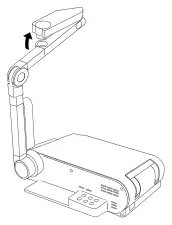
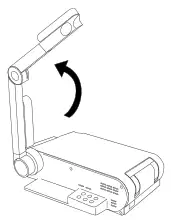


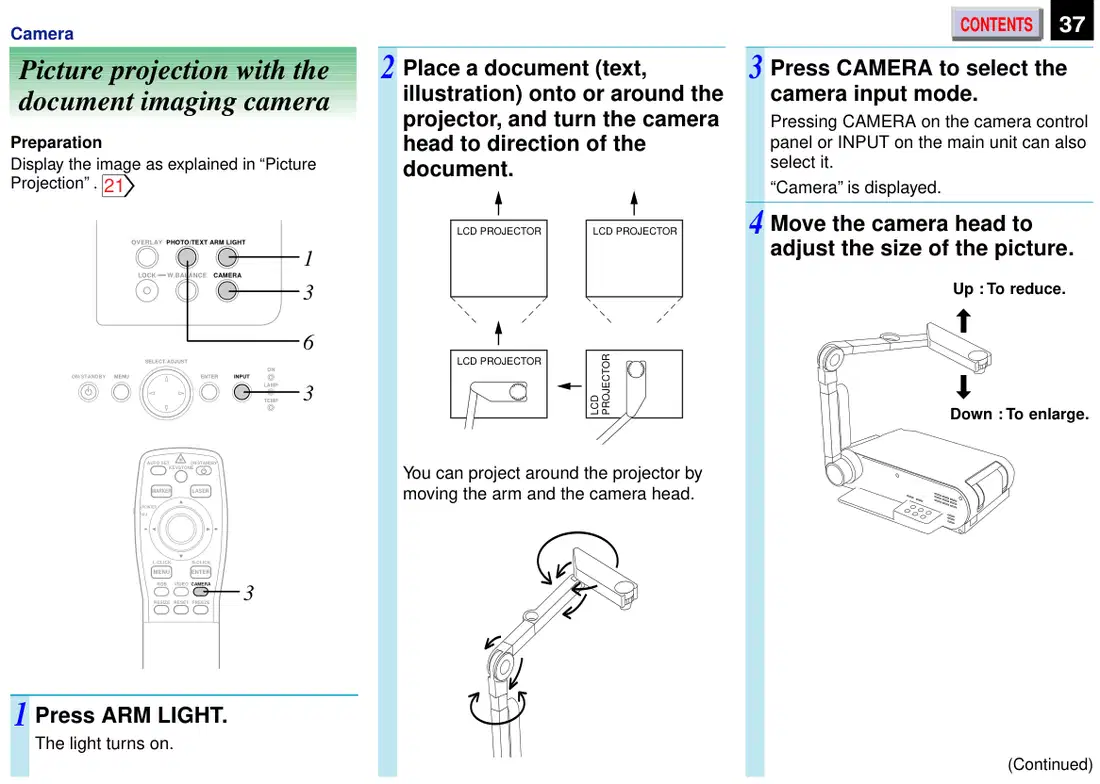
Place a document (text, illustration) onto or around the projector, and turn the camera head to direction of the document.
Pressing CAMERA on the camera control panel or INPUT on the main unit can also select it. “Camera” is displayed.
Preparation Display the image as explained in “Picture Projection” . 21
Move the camera head to adjust the size of the picture.
You can project around the projector by moving the arm and the camera head.

If there are some luminous dots on a projected picture, make the following correction. 1) While the camera is active, cover the camera lens with a black paper completely. 2) Press OVERLAY and ARM LIGHT at the same time.
Focus on the picture by turning the focusing ring on the camera head.
Normally, this camera automatically adjusts the color balance to project the picture. If the adjustment is not sufficient, follow the steps below to lock the white balance. 1) Project a white paper and enlarge it to fill the screen. 2) Press W.BALANCE to turn the LOCK indicator on. The white balance is locked. To release the white balance, press W.BALANCE again to turn the LOCK indicator off.
Press PHOTO/TEXT to select the mode of the document.
In this case, turn off the lighting of the room or adjust the Camera gain in the following manner. 1) Press ARM LIGHT to turn off the arm lighting. 2) Press MENU to display the menu. 3) Press or to select “Picture”. 4) Press or to select “Camera gain”. 5) Press or to adjust the value.
PHOTO: when using a photograph.
TEXT: AB when using a text.
When finished, turn off the light and close it, and put back the arm.
Follow the steps of “Preparation of the document imaging camera” in reverse.

Overlaying projection
Write on the paper with a blue or red pen.
The handwriting is superimposed on the picture.
With the RGB input or the video input selected, you can draw on the screen with the pen.
LOCK W.BALANCE CAMERA 2
Prepare a white paper to write on.
Press OVERLAY.
The camera source is overlaid on the picture.
Project the paper using the camera.
RGB picture

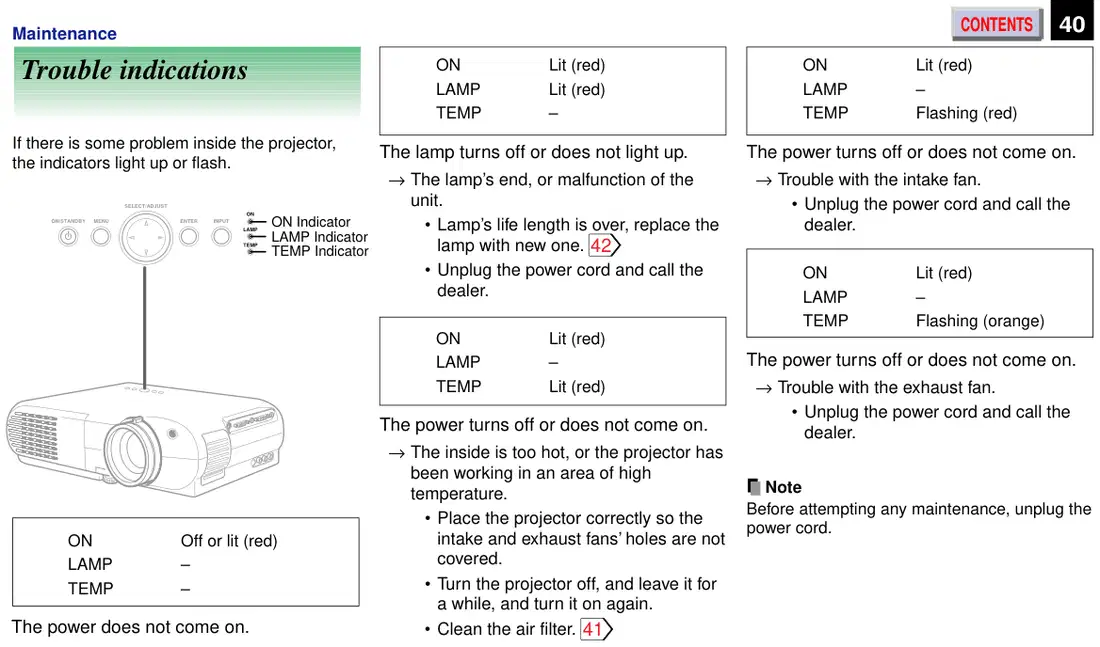
If there is some problem inside the projector, the indicators light up or flash.
The lamp turns off or does not light up.
The power turns off or does not come on.
lamp with new one. 42 • Unplug the power cord and call the
The power turns off or does not come on.
The power turns off or does not come on.
→The inside is too hot, or the projector has
ON Off or lit (red) LAMP – TEMP –
intake and exhaust fans’ holes are not covered. • Turn the projector off, and leave it for
a while, and turn it on again. • Clean the air filter. 41
→Malfunction of the unit.
dealer.
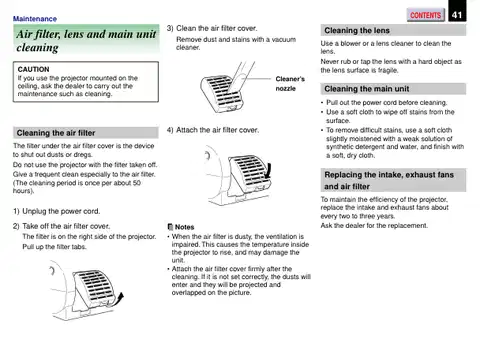
Use a blower or a lens cleaner to clean the lens. Never rub or tap the lens with a hard object as the lens surface is fragile.
The filter under the air filter cover is the device to shut out dusts or dregs. Do not use the projector with the filter taken off. Give a frequent clean especially to the air filter. (The cleaning period is once per about 50 hours).
To maintain the efficiency of the projector, replace the intake and exhaust fans about every two to three years. Ask the dealer for the replacement.
Cleaner’s nozzle

3 Take off the lamp cover on the bottom panel.
Attach the lamp cover.
Slide the cover in place and tighten two screws.
Loosen two screws, and pull off the lamp cover.
The lamp will eventually begin to project dark or dull pictures and finally will not light up. (Lamp’s life length depends on the use condition.) In such a case, replace the lamp with new one.
Pull out the lamp.
Reset the lamp timer.
Refer to the lamp instructions for resetting.
Loosen the two fixing screws, and lift up the handle to pull out the lamp.
Load a new lamp.
Slide until it hits the bottom and tighten the two fixed screws.
Unplug the power cord.
Wait until the lamp gets cold enough.

darkest.
→Focus the picture. 21
→Make the “Brightness” adjustment. 32
appropriate.
Check the following points before asking for support service. Refer also to “Trouble indications”. 40
the projector.
→Adjust the distance properly. 19
→Connect the source correctly to the
projector. 16
screen squarely.
→Adjust the projecting direction so that
The power does not come on.
No sounds are heard.
the light hits the screen squarely. 19
→Firmly plug in the power cord. 19
→Select the input source correctly. 21
or “Phase” adjustments are not correct.
→Make the “Image” or “Picture”
→Attach the cover correctly. 42
adjustments. 31 32
→Press MUTE to restore the sound. 23
The pictures are dim.
The power turns off while using the projector.
→Adjust the sound volume on the
menu. 33
adjustments are not correct.
projection room is too high.
→Make the “Picture” adjustments. 32
the projector.
→Lower the ambient temperature of the
→Connect the source correctly to the
projection room, and turn the power on.
projector. 16
→Replace the lamp. 42
The images are blurred. Focusing is uneven.
The colors are faint. The colors are strange.
No image appears.
“B-Level” adjustments are not correct.
→Take off the lens cover. 19
→Clean the lens.
→Make the “Picture” adjustments. 32
Use a lens cleaner to clean the lens. 41
→Select the input source correctly. 21
→Replace the lamp. 42
→Press MUTE to restore the picture. 23

Image does not appear when using the document imaging camera.
The remote control does not work.
remote sensor.
→Select the correct input source. 37
→Face the remote control transmitter
toward the remote sensor on the projector. 15
Image is out of focus or not clear when using the document imaging camera.
→Operate within about 5 meters. 15
→Clean the camera lens.
Use a lens cleaner to clean the lens. 41
remote control and the remote sensor.
→Remove the obstacle.
focus.
→Focus the document imaging camera.
→Replace the batteries. 14
not correct.
control is not set correctly.
→Focus the picture by turning the
→Set the POINTER/PJ selector
focusing ring. 21
according to the equipment you want to control. 13
The image may not be projected clearly if the light is not on.
→Turn on the light. 37
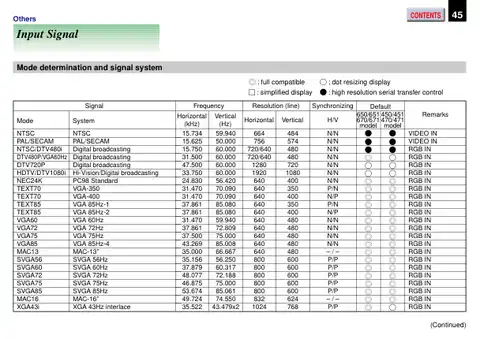
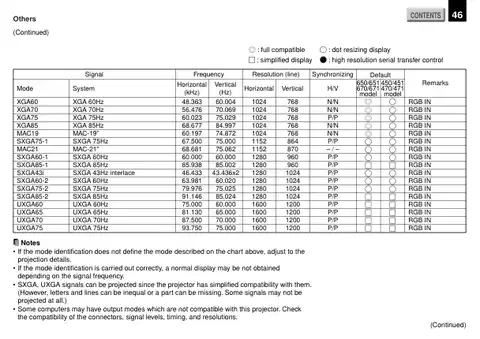

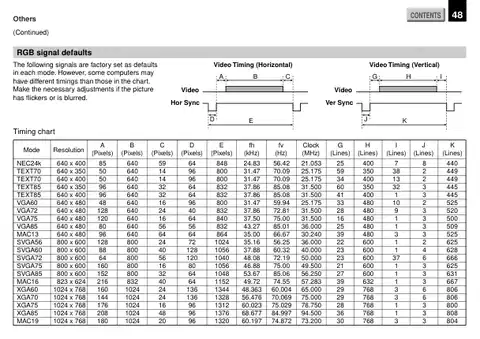
6 11 15 10
D-SUB 15 pin shrinking terminal
Input Signal Video signal
Pin No.
Analog 0.7V(p-p) 75Ω
1 2 3 4 5 6 7 8 9 10 11 12 13
Video input (Red) Video input (Green) Video input (Blue) N.C GND GND (Red) GND (Green) GND (Blue) N.C GND GND N.C Horizontal synchronizing/ composite synchronizing signal Vertical synchronizing signal N.C
TTL level (positive/negative polarity)
TTL level (positive/negative polarity)

Adjustments with RS-232C
Conditioning of the Projection Unit can also be done by a computer via the RS-232C, as well as by the remote control.
Command POF PON MOF MON AON DOF DON FOF FON IN1 IN2 IN3 RS0 RS1 RS2 RS3 RS4 CW0 CW1 CS0 CS1 CO0 CO1 ARS ARG
Meaning Power OFF Power ON Video audio mute OFF Video audio mute ON Audio mute ON Status display OFF Status display ON Freeze OFF Freeze ON Input (RGB) Input (Video) Input (Camera) Resize reset Resize 1 Resize 2 Resize 3 Resize 4 Automatic W/B OFF Automatic W/B ON Text mode OFF Text mode ON Overlaying mode OFF Overlaying mode ON Adjustment value reset Adjustment value increase
NORMAL
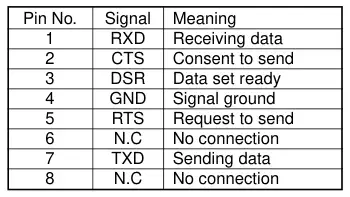
Meaning Receiving data Consent to send Data set ready Signal ground Request to send No connection Sending data No connection
RESIZE CAMERA
RS-232C 9600 bps, No parity, Data length: 8 bit, Stop bit: 1 bit STX (02h) Command (3Byte) ETX (03h) One command only can be used in one communication. Command shall be composed of alphanumeric characters of ASCII description. Use only capital letters. Acknowledge ACK (06h) Not Acknowledge NAK (15h)

Command ALF AUP ADW PKA PKS PAT PVP PHP PPH PCK VBR VCL VCN VSH VTN VLB VLG VLR CGN VOL VTR VBS LJP LEN LFR
Meaning Adjustment value decrease Adjustment value increase Adjustment value decrease Keystone automatic adjustment Keystone manual adjustment Panel automatic adjustment Vertical position adjustment Horizontal position adjustment Phase adjustment Clock adjustment Brightness adjustment Color adjustment Contrast adjustment Sharp adjustment Tint adjustment Blue level adjustment Green level adjustment Red level adjustment Camera gain adjustment Volume adjustment Treble adjustment Bass adjustment Japanese display setting English display setting French display setting
Command LGR LIT LSP LP0 PJ0 PJ1 PJ2 PJ3 KR0 KR1 KV0 KV1 KV2 KV3 KV4 KV5 KV6 KV7 KV8 KV9 KVA MO0 MO1 DRS DSV
Meaning German display setting Italian display setting Spanish display setting Portuguese display setting Floor-mounted front projection Floor-mounted rear projection Ceiling-mounted front projection Ceiling-mounted rear projection RGB input mode (RGB) RGB input mode (Y/Pb/Pr) Video signal mode (Automatic) Video signal mode (60/NTSC/JAPAN) Video signal mode (60/NTSC/3.58) Video signal mode (60/NTSC/4.43) Video signal mode (60/PAL/3.58) Video signal mode (60/PAL/4.43) Video signal mode (50/NTSC/3.58) Video signal mode (50/NTSC/4.43) Video signal mode (50/PAL/3.58) Video signal mode (50/PAL/4.43) Video signal mode (50/SECAM/4.43) OSD mute OFF OSD mute ON Adjustment value preset Adjustment value saving
Default
Image Picture
Audio Audio Audio Default Default Default
Classification · Classification · Save Save

Lamp TLP450U, TLP451U, TLP650U, TLP651U, TLP470U, TLP471U, TLP670U, TLP671U : UHP lamp 150W
TLP650U, TLP651U, TLP650A, TLP651A, TLP670U, TLP671U : 786,432 pixels (1024 x 768 dots) x 3
AC 100 – 240V 50/60Hz
TLP450U, TLP470U : 220W TLP451U, TLP471U : 235W TLP650U, TLP670U : 220W TLP651U, TLP671U : 235W TLP650A : 200W TLP651A : 210W
VIDEO INPUT
Lens Zooming lens F = 1.8 – 2.1 f = 36 – 47mm
S-video signal : Mini DIN 4-pin Video signal : 1V(p-p), 75Ω Audio : 1V(p-p), more than 22kΩ, RCA pin jack
Mass TLP450U, TLP470U : 3.7 Kg TLP451U, TLP471U : 4.5 Kg TLP650U, TLP670U : 3.7 Kg TLP651U, TLP671U : 4.5 Kg TLP650A : 3.7 Kg TLP651A : 4.5 Kg
Lens F = 1.8 – 2.3, f = 5.8 – 23.2mm
Mini DIN 8-pin (RS-232C)
Iris Auto/Level adjustment allowed
TLP450U, TLP650U, TLP650A, TLP470U, TLP670U : 318 x 87 x 232 (mm) (W/H/D) (Including the projecting sections)
TLP451U, TLP651U, TLP651A, TLP471U, TLP671U : 318 x 87 x 288 (mm) (W/H/D) (Including the projecting sections)
Resolution Horizontal 1024, vertical 768
0.9 inches

Wireless remote control 1
AA size battery 2
Power cord 1
RGB cable 1 (3m)
Adapter for Macintosh computers 1
PC audio cable 1 (3m)
Audio/Video cable 1 (3m)
Lens cover 1
IBM/MAC mouse cable (for REMOTE MOUSE RECEIVER) 1
PS/2 mouse adapter (for REMOTE MOUSE RECEIVER) 1
MAC mouse adapter (for REMOTE MOUSE RECEIVER) 1
USB mouse cable (for REMOTE MOUSE RECEIVER) 1
Carrying case 1
Trademarks NEC, PC-98 series are trademarks of NEC Corporation. IBM, DOS/V, VGA, SVGA, XGA, SXGA, UXGA are trademarks or registered trademarks of International Business Machines Corporation. Macintosh is a registered trademark of Apple Computer, Inc. Windows is a registered trademark of Microsoft Corporations in the U.S. and other country.
The design and specifications are subject to change without notice.


TACP is not obligated to provide purchasers with a substitute unit during the warranty period.
82 Totowa Rd., Wayne, NJ 07470, U.S.A. Phone: (973) 628-8000 Fax: (973) 628-1875 Toll Free for Service Call: 1-800-631-3811
Owners and our team usually reply within a day — and your question helps the next person too.
Be the first to ask — other owners or our team will answer.


