EN
Hikvision logo
Official user manual

Hikvision DS-8004HFI-ST

253 pages·10.1 MB·Security·PDF·ENDEFRITNLJA
Hikvision DS-8004HFI-ST
Table of Contents 180 sections Product Key Features · Chapter 1 Introduction · 1.1 Front Panel · 1.2 IR Remote Control Operations · … ShowHide
Product Key Featuresp.7Chapter 1 Introductionp.171.1 Front Panelp.181.2 IR Remote Control Operationsp.221.3 USB Mouse Operationp.251.4 Input Method Descriptionp.261.5 Rear Panelp.27Chapter 2 Getting Startedp.302.1 Starting Up and Shutting Down the Devicep.312.2 Login and Logoutp.332.2.1 User Loginp.332.2.2 User Logoutp.342.3 Using the Wizard for Basic Configurationp.352.4 Adding and Connecting the IP Camerasp.392.4.3 Adding the IP Camerasp.392.4.4 Configuring the Connected IP Camerasp.43Chapter 3 Live Viewp.463.1 Introduction of Live Viewp.473.2 Operations in Live View Modep.483.2.1 Front Panel Operationp.483.2.2 Using the Mouse in Live Viewp.493.2.3 Using an Auxiliary Monitorp.503.2.4 Quick Setting Toolbar in Live View Modep.503.3 Adjusting Live View Settingsp.543.4 Channel-zero Encodingp.563.5 Manual Video Quality Diagnosticsp.573.6 User Logoutp.58Chapter 4 PTZ Controlp.594.1 Configuring PTZ Settingsp.604.2 Setting PTZ Presets, Patrols & Patternsp.624.2.1 Customizing Presetsp.624.2.2 Calling Presetsp.634.2.3 Customizing Patrolsp.634.2.4 Calling Patrolsp.644.2.5 Customizing Patternsp.654.2.6 Calling Patternsp.654.2.7 Customizing Linear Scanp.654.2.8 Calling Linear Scanp.664.2.9 One-touch Parkp.664.3 PTZ Control Panelp.67Chapter 5 Record and Capture Settingsp.695.1 Configuring Encoding Parametersp.705.2 Configuring Record/Capture Schedulep.745.3 Configuring Motion Detection Recording and Capturep.775.4 Configuring Alarm Triggered Recording and Capturep.795.5 Configuring VCA Recording and Capturep.815.6 Configuring Manual Recording and Continuous Capturep.835.7 Configuring Holiday Recording and Capturep.855.8 Configuring Redundant Recording and Capturep.875.9 Configuring HDD Group for Recording and Capturep.895.10 Files Protectionp.915.10.1 Locking the Record Filesp.915.10.2 Setting HDD property to Read-onlyp.93Chapter 6 Playbackp.956.1 Playing Back Record Filesp.966.1.1 Playing Back by Timep.966.1.2 Playing Back by Event Searchp.996.1.3 Playing Back by Tagp.1016.1.4 Playing Back by Smart Playbackp.1036.1.5 Playing Back by Searching System Logp.1066.1.6 Playing Back by Sub-periodsp.1076.1.7 Playing Back External Filesp.1086.1.8 Playing Back Frame Extracting Recordp.1086.2 Auxiliary Functions of Playbackp.1106.2.1 Playing Back Frame by Framep.1106.2.2 Digital Zoomp.1106.2.3 Reverse Playback of Multi-channelp.1116.3 Picture Playbackp.113Chapter 7 Backupp.1147.1 Backing up Record Filesp.1157.1.1 Quick Exportp.1157.1.2 Backing up by Normal Video Searchp.1167.1.3 Backing up by Event Searchp.1187.1.4 Backing up Video Clipsp.1197.2 Backing up Picturesp.1217.3 Managing Backup Devicesp.1237.4 Hot Spare Backupp.1257.4.1 Setting the Hot Spare Devicep.1257.4.2 Setting the Working Devicep.1267.4.3 Hot Spare Managementp.127Chapter 8 Alarm Settingsp.1298.1 Setting Motion Detectionp.1308.2 Setting Sensor Alarmp.1328.3 Detecting Video Lossp.1348.4 Detecting Video Tamperingp.1368.5 Handling Exceptionsp.1388.6 Setting Alarm Linkage Actionsp.1398.7 Triggering or Clearing Alarm Output Manuallyp.142Chapter 9 VCA Alarmp.1439.1 Face Detectionp.1449.2 Line Crossing Detectionp.1459.3 Intrusion Detectionp.1479.4 Region Entrance Detectionp.1499.5 Region Exiting Detectionp.1509.6 Loitering Detectionp.1509.7 People Gathering Detectionp.1509.8 Fast Moving Detectionp.1509.9 Parking Detectionp.1519.10 Unattended Baggage Detectionp.1519.11 Object Removal Detectionp.1519.12 Audio Exception Detectionp.1529.13 Sudden Scene Change Detectionp.1539.14 Defocus Detectionp.1539.15 PIR Alarmp.153Chapter 10 VCA Searchp.15410.1 Face Searchp.15510.2 Behavior Searchp.15710.3 People Countingp.15810.4 Heat Mapp.160Chapter 11 Network Settingsp.16111.1 Configuring General Settingsp.16211.2 Configuring Advanced Settingsp.16511.2.1 Configuring PPPoE Settingsp.16511.2.2 Configuring DDNS Settingsp.16511.2.3 Configuring NTP Server Settingsp.16811.2.4 Configuring Email Settingsp.16911.2.5 Configuring FTP Server Settingsp.17011.2.6 Configuring SNMP Settingsp.17111.2.7 Configuring NAT Settingsp.17211.2.8 Configuring More Network Settingsp.17411.2.9 Configuring HTTPS Settingsp.17611.2.10 Virtual Host Settingsp.17711.2.11 Telnet Settingsp.17811.3 Checking Network Trafficp.18011.4 Network Detectionp.18111.4.1 Testing Network Delay and Packet Lossp.18111.4.2 Exporting Network Packetp.18111.4.3 Checking Network Statusp.18211.4.4 Checking Network Statisticsp.183Chapter 12 RAID Configurationp.18512.1 Configuring Array and Virtual Diskp.18612.1.1 One-touch Configurationp.18712.1.2 Manually Creating Array and Virtual Diskp.18812.2 Rebuilding Arrayp.19312.2.1 Automatically Rebuilding Arrayp.19312.2.2 Manually Rebuilding Arrayp.19412.3 Repairing Virtual Diskp.19512.4 Deleting Array / Virtual Diskp.19612.4.3 Deleting the Virtual Diskp.19612.4.4 Deleting the Arrayp.19612.5 Upgrading Firmwarep.197Chapter 13 HDD Managementp.19913.1 Initializing HDDsp.20013.2 Managing Network HDDp.20213.3 Managing eSATAp.20413.4 Managing HDD Groupp.20513.4.1 Setting HDD Groupsp.20513.4.2 Setting HDD Propertyp.20613.5 Configuring Quota Modep.20713.6 Configuring Frame Extracting Modep.20813.7 Configuring Disk Clonep.21013.8 Checking HDD Statusp.21213.9 Checking S.M.A.R.T. Informationp.21313.10 Detecting Bad Sectorp.21413.11 Configuring HDD Error Alarmsp.215Chapter 14 Camera Settingsp.21614.1 Configuring OSD Settingsp.21714.2 Configuring Privacy Maskp.21814.3 Configuring Video Parametersp.218Chapter 15 Device Management and Maintenancep.22115.1 Viewing System Informationp.22215.2 Searching & Exporting Log Filesp.22315.3 Importing/Exporting Configuration Filesp.22515.4 Upgrading Systemp.22615.4.1 Upgrading by Local Backup Devicep.22615.4.2 Upgrading by FTPp.22615.5 Restoring Default Settingsp.227Chapter 16 Othersp.22816.1 Configuring RS-232 Serial Portp.22916.2 Configuring General Settingsp.23016.3 Configuring DST Settingsp.23216.4 Configuring More Settingsp.23316.5 Managing User Accountsp.234Chapter 17 Appendixp.237Glossaryp.238Troubleshootingp.239Summary of Changesp.244List of Compatible IP Camerasp.246List of Hikvision IP Camerasp.246List of Third-party IP Camerasp.250
Page 1 of the Hikvision DS-8004HFI-ST user manual — UD.6L0202D1782A01
Page 1 · click to enlarge
Page 1
Hikvision DS-8004HFI-ST diagram (page 1)
Fig. 1

Digital Video Recorder

User Manual

UD.6L0202D1782A01

Page 2 of the Hikvision DS-8004HFI-ST user manual
Page 2 · click to enlarge
Page 2

©2015 Hangzhou Hikvision Digital Technology Co., Ltd.

This user manual is intended for users of Digital Video Recorder (V3.2.0). It includes instructions on how to use the

Product. The software embodied in the Product is governed by the user license agreement covering that Product.

This Manual is subject to domestic and international copyright protection. Hangzhou Hikvision Digital Technology

Co., Ltd. (“Hikvision”) reserves all rights to this manual. This manual cannot be reproduced, changed, translated, or

distributed, partially or wholly, by any means, without the prior written permission of Hikvision.

and other Hikvision marks are the property of Hikvision and are registered trademarks or the

subject of applications for the same by Hikvision and/or its affiliates. Other trademarks mentioned in this manual are the

properties of their respective owners. No right of license is given to use such trademarks without express permission.

TO THE MAXIMUM EXTENT PERMITTED BY APPLICABLE LAW, HIKVISION MAKES NO WARRANTIES,

EXPRESS OR IMPLIED, INCLUDING WITHOUT LIMITATION THE IMPLIED WARRANTIES OF

MERCHANTABILITY AND FITNESS FOR A PARTICULAR PURPOSE, REGARDING THIS MANUAL.

HIKVISION DOES NOT WARRANT, GUARANTEE, OR MAKE ANY REPRESENTATIONS REGARDING THE

USE OF THE MANUAL, OR THE CORRECTNESS, ACCURACY, OR RELIABILITY OF INFORMATION

CONTAINED HEREIN. YOUR USE OF THIS MANUAL AND ANY RELIANCE ON THIS MANUAL SHALL BE

WHOLLY AT YOUR OWN RISK AND RESPONSIBILITY.

TO THE MAXIMUM EXTENT PERMITTED BY APPLICABLE LAW, IN NO EVENT WILL HIKVISION, ITS

DIRECTORS, OFFICERS, EMPLOYEES, OR AGENTS BE LIABLE TO YOU FOR ANY SPECIAL,

CONSEQUENTIAL, INCIDENTAL, OR INDIRECT DAMAGES, INCLUDING, AMONG OTHERS, DAMAGES

FOR LOSS OF BUSINESS PROFITS, BUSINESS INTERRUPTION, SECURITY BREACHES, OR LOSS OF DATA

OR DOCUMENTATION, IN CONNECTION WITH THE USE OF OR RELIANCE ON THIS MANUAL, EVEN IF

HIKVISION HAS BEEN ADVISED OF THE POSSIBILITY OF SUCH DAMAGES.

SOME JURISDICTIONS DO NOT ALLOW THE EXCLUSION OR LIMITATION OF LIABILITY OR CERTAIN

DAMAGES, SO SOME OR ALL OF THE ABOVE EXCLUSIONS OR LIMITATIONS MAY NOT APPLY TO YOU.

Surveillance laws vary by jurisdiction. Check all relevant laws in your jurisdiction before using this product for

surveillance purposes to ensure that your use of this product conforms.

Should you have any questions, please do not hesitate to contact your local dealer.

Show 6 more labels / short text on this page
User Manual · About this Manual · Trademarks · Disclaimer · Privacy Notice · Support
Page 3 of the Hikvision DS-8004HFI-ST user manual — EU Conformity Statement
Page 3 · click to enlarge
Page 3

Regulatory information

FCC information

FCC compliance: This equipment has been tested and found to comply with the limits for a digital device, pursuant to

part 15 of the FCC Rules. These limits are designed to provide reasonable protection against harmful interference when

the equipment is operated in a commercial environment. This equipment generates, uses, and can radiate radio frequency

energy and, if not installed and used in accordance with the instruction manual, may cause harmful interference to radio

communications. Operation of this equipment in a residential area is likely to cause harmful interference in which case

the user will be required to correct the interference at his own expense.

FCC conditions

This device complies with part 15 of the FCC Rules. Operation is subject to the following two conditions:

1. This device may not cause harmful interference.
2. This device must accept any interference received, including interference that may cause undesired operation.

EU Conformity Statement

This product and - if applicable - the supplied accessories too are marked with "CE" and comply therefore with the

applicable harmonized European standards listed under the Low Voltage Directive 2006/95/EC, the EMC Directive

2004/108/EC, the RoHS Directive 2011/65/EU.

Hikvision DS-8004HFI-ST — EU Conformity Statement diagram (page 3)
Fig. 2 · EU Conformity Statement
2012/19/EU (WEEE directive)Products marked with this symbol cannot be disposed of as unsorted municipal waste in

the European Union. For proper recycling, return this product to your local supplier upon the purchase of equivalent new

equipment, or dispose of it at designated collection points. For more information see: www.recyclethis.info

2006/66/EC (battery directive): This product contains a battery that cannot be disposed of as unsorted municipal waste in

the European Union. See the product documentation for specific battery information. The battery is marked with this

symbol, which may include lettering to indicate cadmium (Cd), lead (Pb), or mercury (Hg). For proper recycling, return

the battery to your supplier or to a designated collection point. For more information see: www.recyclethis.info

Page 4 of the Hikvision DS-8004HFI-ST user manual — Trademarks and Registered Trademarks
Page 4 · click to enlarge
Page 4

Trademarks and Registered Trademarks

  • Windows and Windows mark are trademarks or registered trademarks of Microsoft Corporation in the United States

and/or other countries. • HDMI, HDMI mark and High-Definition Multimedia Interface are trademarks or registered trademarks of HDMI

Licensing LLC. • The products contained in this manual are authorized by HDMI Licensing LLC with the use right of the HDMI

technology.

  • VGA is the trademark of IBM.
  • UPnP TM is a certification mark of the UPnP TM Implementers Corporation.
  • Other names of companies and product contained in this manual may be trademarks or registered trademarks of their

respective owners.

Page 5 of the Hikvision DS-8004HFI-ST user manual
Page 5 · click to enlarge
Page 5

Thank you for purchasing our product. If there is any question or request, please do not hesitate to contact dealer.

This manual is applicable to following embedded network DVR series.

Hikvision DS-8004HFI-ST diagram (page 5)
Fig. 3

This manual may contain several technically incorrect places or printing errors, and the content is subject to

change without notice. The updates will be added into the new version of this manual. We will readily improve or

update the products or procedures described in the manual.

In order to simplify the description, we make the following conventions (unless otherwise stated):

We define DS-9200HWI-ST, DS-9100HFI-ST, 9100HWI-ST, 9100HFI-RT, 9100HFI-XT, 8100HFI-ST,

8100HWI-ST, and 7200HWI-SV series as DVR, and 9000HFI-ST, 9000HWI-ST, 9000HFI-RT, 9000HFI-XT,

8000HFI-ST and 8000HWI-ST series as HDVR (Hybrid DVR) in this manual.

The front panel operation is not supported by 7200HWI-SV series.

The figures shown in this manual are for reference only. The appearance and interface of the device are subject to

the actual model.

Page 6 of the Hikvision DS-8004HFI-ST user manual — CHANGE THE DEFAULT PASSWORD
Page 6 · click to enlarge
Page 6

Preventive and Cautionary Tips

  • Before connecting and operating your device, please be advised of the following tips:
  • Ensure unit is installed in a well-ventilated, dust-free environment.
  • Unit is designed for indoor use only.
  • Keep all liquids away from the device.
  • Ensure environmental conditions meet factory specifications.
  • Ensure unit is properly secured to a rack or shelf. Major shocks or jolts to the unit as a result of dropping it
  • may cause damage to the sensitive electronics within the unit.
  • Use the device in conjunction with an UPS if possible.
  • Power down the unit before connecting and disconnecting accessories and peripherals.
  • A factory recommended HDD should be used for this device.
  • Improper use or replacement of the battery may result in hazard of explosion. Replace with the same or

equivalent type only. Dispose of used batteries according to the instructions provided by the battery

manufacturer.

Hikvision DS-8004HFI-ST — Preventive and Cautionary Tips diagram (page 6)
Fig. 4 · Preventive and Cautionary Tips

CHANGE THE DEFAULT PASSWORD

The default password (12345) for the Admin account is for first-time log-in purposes

only. You must change this default password to better protect against security risks, such as the unauthorized

access by others to the product that may prevent the product from functioning properly and/or lead to other

undesirable consequences.

For your privacy, we strongly recommend changing the password to something of your own choosing (using a

minimum of 8 characters, including upper case letters, lower case letters, numbers, and special characters) in

order to increase the security of your product.

Proper configuration of all passwords and other security settings is the responsibility of the installer and/or

end-user.

Page 7 of the Hikvision DS-8004HFI-ST user manual — Product Key Features
Page 7 · click to enlarge
Page 7

Product Key Features

Connectable to the network cameras, network dome and encoders (this feature is supported by

HDVR series).

Connectable to the third-party network cameras like ACTI, Arecont, AXIS, Brickcom, Bosch, Canon,

PANASONIC, Pelco, SAMSUNG, SANYO, SONY, Vivotek and ZAVIO (this feature is supported by

HDVR series).

Connectable to the third-party network cameras that support ONVIF or PSIA protocol (this feature is

supported by HDVR series).

Connectable to Hikvision smart IP cameras.

PAL/NTSC adaptive video inputs.

H.264 video compression with high reliability and superior definition.

Each channel supports dual-stream.

Up to 32 network cameras can be added (this feature is supported by HDVR series).

Independent configuration for each channel, including resolution, frame rate, bitrate, image quality,

etc.

The quality of the input and output video is configurable.

Each channel supports two kinds of compression parameters, the normal continuous and event.

Sub-stream can be configured locally.

Encoding for both audio/video composite stream and video stream; audio and video synchronization

during composite stream encoding.

Support CABAC (this feature is supported by analog cameras only).

Watermark technology.

Defog technology providing correct and natural image (this feature is only supported by DS-9200

series DVR).

Simultaneous HDMI, VGA and CVBS outputs.

HDMI output and VGA output at up to 1920×1080P resolution.

Multi-screen display in live view is supported, and the display sequence of screens is adjustable.

Live view screen can be switched in group. Manual switch and auto-switch are selectable and the

auto-switch dwell time is configurable.

Quick setting menu is provided for live view.

The selected live view channel can be shielded.

Motion detection, video tampering detection, video exception alarm and video loss alarm functions.

Privacy mask.

Several PTZ protocols supported; PTZ preset, patrol and pattern.

Zooming in by clicking the mouse and PTZ tracing by dragging mouse.

For DS-9100/9000HFI-XT series, up to 16 SATA hard disks and 2 eSATA disks can be connected;

for DS-7200HWI-SV series, up to 2 SATA hard disks can be connected; and for other models, up to 8

SATA hard disks and 1 eSATA disk can be connected, each disk with a maximum of 4TB storage

capacity.

8 network disks (8 NAS disks, 8 IP SAN disks or n NAS disks + m IP SAN disks (n+m ≤ 8)) can be

Show 4 more labels / short text on this page
General · Local Monitoring · VCA alarm function · HDD Management
Page 8 of the Hikvision DS-8004HFI-ST user manual — Product Key Features
Page 8 · click to enlarge
Page 8

connected.

Support eSATA disk for recording or backup.

Hot-swappable HDD supporting RAID0, RAID1, RAID5 and RAID10 storage schemes. And 8

virtual disks can be configurable (this feature is supported by DS-9100/9000HFI-RT series only).

HDD hot swap function (the feature is supported by DS-9100/9000HFI-RT series only).

HDD group management.

Support HDD standby function.

HDD property: redundancy, read-only, read/write (R/W).

HDD quota management; different capacity can be assigned to different channel.

HDD frame-extracting management to extend the record time.

Support S.M.A.R.T. and bad sector detection (this feature is not supported by DS-9100/9000HFI-RT

series).

Disk clone function (this feature is not supported by DS-9100HFI-RT/9000HFI-RT/7200HWI-SV

series).

Recording, Capture and Playback

Provide new playback interface with easy and flexible operation.

Holiday recording schedule configuration.

Normal and event video encoding parameters.

Multiple recording types: manual, continuous, alarm, motion, motion | alarm, motion & alarm, event.

8 recording time periods with separated recording types.

Pre-record and post-record for alarm, motion detection recording, and pre-record time for schedule

and manual recording.

Searching record files and captured pictures by events (alarm input/motion detection/VCA).

Customization of tags, searching and playing back by tags.

Locking and unlocking record files.

Local redundant recording and capture.

Searching and playing back record files by camera No., recording type, start time, end time, etc.

Smart search for the selected area in the video.

Smart playback to go through less effective information;

Zooming in when playback.

Reverse playback for multi-channel.

Supports pause, fast forward, slow forward, skip forward, and skip backward when playback,

locating by dragging the mouse.

For DS-9200/9100/9000/8100HWI-ST & DS-7200HWI-SV, up to 16-ch synchronous playback at

WD1 real time; for other models, up to 16-ch synchronous playback at 4CIF real time.

Manual capture, continuous capture of video images and playback of captured pictures.

Export video data by USB, SATA or eSATA device.

Export video clips when playback.

Management and maintenance of backup devices.

Support NTFS and FAT32 formatted backup devices.

Configurable arming time of alarm input/output.

Alarm for video loss, motion detection, tampering, abnormal signal, video input/output standard

mismatch, illegal login, network disconnected, IP confliction, abnormal record/capture, HDD error,

and HDD full, etc.

Backup · Alarm and Exception

Page 9 of the Hikvision DS-8004HFI-ST user manual — Product Key Features
Page 9 · click to enlarge
Page 9

VCA detection alarm is supported.

VCA search for face detection, behavior analysis, people counting and heat map.

Alarm triggers full screen monitoring, audio alarm, notifying surveillance center, sending email and

alarm output.

Automatic restore when system is abnormal.

Users can operate by front panel, mouse, remote control, and control keyboard.

Three-level user management; admin user is allowed to create many operating accounts and define

their operating permission, which includes the limit to access any camera.

Operation, alarm, exceptions and log recording and searching.

Manually triggering and clearing alarms.

Importing and exporting of device configuration file.

Manual video quality diagnostics for analog channels.

Either normal or hot spare working mode is configurable to constitute an N+1 hot spare system (this

function is supported by HDVR series only).

2 self-adaptive 10M/100M/1000M network interfaces, and three working modes are configurable:

multi-address, load balance and network fault tolerance.

IPv6 is supported.

TCP/IP protocol, PPPoE, DHCP, DNS, DDNS, NTP, SADP, SMTP, SNMP, NFS, and iSCSI are

supported.

TCP, UDP and RTP for unicast.

Auto/Manual port mapping and automatically discovered by NAT.

Remote web browser access by HTTPS ensures high security.

Remote reverse playback by RTSP.

Support accessing by the platform by ONVIF.

Remote search, playback, download, locking and unlocking the record files, and downloading files

broken transfer resume.

Remote parameters setup; remote import/export of device parameters.

Remote viewing of the device status, system logs and alarm status.

Remote keyboard operation.

Remote locking and unlocking of control panel and mouse.

Remote HDD formatting and program upgrading.

Remote system restart.

RS-232, RS-485 transparent channel transmission.

Alarm and exception information can be sent to the remote host

Remotely start/stop recording.

Remotely start/stop alarm output.

Captured pictures can be sent to the FTP server which supports FTP and SFTP protocol, and two FTP

servers can be configured (this feature is supported by DVR series).

Upgraded by remote FTP server is supported.

Remote PTZ control.

Remote JPEG capture.

Two-way voice talk and voice broadcasting.

Embedded WEB server.

Development Scalability:

Other Local Functions · Network Functions

Page 10 of the Hikvision DS-8004HFI-ST user manual — Product Key Features
Page 10 · click to enlarge
Page 10

SDK for Windows and Linux system.

Source code of application software for demo.

Development support and training for application system.

Page 11 of the Hikvision DS-8004HFI-ST user manual — Table of contents
Page 11 · click to enlarge
Page 11

Table of contents

Product Key Featuresp.7Chapter 1 Introductionp.171.1 Front Panelp.181.2 IR Remote Control Operationsp.221.3 USB Mouse Operationp.251.4 Input Method Descriptionp.261.5 Rear Panelp.27Chapter 2 Getting Startedp.302.1 Starting Up and Shutting Down the Devicep.312.2 Login and Logoutp.332.2.1 User Loginp.332.2.2 User Logoutp.342.3 Using the Wizard for Basic Configurationp.352.4 Adding and Connecting the IP Camerasp.392.4.3 Adding the IP Camerasp.392.4.4 Configuring the Connected IP Camerasp.43Chapter 3 Live Viewp.463.1 Introduction of Live Viewp.473.2 Operations in Live View Modep.483.2.1 Front Panel Operationp.483.2.2 Using the Mouse in Live Viewp.493.2.3 Using an Auxiliary Monitorp.503.2.4 Quick Setting Toolbar in Live View Modep.503.3 Adjusting Live View Settingsp.543.4 Channel-zero Encodingp.563.5 Manual Video Quality Diagnosticsp.573.6 User Logoutp.58Chapter 4 PTZ Controlp.594.1 Configuring PTZ Settingsp.604.2 Setting PTZ Presets, Patrols & Patternsp.624.2.1 Customizing Presetsp.624.2.2 Calling Presetsp.634.2.3 Customizing Patrolsp.634.2.4 Calling Patrolsp.644.2.5 Customizing Patternsp.654.2.6 Calling Patternsp.654.2.7 Customizing Linear Scanp.654.2.8 Calling Linear Scanp.664.2.9 One-touch Parkp.664.3 PTZ Control Panelp.67Chapter 5 Record and Capture Settingsp.695.1 Configuring Encoding Parametersp.705.2 Configuring Record/Capture Schedulep.745.3 Configuring Motion Detection Recording and Capturep.775.4 Configuring Alarm Triggered Recording and Capturep.795.5 Configuring VCA Recording and Capturep.815.6 Configuring Manual Recording and Continuous Capturep.835.7 Configuring Holiday Recording and Capturep.855.8 Configuring Redundant Recording and Capturep.875.9 Configuring HDD Group for Recording and Capturep.895.10 Files Protectionp.915.10.1 Locking the Record Filesp.915.10.2 Setting HDD property to Read-onlyp.93Chapter 6 Playbackp.956.1 Playing Back Record Filesp.966.1.1 Playing Back by Timep.966.1.2 Playing Back by Event Searchp.996.1.3 Playing Back by Tagp.1016.1.4 Playing Back by Smart Playbackp.1036.1.5 Playing Back by Searching System Logp.1066.1.6 Playing Back by Sub-periodsp.1076.1.7 Playing Back External Filesp.1086.1.8 Playing Back Frame Extracting Recordp.1086.2 Auxiliary Functions of Playbackp.1106.2.1 Playing Back Frame by Framep.1106.2.2 Digital Zoomp.1106.2.3 Reverse Playback of Multi-channelp.1116.3 Picture Playbackp.113Chapter 7 Backupp.1147.1 Backing up Record Filesp.1157.1.1 Quick Exportp.1157.1.2 Backing up by Normal Video Searchp.1167.1.3 Backing up by Event Searchp.1187.1.4 Backing up Video Clipsp.1197.2 Backing up Picturesp.1217.3 Managing Backup Devicesp.1237.4 Hot Spare Backupp.1257.4.1 Setting the Hot Spare Devicep.1257.4.2 Setting the Working Devicep.1267.4.3 Hot Spare Managementp.127Chapter 8 Alarm Settingsp.1298.1 Setting Motion Detectionp.1308.2 Setting Sensor Alarmp.1328.3 Detecting Video Lossp.1348.4 Detecting Video Tamperingp.1368.5 Handling Exceptionsp.1388.6 Setting Alarm Linkage Actionsp.1398.7 Triggering or Clearing Alarm Output Manuallyp.142Chapter 9 VCA Alarmp.1439.1 Face Detectionp.1449.2 Line Crossing Detectionp.1459.3 Intrusion Detectionp.1479.4 Region Entrance Detectionp.1499.5 Region Exiting Detectionp.1509.6 Loitering Detectionp.1509.7 People Gathering Detectionp.1509.8 Fast Moving Detectionp.1509.9 Parking Detectionp.1519.10 Unattended Baggage Detectionp.1519.11 Object Removal Detectionp.1519.12 Audio Exception Detectionp.1529.13 Sudden Scene Change Detectionp.1539.14 Defocus Detectionp.1539.15 PIR Alarmp.153Chapter 10 VCA Searchp.15410.1 Face Searchp.15510.2 Behavior Searchp.15710.3 People Countingp.15810.4 Heat Mapp.160Chapter 11 Network Settingsp.16111.1 Configuring General Settingsp.16211.2 Configuring Advanced Settingsp.16511.2.1 Configuring PPPoE Settingsp.16511.2.2 Configuring DDNS Settingsp.16511.2.3 Configuring NTP Server Settingsp.16811.2.4 Configuring Email Settingsp.16911.2.5 Configuring FTP Server Settingsp.17011.2.6 Configuring SNMP Settingsp.17111.2.7 Configuring NAT Settingsp.17211.2.8 Configuring More Network Settingsp.17411.2.9 Configuring HTTPS Settingsp.17611.2.10 Virtual Host Settingsp.17711.2.11 Telnet Settingsp.17811.3 Checking Network Trafficp.18011.4 Network Detectionp.18111.4.1 Testing Network Delay and Packet Lossp.18111.4.2 Exporting Network Packetp.18111.4.3 Checking Network Statusp.18211.4.4 Checking Network Statisticsp.183Chapter 12 RAID Configurationp.18512.1 Configuring Array and Virtual Diskp.18612.1.1 One-touch Configurationp.18712.1.2 Manually Creating Array and Virtual Diskp.18812.2 Rebuilding Arrayp.19312.2.1 Automatically Rebuilding Arrayp.19312.2.2 Manually Rebuilding Arrayp.19412.3 Repairing Virtual Diskp.19512.4 Deleting Array / Virtual Diskp.19612.4.3 Deleting the Virtual Diskp.19612.4.4 Deleting the Arrayp.19612.5 Upgrading Firmwarep.197Chapter 13 HDD Managementp.19913.1 Initializing HDDsp.20013.2 Managing Network HDDp.20213.3 Managing eSATAp.20413.4 Managing HDD Groupp.20513.4.1 Setting HDD Groupsp.20513.4.2 Setting HDD Propertyp.20613.5 Configuring Quota Modep.20713.6 Configuring Frame Extracting Modep.20813.7 Configuring Disk Clonep.21013.8 Checking HDD Statusp.21213.9 Checking S.M.A.R.T. Informationp.21313.10 Detecting Bad Sectorp.21413.11 Configuring HDD Error Alarmsp.215Chapter 14 Camera Settingsp.21614.1 Configuring OSD Settingsp.21714.2 Configuring Privacy Maskp.21814.3 Configuring Video Parametersp.218Chapter 15 Device Management and Maintenancep.22115.1 Viewing System Informationp.22215.2 Searching & Exporting Log Filesp.22315.3 Importing/Exporting Configuration Filesp.22515.4 Upgrading Systemp.22615.4.1 Upgrading by Local Backup Devicep.22615.4.2 Upgrading by FTPp.22615.5 Restoring Default Settingsp.227Chapter 16 Othersp.22816.1 Configuring RS-232 Serial Portp.22916.2 Configuring General Settingsp.23016.3 Configuring DST Settingsp.23216.4 Configuring More Settingsp.23316.5 Managing User Accountsp.234Chapter 17 Appendixp.237Glossaryp.238Troubleshootingp.239Summary of Changesp.244List of Compatible IP Camerasp.246List of Hikvision IP Camerasp.246List of Third-party IP Camerasp.250
Page 12 of the Hikvision DS-8004HFI-ST user manual — Product Key Features
Page 12 · click to enlarge
Page 12

4.2.3 Customizing Patrols 62

4.2.4 Calling Patrols 63

4.2.5 Customizing Patterns 64

4.2.6 Calling Patterns 64

4.2.7 Customizing Linear Scan 64

4.2.8 Calling Linear Scan 65

4.2.9 One-touch Park 65

4.3 PTZ Control Panel 66

Chapter 5 Record and Capture Settings 68

5.1 Configuring Encoding Parameters 69

5.2 Configuring Record/Capture Schedule 73

5.3 Configuring Motion Detection Recording and Capture 76

5.4 Configuring Alarm Triggered Recording and Capture 78

5.5 Configuring VCA Recording and Capture 80

5.6 Configuring Manual Recording and Continuous Capture 82

5.7 Configuring Holiday Recording and Capture 84

5.8 Configuring Redundant Recording and Capture 86

5.9 Configuring HDD Group for Recording and Capture 88

5.10 Files Protection 90

5.10.1 Locking the Record Files 90

5.10.2 Setting HDD property to Read-only 92

Chapter 6 Playback 94

6.1 Playing Back Record Files 95

6.1.1 Playing Back by Time 95

6.1.2 Playing Back by Event Search 98

6.1.3 Playing Back by Tag 100

6.1.4 Playing Back by Smart Playback 102

6.1.5 Playing Back by Searching System Log 105

6.1.6 Playing Back by Sub-periods 106

6.1.7 Playing Back External Files 107

6.1.8 Playing Back Frame Extracting Record 107

6.2 Auxiliary Functions of Playback 109

6.2.1 Playing Back Frame by Frame 109

6.2.2 Digital Zoom 109

6.2.3 Reverse Playback of Multi-channel 110

6.3 Picture Playback 112

Chapter 7 Backup 113

Page 13 of the Hikvision DS-8004HFI-ST user manual — Product Key Features
Page 13 · click to enlarge
Page 13

7.1 Backing up Record Files 114

7.1.1 Quick Export 114

7.1.2 Backing up by Normal Video Search 115

7.1.3 Backing up by Event Search 117

7.1.4 Backing up Video Clips 118

7.2 Backing up Pictures 120

7.3 Managing Backup Devices 122

7.4 Hot Spare Backup 124

7.4.1 Setting the Hot Spare Device 124

7.4.2 Setting the Working Device 125

7.4.3 Hot Spare Management 126

Chapter 8 Alarm Settings 128

8.1 Setting Motion Detection 129

8.2 Setting Sensor Alarm 131

8.3 Detecting Video Loss 133

8.4 Detecting Video Tampering 135

8.5 Handling Exceptions 137

8.6 Setting Alarm Linkage Actions 138

8.7 Triggering or Clearing Alarm Output Manually 141

Chapter 9 VCA Alarm 142

9.1 Face Detection 143

9.2 Line Crossing Detection 144

9.3 Intrusion Detection 146

9.4 Region Entrance Detection 148

9.5 Region Exiting Detection 149

9.6 Loitering Detection 149

9.7 People Gathering Detection 149

9.8 Fast Moving Detection 149

9.9 Parking Detection 150

9.10 Unattended Baggage Detection 150

9.11 Object Removal Detection 150

9.12 Audio Exception Detection 151

9.13 Sudden Scene Change Detection 152

9.14 Defocus Detection 152

Page 14 of the Hikvision DS-8004HFI-ST user manual — Product Key Features
Page 14 · click to enlarge
Page 14

9.15 PIR Alarm 152

Chapter 10 VCA Search 153

10.1 Face Search 154

10.2 Behavior Search 156

10.3 People Counting 157

10.4 Heat Map 159

Chapter 11 Network Settings 160

11.1 Configuring General Settings 161

11.2 Configuring Advanced Settings 164

11.2.1 Configuring PPPoE Settings 164

11.2.2 Configuring DDNS Settings 164

11.2.3 Configuring NTP Server Settings 167

11.2.4 Configuring Email Settings 168

11.2.5 Configuring FTP Server Settings 169

11.2.6 Configuring SNMP Settings 170

11.2.7 Configuring NAT Settings 171

11.2.8 Configuring More Network Settings 173

11.2.9 Configuring HTTPS Settings 175

11.2.10 Virtual Host Settings 176

11.2.11 Telnet Settings 177

11.3 Checking Network Traffic 179

11.4 Network Detection 180

11.4.1 Testing Network Delay and Packet Loss 180

11.4.2 Exporting Network Packet 180

11.4.3 Checking Network Status 181

11.4.4 Checking Network Statistics 182

Chapter 12 RAID Configuration 184

12.1 Configuring Array and Virtual Disk 185

12.1.1 One-touch Configuration 186

12.1.2 Manually Creating Array and Virtual Disk 187

12.2 Rebuilding Array 192

12.2.1 Automatically Rebuilding Array 192

12.2.2 Manually Rebuilding Array 193

12.3 Repairing Virtual Disk 194

12.4 Deleting Array / Virtual Disk 195

12.4.3 Deleting the Virtual Disk 195

12.4.4 Deleting the Array 195

Page 15 of the Hikvision DS-8004HFI-ST user manual — Product Key Features
Page 15 · click to enlarge
Page 15

12.5 Upgrading Firmware 196

Chapter 13 HDD Management 198

13.1 Initializing HDDs 199

13.2 Managing Network HDD 201

13.3 Managing eSATA 203

13.4 Managing HDD Group 204

13.4.1 Setting HDD Groups 204

13.4.2 Setting HDD Property 205

13.5 Configuring Quota Mode 206

13.6 Configuring Frame Extracting Mode 207

13.7 Configuring Disk Clone 209

13.8 Checking HDD Status 211

13.9 Checking S.M.A.R.T. Information 212

13.10 Detecting Bad Sector 213

13.11 Configuring HDD Error Alarms 214

Chapter 14 Camera Settings 215

14.1 Configuring OSD Settings 216

14.2 Configuring Privacy Mask 217

14.3 Configuring Video Parameters 217

Chapter 15 Device Management and Maintenance 220

15.1 Viewing System Information 221

15.2 Searching & Exporting Log Files 222

15.3 Importing/Exporting Configuration Files 224

15.4 Upgrading System 225

15.4.1 Upgrading by Local Backup Device 225

15.4.2 Upgrading by FTP 225

15.5 Restoring Default Settings 226

Chapter 16 Others 227

16.1 Configuring RS-232 Serial Port 228

16.2 Configuring General Settings 229

16.3 Configuring DST Settings 231

16.4 Configuring More Settings 232

Page 16 of the Hikvision DS-8004HFI-ST user manual — Table of contents
Page 16 · click to enlarge
Page 16

Table of contents

Product Key Featuresp.7Chapter 1 Introductionp.171.1 Front Panelp.181.2 IR Remote Control Operationsp.221.3 USB Mouse Operationp.251.4 Input Method Descriptionp.261.5 Rear Panelp.27Chapter 2 Getting Startedp.302.1 Starting Up and Shutting Down the Devicep.312.2 Login and Logoutp.332.2.1 User Loginp.332.2.2 User Logoutp.342.3 Using the Wizard for Basic Configurationp.352.4 Adding and Connecting the IP Camerasp.392.4.3 Adding the IP Camerasp.392.4.4 Configuring the Connected IP Camerasp.43Chapter 3 Live Viewp.463.1 Introduction of Live Viewp.473.2 Operations in Live View Modep.483.2.1 Front Panel Operationp.483.2.2 Using the Mouse in Live Viewp.493.2.3 Using an Auxiliary Monitorp.503.2.4 Quick Setting Toolbar in Live View Modep.503.3 Adjusting Live View Settingsp.543.4 Channel-zero Encodingp.563.5 Manual Video Quality Diagnosticsp.573.6 User Logoutp.58Chapter 4 PTZ Controlp.594.1 Configuring PTZ Settingsp.604.2 Setting PTZ Presets, Patrols & Patternsp.624.2.1 Customizing Presetsp.624.2.2 Calling Presetsp.634.2.3 Customizing Patrolsp.634.2.4 Calling Patrolsp.644.2.5 Customizing Patternsp.654.2.6 Calling Patternsp.654.2.7 Customizing Linear Scanp.654.2.8 Calling Linear Scanp.664.2.9 One-touch Parkp.664.3 PTZ Control Panelp.67Chapter 5 Record and Capture Settingsp.695.1 Configuring Encoding Parametersp.705.2 Configuring Record/Capture Schedulep.745.3 Configuring Motion Detection Recording and Capturep.775.4 Configuring Alarm Triggered Recording and Capturep.795.5 Configuring VCA Recording and Capturep.815.6 Configuring Manual Recording and Continuous Capturep.835.7 Configuring Holiday Recording and Capturep.855.8 Configuring Redundant Recording and Capturep.875.9 Configuring HDD Group for Recording and Capturep.895.10 Files Protectionp.915.10.1 Locking the Record Filesp.915.10.2 Setting HDD property to Read-onlyp.93Chapter 6 Playbackp.956.1 Playing Back Record Filesp.966.1.1 Playing Back by Timep.966.1.2 Playing Back by Event Searchp.996.1.3 Playing Back by Tagp.1016.1.4 Playing Back by Smart Playbackp.1036.1.5 Playing Back by Searching System Logp.1066.1.6 Playing Back by Sub-periodsp.1076.1.7 Playing Back External Filesp.1086.1.8 Playing Back Frame Extracting Recordp.1086.2 Auxiliary Functions of Playbackp.1106.2.1 Playing Back Frame by Framep.1106.2.2 Digital Zoomp.1106.2.3 Reverse Playback of Multi-channelp.1116.3 Picture Playbackp.113Chapter 7 Backupp.1147.1 Backing up Record Filesp.1157.1.1 Quick Exportp.1157.1.2 Backing up by Normal Video Searchp.1167.1.3 Backing up by Event Searchp.1187.1.4 Backing up Video Clipsp.1197.2 Backing up Picturesp.1217.3 Managing Backup Devicesp.1237.4 Hot Spare Backupp.1257.4.1 Setting the Hot Spare Devicep.1257.4.2 Setting the Working Devicep.1267.4.3 Hot Spare Managementp.127Chapter 8 Alarm Settingsp.1298.1 Setting Motion Detectionp.1308.2 Setting Sensor Alarmp.1328.3 Detecting Video Lossp.1348.4 Detecting Video Tamperingp.1368.5 Handling Exceptionsp.1388.6 Setting Alarm Linkage Actionsp.1398.7 Triggering or Clearing Alarm Output Manuallyp.142Chapter 9 VCA Alarmp.1439.1 Face Detectionp.1449.2 Line Crossing Detectionp.1459.3 Intrusion Detectionp.1479.4 Region Entrance Detectionp.1499.5 Region Exiting Detectionp.1509.6 Loitering Detectionp.1509.7 People Gathering Detectionp.1509.8 Fast Moving Detectionp.1509.9 Parking Detectionp.1519.10 Unattended Baggage Detectionp.1519.11 Object Removal Detectionp.1519.12 Audio Exception Detectionp.1529.13 Sudden Scene Change Detectionp.1539.14 Defocus Detectionp.1539.15 PIR Alarmp.153Chapter 10 VCA Searchp.15410.1 Face Searchp.15510.2 Behavior Searchp.15710.3 People Countingp.15810.4 Heat Mapp.160Chapter 11 Network Settingsp.16111.1 Configuring General Settingsp.16211.2 Configuring Advanced Settingsp.16511.2.1 Configuring PPPoE Settingsp.16511.2.2 Configuring DDNS Settingsp.16511.2.3 Configuring NTP Server Settingsp.16811.2.4 Configuring Email Settingsp.16911.2.5 Configuring FTP Server Settingsp.17011.2.6 Configuring SNMP Settingsp.17111.2.7 Configuring NAT Settingsp.17211.2.8 Configuring More Network Settingsp.17411.2.9 Configuring HTTPS Settingsp.17611.2.10 Virtual Host Settingsp.17711.2.11 Telnet Settingsp.17811.3 Checking Network Trafficp.18011.4 Network Detectionp.18111.4.1 Testing Network Delay and Packet Lossp.18111.4.2 Exporting Network Packetp.18111.4.3 Checking Network Statusp.18211.4.4 Checking Network Statisticsp.183Chapter 12 RAID Configurationp.18512.1 Configuring Array and Virtual Diskp.18612.1.1 One-touch Configurationp.18712.1.2 Manually Creating Array and Virtual Diskp.18812.2 Rebuilding Arrayp.19312.2.1 Automatically Rebuilding Arrayp.19312.2.2 Manually Rebuilding Arrayp.19412.3 Repairing Virtual Diskp.19512.4 Deleting Array / Virtual Diskp.19612.4.3 Deleting the Virtual Diskp.19612.4.4 Deleting the Arrayp.19612.5 Upgrading Firmwarep.197Chapter 13 HDD Managementp.19913.1 Initializing HDDsp.20013.2 Managing Network HDDp.20213.3 Managing eSATAp.20413.4 Managing HDD Groupp.20513.4.1 Setting HDD Groupsp.20513.4.2 Setting HDD Propertyp.20613.5 Configuring Quota Modep.20713.6 Configuring Frame Extracting Modep.20813.7 Configuring Disk Clonep.21013.8 Checking HDD Statusp.21213.9 Checking S.M.A.R.T. Informationp.21313.10 Detecting Bad Sectorp.21413.11 Configuring HDD Error Alarmsp.215Chapter 14 Camera Settingsp.21614.1 Configuring OSD Settingsp.21714.2 Configuring Privacy Maskp.21814.3 Configuring Video Parametersp.218Chapter 15 Device Management and Maintenancep.22115.1 Viewing System Informationp.22215.2 Searching & Exporting Log Filesp.22315.3 Importing/Exporting Configuration Filesp.22515.4 Upgrading Systemp.22615.4.1 Upgrading by Local Backup Devicep.22615.4.2 Upgrading by FTPp.22615.5 Restoring Default Settingsp.227Chapter 16 Othersp.22816.1 Configuring RS-232 Serial Portp.22916.2 Configuring General Settingsp.23016.3 Configuring DST Settingsp.23216.4 Configuring More Settingsp.23316.5 Managing User Accountsp.234Chapter 17 Appendixp.237Glossaryp.238Troubleshootingp.239Summary of Changesp.244List of Compatible IP Camerasp.246List of Hikvision IP Camerasp.246List of Third-party IP Camerasp.250
Page 17 of the Hikvision DS-8004HFI-ST user manual — Chapter 1 Introduction
Page 17 · click to enlarge
Page 17

Chapter 1 Introduction

Page 18 of the Hikvision DS-8004HFI-ST user manual — DS-8100/8000HFI-ST & DS-8100/8000HWI-ST
Page 18 · click to enlarge
Page 18

1.1 Front Panel

The front panels of the devices are shown below.

Hikvision DS-8004HFI-ST — 1.1 Front Panel diagram (page 18)
Fig. 5 · 1.1 Front Panel

DS-9100/9000HFI-ST & DS-9100/9000HFI-RT & DS-9200HWI-ST

Hikvision DS-8004HFI-ST — DS-9100/9000HFI-ST & DS-9100/9000HFI-RT & DS-9200HWI-ST diagram (page 18)
Fig. 6

DS-9100/9000HWI-ST

Hikvision DS-8004HFI-ST — DS-9100/9000HWI-ST diagram (page 18)
Fig. 7

DS-9100/9000HFI-XT

Hikvision DS-8004HFI-ST — DS-9100/9000HFI-XT diagram (page 18)
Fig. 8

DS-8100/8000HFI-ST & DS-8100/8000HWI-ST

Figure 1. 1 Front Panel (1)

Page 19 of the Hikvision DS-8004HFI-ST user manual — A/FOCUS+
Page 19 · click to enlarge
Page 19

Table 1. 1 Description of Control Panel Buttons (1)

No. Name Function Description

ALARM Alarm indicator turns red when a sensor alarm is detected.

READY Ready indicator is normally blue, indicating that the device is functioning

properly.

Status indicator turns blue when device is controlled by an IR remote (if

the device ID# is 255, the indicator is off when the device is controlled

by an IR remote).

STATUS

Indicator turns red when controlled by a keyboard and purple when IR

remote and keyboard is used at the same time.

HDD HDD indicator blinks red when data is being read from or written to

HDD.

Reserved for future usage.

TX/RX TX/RX indictor blinks blue when network connection is functioning

properly.

Guard indicator turns blue when the device is in armed status; at this

time, an alarm is enabled when an event is detected.

GUARD

The indicator turns off when the device is unarmed. The arm/disarm

status can be changed by pressing and holding on the ESC button for

more than 3 seconds in live view mode.

2 IR Receiver Receiver for IR remote

You can lock or unlock the panel by the key.

4 DVD-R/W Slot for DVD-R/W. (Optional for DS-9100/9000HFI-RT)

Switch to the corresponding channel in Live view or PTZ Control mode.

Input numbers and characters in Edit mode.

Switch channels in Playback mode.

The light of the button is blue when the corresponding channel is

recording; it is red when the channel is in network transmission status; it

is pink when the channel is recording and transmitting.

Universal Serial Bus (USB) ports for additional devices such as USB

mouse and USB Hard Disk Drive (HDD).

Back to the previous menu.

ESC

Press for arming/disarming the device in Live View mode.

Enter the Manual Record setting menu.

In PTZ control settings, press the button and then you can call a PTZ

REC/SHOT

preset by pressing Numeric button.

It is also used to turn audio on/off in the Playback mode.

PLAY/AUTO The button is used to enter the Playback mode.

It is also used to auto scan in the PTZ Control menu.

ZOOM+ Zoom in the PTZ camera in the PTZ Control setting.

Adjust focus in the PTZ Control menu.

A/FOCUS+

It is also used to switch input methods (upper and lowercase alphabet,

symbols and numeric input).

EDIT/IRIS+ Edit text fields. When editing text fields, it will also function as a

Backspace button to delete the character in front of the cursor.

Show 7 more labels / short text on this page
MODEM (Not supported · by 9100/9000HFI-XT) · Front Panel Lock · (for DS-9200/9100/9000 · series) · 5 Alphanumeric Buttons · 6 USB Interfaces
Page 20 of the Hikvision DS-8004HFI-ST user manual — ENTER
Page 20 · click to enlarge
Page 20

On checkbox fields, pressing the button will tick the checkbox.

In PTZ Control mode, the button adjusts the iris of the camera.

In Playback mode, it can be used to generate video clips for backup.

Enter/exit the folder of USB device and eSATA HDD.

Switch main and spot output.

MAIN/SPOT/ZOOM-

In PTZ Control mode, it can be used to zoom out the image.

Select all items on the list when used in a list field.

F1/ LIGHT

In PTZ Control mode, it will turn on/off PTZ light (if applicable).

In Playback mode, it is used to switch play and reverse play.

Cycle through tab pages.

F2/ AUX

In synchronous playback mode, it is used to switch channels.

Press the button will help you return to the Main menu (after successful

login).

Press and hold the button for 5 seconds will turn off audible key beep.

MENU/WIPER

In PTZ Control mode, the MENU/WIPER button will start wiper (if

applicable).

In Playback mode, it is used to show/hide the control toolbar.

Switch single screen and multi-screen mode.

PREV/FOCUS-

In PTZ Control mode, it is used to adjust the focus in conjunction with

the A/FOCUS+ button.

Enter the PTZ Control mode.

PTZ/IRIS-

In the PTZ Control mode, it is used to adjust the iris of the PTZ camera.

The DIRECTION buttons are used to navigate between different fields

and items in menus.

In the Playback mode, the Up and Down button is used to speed up and

DIRECTION

slow down recorded video. The Left and Right button will select the next

and previous record files.

In Live View mode, these buttons can be used to cycle through channels.

In PTZ control mode, it can control the movement of the PTZ camera.

The ENTER button is used to confirm selection in any of the menu

modes.

It can also be used to tick checkbox fields.

ENTER

In Playback mode, it can be used to play or pause the video.

In single-frame Playback mode, pressing the button will advance the

video by a single frame.

In Auto-switch mode, it can be used to stop /start auto switch.

Move the active selection in a menu. It will move the selection up and

down.

In Live View mode, it can be used to cycle through different channels.

In the Playback modeFor DS-9200/9100/9000 series, the ring is used to

9 JOG SHUTTLE Control

jump 30s forward/backward in video files. For DS-8100/8000 series, the

outer ring is used to speed up or slow down the record files and the inner

ring is used to jump 30s forward/backward in records files.

In PTZ control mode, it can control the movement of the PTZ camera.

10 POWER ON/OFF Power on/off switch.

Page 21 of the Hikvision DS-8004HFI-ST user manual — DS-7200HWI-SV
Page 21 · click to enlarge
Page 21

If GUARD indicator is blue (default), all the alarm event and exception settings are valid. Otherwise, alarm event

and exception settings are invalid, but normal recording is still available.

It is important to note that you must press the EDIT button on either the remote or front panel on a text field before

you’re able to edit its content. After you’re done entering text, you must hit the ENTER button to be able to move

on to the next field.

Hikvision DS-8004HFI-ST — 1.1 Front Panel diagram (page 21)
Fig. 9 · 1.1 Front Panel

DS-7200HWI-SV

Figure 1. 2 Front Panel (2)

Table 1. 2 Description of Control Panel Buttons (2)

No. Name Function Description

1 POWER POWER indicator turns green when DVR is powered up.

2 STATUS STATUS indicator lights in red when data is being read from or written to

HDD.

3 Tx/Rx Tx/Rx indictor blinks green when network connection is functioning properly.

4 IR Receiver Receiver for IR remote.

5 USB Interface Connects USB mouse or USB flash memory devices.

Page 22 of the Hikvision DS-8004HFI-ST user manual — 1.2 IR Remote Control Operations
Page 22 · click to enlarge
Page 22

1.2 IR Remote Control Operations

The device may also be controlled with the included IR remote control, shown in Figure 1.3.

Batteries (2×AAA) must be installed before operation.

Hikvision DS-8004HFI-ST — 1.2 IR Remote Control Operations diagram (page 22)
Fig. 10 · 1.2 IR Remote Control Operations

Figure 1. 3 Remote Control

The keys on the remote control closely resemble the ones on the front panel. See Table 1.3.

Table 1. 3 Description of the IR Remote Control Buttons

Hikvision DS-8004HFI-ST — 1.2 IR Remote Control Operations diagram (page 22)
Fig. 11 · 1.2 IR Remote Control Operations

Switch to the corresponding channel in Live view or PTZ Control

Edit text fields. When editing text fields, it will also function as a

Backspace button to delete the character in front of the cursor.

On checkbox fields, pressing the button will tick the checkbox.

In PTZ Control mode, the button adjusts the iris of the camera.

In Playback mode, it can be used to generate video clips for backup.

Enter/exit the folder of USB device and eSATA HDD.

Page 23 of the Hikvision DS-8004HFI-ST user manual — DIRECTION/ENTER
Page 23 · click to enlarge
Page 23

Adjust focus in the PTZ Control menu. It is also used to switch input methods (upper and lowercase alphabet, symbols and numeric input).

Enter the Manual Record setting menu.

In PTZ control settings, press the button and then you can call a PTZ

preset by pressing Numeric button.

It is also used to turn audio on/off in the Playback mode.

7 PLAY Button The button is used to enter the Playback mode.

It is also used to auto scan in the PTZ Control menu.

8 INFO Button Reserved for future usage.

9 VOIP/MON Button Switch main and spot output.

In PTZ Control mode, it can be used to zoom out the image.

Press the button will help you return to the Main menu (after successful

login).

Press and hold the button for 5 seconds will turn off audible key beep. In PTZ Control mode, the MENU/WIPER button will start wiper (if applicable).

In Playback mode, it is used to show/hide the control toolbar.

Switch single screen and multi-screen mode.

In PTZ Control mode, it is used to adjust the focus in conjunction with

the A/FOCUS+ button.

The DIRECTION buttons are used to navigate between different fields

and items in menus.

In the Playback mode, the Up and Down button is used to speed up and

slow down recorded video. The Left and Right button will select the

next and previous record files.

In Live View mode, these buttons can be used to cycle through

DIRECTION/ENTER

channels.

In PTZ control mode, it can control the movement of the PTZ camera. The ENTER button is used to confirm selection in any of the menu modes.

It can also be used to tick checkbox fields.

In Playback mode, it can be used to play or pause the video. In single-frame Playback mode, pressing the button will advance the video by a single frame.

In Auto-switch mode, it can be used to stop /start auto switch.

13 PTZ Button Enter the PTZ Control mode.

In the PTZ Control mode, it is used to adjust the iris of the PTZ camera.

14 ESC Button Back to the previous menu.

Press for arming/disarming the device in Live View mode.

15 RESERVED Reserved for future usage.

Select all items on the list when used in a list field.

In PTZ Control mode, it will turn on/off PTZ light (if applicable).

In Playback mode, it is used to switch play and reverse play.

17 PTZ Control Buttons Buttons to adjust the iris, focus and zoom of a PTZ camera.

18 F2 Button Cycle through tab pages.

In synchronous playback mode, it is used to switch channels.

Remote Control Troubleshooting:

Show 6 more labels / short text on this page
5 A Button · REC Button · MENU Button · PREV Button · Buttons · F1 Button
Page 24 of the Hikvision DS-8004HFI-ST user manual — 1.2 IR Remote Control Operations
Page 24 · click to enlarge
Page 24

Make sure you have installed batteries properly in the remote control. And you have to aim the remote control at

the IR receiver in the front panel.

If there is no response after you press any button on the remote, follow the procedure below to troubleshoot.

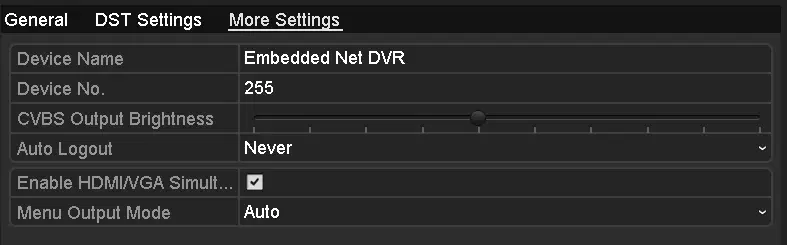
1. Go to Menu > Settings > General > More Settings by operating the front control panel or the mouse.
2. Check and remember device ID#. The default ID# is 255. This ID# is valid for all the IR remote controls.
3. Press the DEV button on the remote control.
4. Enter the device ID# in step 2.
5. Press the ENTER button on the remote.

If the Status indicator on the front panel turns blue, the remote control is operating properly. If the Status indicator

does not turn blue and there is still no response from the remote, please check the following:

When the device ID# is 255, the Status indicator is off when device is controlled by an IR remote control.

1. Batteries are installed correctly and the polarities of the batteries are not reversed.
2. Batteries are fresh and not out of charge.
3. IR receiver is not obstructed.

If the remote still can’t function properly, please change a remote and try again, or contact the device provider.

Page 25 of the Hikvision DS-8004HFI-ST user manual — 1.3 USB Mouse Operation
Page 25 · click to enlarge
Page 25

1.3 USB Mouse Operation

A regular 3-button (Left/Right/Scroll-wheel) USB mouse can also be used with this device. To use a USB mouse:

1. Plug USB mouse into one of the USB interfaces on the front panel of the device.
2. The mouse should automatically be detected. If in a rare case that the mouse is not detected, the possible

reason may be that the two devices are not compatible, please refer to the recommended device list from

your provider.

The operation of the mouse:

Table 1. 4 Description of the Mouse Control

Single-Click Live view: Select channel and show the quick set menu.

Menu: Select and enter.

Double-Click Live view: Switch single-screen and multi-screen.

Click and Drag PTZ control: pan, tilt and zoom.

Tamper-proof, privacy mask and motion detection: Select target area.

Digital zoom-in: Drag and select target area.

Live view: Drag channel/time bar.

Right-Click Single-Click Live view: Show menu.

Menu: Exit current menu to upper level menu.

Scrolling up Live view: Previous screen.

Right-click Menu: Previous item.

Scrolling down Live view: Next screen.

Right-click Menu: Next item.

Name Action Description · Left-Click · Scroll-Wheel

Page 26 of the Hikvision DS-8004HFI-ST user manual — 1.4 Input Method Description
Page 26 · click to enlarge
Page 26

1.4 Input Method Description

Hikvision DS-8004HFI-ST — 1.4 Input Method Description diagram (page 26)
Fig. 12 · 1.4 Input Method Description

Figure 1. 4 Soft Keyboard (1)

Hikvision DS-8004HFI-ST — 1.4 Input Method Description diagram (page 26)
Fig. 13 · 1.4 Input Method Description

Figure 1. 5 Soft Keyboard (2)

Description of the buttons on the soft keyboard:

Table 1. 5 Description of the Soft Keyboard Icons
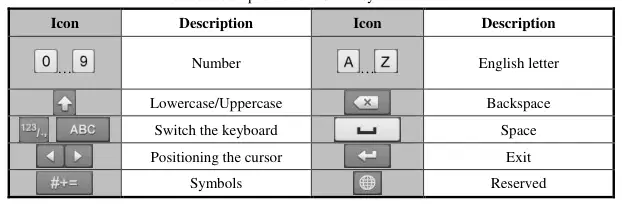
Hikvision DS-8004HFI-ST — 1.4 Input Method Description diagram (page 26)
Fig. 14 · 1.4 Input Method Description
Page 27 of the Hikvision DS-8004HFI-ST user manual — DS-8100/8000HFI-ST
Page 27 · click to enlarge
Page 27

1.5 Rear Panel

Hikvision DS-8004HFI-ST — 1.5 Rear Panel diagram (page 27)
Fig. 15 · 1.5 Rear Panel

DS-9100/9000HFI-ST

Hikvision DS-8004HFI-ST — DS-9100/9000HFI-ST diagram (page 27)
Fig. 16

DS-9200/9100/9000HWI-ST & DS-9100/9000HFI-RT

Hikvision DS-8004HFI-ST — DS-9200/9100/9000HWI-ST & DS-9100/9000HFI-RT diagram (page 27)
Fig. 17

DS-9100/9000HFI-XT

Hikvision DS-8004HFI-ST — DS-9100/9000HFI-XT diagram (page 27)
Fig. 18

DS-8100/8000HFI-ST

Page 28 of the Hikvision DS-8004HFI-ST user manual — DS-8100/8000HWI-ST
Page 28 · click to enlarge
Page 28
Hikvision DS-8004HFI-ST — 1.5 Rear Panel diagram (page 28)
Fig. 19 · 1.5 Rear Panel

DS-8100/8000HWI-ST

Figure 1. 6 Rear Panel (1)

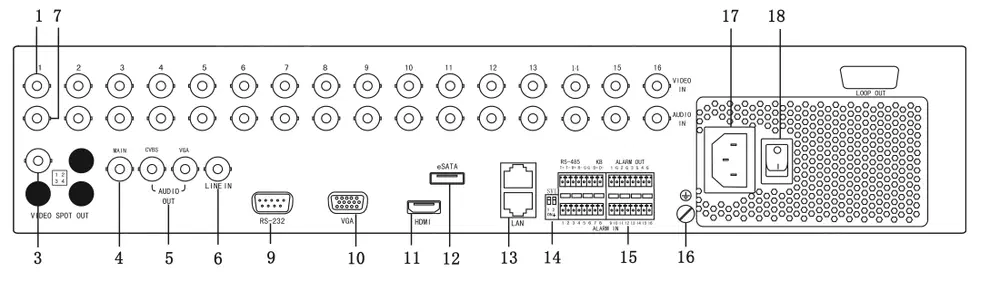
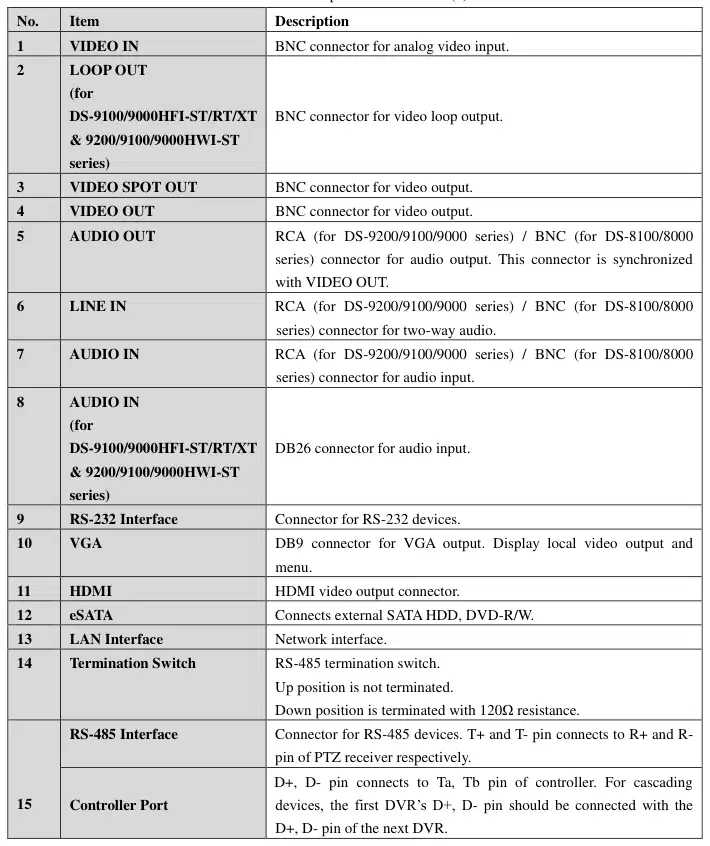
Table 1. 6 Description of Rear Panel (1)
Hikvision DS-8004HFI-ST — DS-8100/8000HWI-ST diagram (page 28)
Fig. 20

1 VIDEO IN BNC connector for analog video input.

3 VIDEO SPOT OUT BNC connector for video output.

5 AUDIO OUT RCA (for DS-9200/9100/9000 series) / BNC (for DS-8100/8000

series) connector for audio output. This connector is synchronized

6 LINE IN RCA (for DS-9200/9100/9000 series) / BNC (for DS-8100/8000

7 AUDIO IN RCA (for DS-9200/9100/9000 series) / BNC (for DS-8100/8000

10 VGA DB9 connector for VGA output. Display local video output and

RS-485 Interface Connector for RS-485 devices. T+ and T- pin connects to R+ and R-

D+, D- pin connects to Ta, Tb pin of controller. For cascading

devices, the first DVR’s D+, D- pin should be connected with the

Page 29 of the Hikvision DS-8004HFI-ST user manual — DS-7200HWI-SV
Page 29 · click to enlarge
Page 29
Hikvision DS-8004HFI-ST — 1.5 Rear Panel diagram (page 29)
Fig. 21 · 1.5 Rear Panel

16 GND Ground (needs to be connected when DVR starts up).

17 AC 100V ~ 240V AC 100V ~ 240V power supply.

19 USB Universal Serial Bus (USB) ports for additional devices such as USB

Hikvision DS-8004HFI-ST — 1.5 Rear Panel diagram (page 29)
Fig. 22 · 1.5 Rear Panel

DS-7200HWI-SV

Figure 1. 7 Rear Panel (2)

Table 1. 7 Description of Rear Panel (2)

Hikvision DS-8004HFI-ST — DS-7200HWI-SV diagram (page 29)
Fig. 23

1 VIDEO IN BNC connector for analog video input.

4 USB Interface Connects USB mouse or USB flash memory devices.

6 VGA DB15 connector for VGA output. Display local video output and menu.

9 RS-485 Interface Connector for RS-485 devices. Connect the D+ and D- terminals to R+

12 GND Ground (needs to be connected when DVR starts up).

Page 30 of the Hikvision DS-8004HFI-ST user manual — Chapter 2 Getting Started
Page 30 · click to enlarge
Page 30

Chapter 2 Getting Started

Page 31 of the Hikvision DS-8004HFI-ST user manual — 2.1 Starting Up and Shutting Down the Device
Page 31 · click to enlarge
Page 31

2.1 Starting Up and Shutting Down the Device

Proper startup and shutdown procedures are crucial to expanding the life of the device.

Before you start:

Check that the voltage of the extra power supply is the same with the device’s requirement, and the ground

connection is working properly.

Starting up the device:

Steps (for 7200 series):

1. Check the power supply is plugged into an electrical outlet. It is HIGHLY recommended that an

Uninterruptible Power Supply (UPS) be used in conjunction with the device.

2. Press the POWER button on the rear panel. The Power indicator LED should turn green indicating that the

device begins to start up.

3. After startup, the Power indicator LED is solid green. A splash screen with the status of the HDD appears on

the monitor. The row of icons at the bottom of the screen shows the HDD status. ‘X’ means that the HDD is

not installed or cannot be detected.

Steps (for other series):

1. Check the power supply is plugged into an electrical outlet. It is HIGHLY recommended that an

Uninterruptible Power Supply (UPS) be used in conjunction with the device.

2. Turn on the Power Switch on the rear panel and press the POWER button on the front panel. The Power

indicator LED should turn blue indicating that the device begins to start up.

3. After startup, the Power indicator LED is solid blue. A splash screen with the status of the HDD appears on

the monitor. The row of icons at the bottom of the screen shows the HDD status. ‘X’ means that the HDD is

not installed or cannot be detected.

Shutting down the device:

There are two proper ways to shut down the device.

Task 1Standard shutdown
1. Enter the Shutdown menu.
Hikvision DS-8004HFI-ST — 2.1 Starting Up and Shutting Down the Device diagram (page 31)
Fig. 24 · 2.1 Starting Up and Shutting Down the Device

Figure 2. 1 Shutdown Menu

2. Click the Shutdown button.
3. Click the Yes button.
Take 2By operating the front panel (not available for 7200 series)

Menu > Shutdown

Page 32 of the Hikvision DS-8004HFI-ST user manual — 2.1 Starting Up and Shutting Down the Device
Page 32 · click to enlarge
Page 32
1. Press and hold the POWER button on the front panel for 3 seconds.
2. Enter the administrator’s username and password in the dialog box for authentication.
3. Click the Yes button.

Do not press the POWER button again when the system is shutting down.

If you disable the ID Authentication in General Settings interface (Chapter 14.2), the dialog box for

authentication does not pop up.

In the Shutdown menu (Figure 1.7), you can also reboot the device.

1. Enter the Shutdown menu by clicking Menu > Shutdown.
2. Click the Logout button to logout the device or the Reboot button to reboot the device.

Rebooting the device

Page 33 of the Hikvision DS-8004HFI-ST user manual — 2.2 Login and Logout
Page 33 · click to enlarge
Page 33

2.2 Login and Logout

2.2.1 User Login

You must login the device before operating the menu and other functions. For the first-time access, you must login

by the admin user account.

1. In the Login dialog box, enter the admin password. By default, the password is 12345.
Hikvision DS-8004HFI-ST — 2.2 Login and Logout diagram (page 33)
Fig. 25 · 2.2 Login and Logout

Figure 1. 1 Change Password

The default password (12345) for the Admin account is for first-time log-in purposes only. You

must change this default password to better protect against security risks, such as the unauthorized

access by others to the product that may prevent the product from functioning properly and/or lead

to other undesirable consequences.

2. Click OK and you will be required to change the password.
Hikvision DS-8004HFI-ST — 2.2 Login and Logout diagram (page 33)
Fig. 26 · 2.2 Login and Logout

Figure 1. 2 Change Password

3. Click Yes and enter the old password and new password in the following dialog box. The new password must

be different from the old password.

Hikvision DS-8004HFI-ST — 2.2 Login and Logout diagram (page 33)
Fig. 27 · 2.2 Login and Logout

Figure 1. 3 Enter New Password

For your privacy, we strongly recommend changing the password to something of your own

choosing (using a minimum of 8 characters, including upper case letters, lower case letters,

numbers, and special characters) in order to increase the security of your product.

4. Click OK to finish changing the password and enter the menu operation.
Page 34 of the Hikvision DS-8004HFI-ST user manual — 2.2.2 User Logout
Page 34 · click to enlarge
Page 34

In the Login dialog box, if you have entered the wrong password for more than 5 times, the current user

account will be locked for 600 seconds.

Hikvision DS-8004HFI-ST — 2.2.2 User Logout diagram (page 34)
Fig. 28 · 2.2.2 User Logout
Hikvision DS-8004HFI-ST — 2.2.2 User Logout diagram (page 34)
Fig. 29 · 2.2.2 User Logout

Figure 1. 4 User Account Protection

2.2.2 User Logout

After logging out, the monitor turns to the live view mode and if you want to do some operation, you need to enter

user name and password tog in again.

1. Enter the Shutdown menu.

Figure 1. 5 Logout

2. Click Logout .

After you have logged out the system, menu operation on the screen is invalid. It is required to input a user name

and password to unlock the system.

Menu>Shutdown

Page 35 of the Hikvision DS-8004HFI-ST user manual — 2.3 Using the Wizard for Basic Configuration
Page 35 · click to enlarge
Page 35

2.3 Using the Wizard for Basic Configuration

By default, the Setup Wizard starts once the device has loaded.

Hikvision DS-8004HFI-ST — 2.3 Using the Wizard for Basic Configuration diagram (page 35)
Fig. 30 · 2.3 Using the Wizard for Basic Configuration

Figure 2. 2 Start Wizard Interface

Operating the Setup Wizard:

1. The Start Wizard can walk you through some important settings of the device. If you don’t want to use the

Start Wizard at that moment, click Exit. You can also choose to use the Start Wizard next time by leaving

the “Start wizard when device starts?” checkbox checked.

2. Click Next on the Wizard window to enter the Login window.
Hikvision DS-8004HFI-ST — 2.3 Using the Wizard for Basic Configuration diagram (page 35)
Fig. 31 · 2.3 Using the Wizard for Basic Configuration

Figure 2. 3 Login Window

3. Enter the admin password. By default, the password is 12345.

The default password (12345) for the Admin account is for first-time log-in purposes only. You

must change this default password to better protect against security risks, such as the unauthorized

access by others to the product that may prevent the product from functioning properly and/or lead

to other undesirable consequences.

If you do not change the default password, the following attention box will pop up to remind you. Click Yes

to set the new password.

Page 36 of the Hikvision DS-8004HFI-ST user manual — DS-9100/9000HFI-ST/RT/XT & DS-9200/9100/9000HWI-ST & DS-8100/8000HFI (HWI)-ST
Page 36 · click to enlarge
Page 36

Figure 2. 4 Message Box

4. To change the admin password, check the New Admin Password checkbox. Enter the new password and

confirm the password in the given fields.

For your privacy, we strongly recommend changing the password to something of your own

choosing (using a minimum of 8 characters, including upper case letters, lower case letters,

numbers, and special characters) in order to increase the security of your product.

5. Click Next to enter the date and time settings window.
Hikvision DS-8004HFI-ST — 2.3 Using the Wizard for Basic Configuration diagram (page 36)
Fig. 32 · 2.3 Using the Wizard for Basic Configuration

Figure 2. 5 Date and Time Settings

6. After the time settings, click Next which takes you to the Network Start Wizard window.

Dual NIC is not supported by DS-7200HWI-SV series.

Hikvision DS-8004HFI-ST — 2.3 Using the Wizard for Basic Configuration diagram (page 36)
Fig. 33 · 2.3 Using the Wizard for Basic Configuration

DS-9100/9000HFI-ST/RT/XT & DS-9200/9100/9000HWI-ST & DS-8100/8000HFI (HWI)-ST

Page 37 of the Hikvision DS-8004HFI-ST user manual — DS-7200HWI-ST
Page 37 · click to enlarge
Page 37
Hikvision DS-8004HFI-ST — 2.3 Using the Wizard for Basic Configuration diagram (page 37)
Fig. 34 · 2.3 Using the Wizard for Basic Configuration

DS-7200HWI-ST

Figure 2. 6 Network Configuration

7. Click Next after you configured the network parameters, which takes you to the Array Management window

(supported by DS-9100/9000HFI-RT series only).

Hikvision DS-8004HFI-ST — DS-7200HWI-ST diagram (page 37)
Fig. 35

Figure 2. 7 Array Management

8. After configuring array settings, click Next to enter the HDD Management window.
Hikvision DS-8004HFI-ST — DS-7200HWI-ST diagram (page 37)
Fig. 36

Figure 2. 8 HDD Management

Page 38 of the Hikvision DS-8004HFI-ST user manual — 2.3 Using the Wizard for Basic Configuration
Page 38 · click to enlarge
Page 38
9. To initialize the HDD, click Init . Initialization removes all the data saved in the HDD.
10. Click Next to enter the IP Camera Management window (only supported by HDVR series).
Hikvision DS-8004HFI-ST — 2.3 Using the Wizard for Basic Configuration diagram (page 38)
Fig. 37 · 2.3 Using the Wizard for Basic Configuration

Figure 2. 9 IP Camera Management

11. Click Search to search IP Camera. Click Add to add IP Camera (only supported by HDVR series).
12. After finishing IP Camera settings, click Next to enter the Record Settings window.
13. Click the icon

, and you can enable the continuous recording or motion Detection recording for all

channels of the device.

Hikvision DS-8004HFI-ST — 2.3 Using the Wizard for Basic Configuration diagram (page 38)
Fig. 38 · 2.3 Using the Wizard for Basic Configuration

Figure 2. 10 Record Settings

14. Click OK to complete the wizard settings.
Page 39 of the Hikvision DS-8004HFI-ST user manual — 2.4.3 Adding the IP Cameras
Page 39 · click to enlarge
Page 39

2.4 Adding and Connecting the IP Cameras

This Chapter is available for HDVR series only.

2.4.3 Adding the IP Cameras

HDVR can connect the network cameras and record the video got from them. So before you can get a live view or

record of the video, you should add the network cameras to the connection list of the device.

Before you start:

Ensure the network connection is valid and correct. For detailed checking and configuring of the network, please

see Chapter 9.1 Configuring General Settings, Chapter 9.3 Checking Network Traffic and Chapter 9.4 Network

Detection.

1. Enter the Camera Management interface.

Menu > Camera > Camera

Hikvision DS-8004HFI-ST — 2.4.3 Adding the IP Cameras diagram (page 39)
Fig. 39 · 2.4.3 Adding the IP Cameras

Figure 2. 11 Main Menu

In Analog Camera Management interface, the status of analog cameras is displayed. Clear the checkboxes,

and you can disable the corresponding analog cameras. One more network camera can be added by disabling

one analog camera. 16 /8 /4 network cameras can be added to DS-9016 & 8016 HFI-ST & 9016HFI-RT &

9016HFI-XT & 9016HWI-ST/9008&8008HFI-ST & 9008HFI-RT & 9008HWI-ST/9004 & 8004HFI-ST &

DS-9004HFI-RT & 9004HWI-ST series at most when all the analog cameras are enabled. 32 /16 /8 network

cameras can be added to DS-9016&8016 HFI-ST & 9016HFI-RT & 9016HFI-XT & 9016HWI-ST/9008 &

8008HFI-ST & 9008HFI-RT & 9008HWI-ST/9004&8004HFI-ST&DS-9004HFI-RT&9004HWI-ST series at

most when all the analog cameras are disabled.

Page 40 of the Hikvision DS-8004HFI-ST user manual — 2.4 Adding and Connecting the IP Cameras
Page 40 · click to enlarge
Page 40
Hikvision DS-8004HFI-ST — 2.4 Adding and Connecting the IP Cameras diagram (page 40)
Fig. 40 · 2.4 Adding and Connecting the IP Cameras

Figure 2. 12 Analog Camera Management

2. To add the online cameras:
1. Select the IP Camera tab, and the online cameras in the same network segment with the device will be

displayed on the list. You can click the button Refresh to refresh the information of the online cameras.

Hikvision DS-8004HFI-ST — 2.4 Adding and Connecting the IP Cameras diagram (page 40)
Fig. 41 · 2.4 Adding and Connecting the IP Cameras

Figure 2. 13 IP Camera Management

2. Click the icon

on the list, and the corresponding camera will be added automatically;

Or click the button Add All to add all the online cameras automatically. The user name and password

are admin and 12345 by default.

3. Optionally, you can click the button Custom Adding to enter the Custom Adding interface.
Page 41 of the Hikvision DS-8004HFI-ST user manual — 2.4 Adding and Connecting the IP Cameras
Page 41 · click to enlarge
Page 41
Hikvision DS-8004HFI-ST — 2.4 Adding and Connecting the IP Cameras diagram (page 41)
Fig. 42 · 2.4 Adding and Connecting the IP Cameras

Figure 2. 14 Custom Adding

Input the required information, including the IP address, protocol, management port, user name and admin

password, and then click the button Add to add the camera manually.

The cameras added and not added are differently color coded.

When adding encoding device with multiple channels, check the checkbox in the pop-up window to

select the channels to be added and click OK.

Hikvision DS-8004HFI-ST — 2.4 Adding and Connecting the IP Cameras diagram (page 41)
Fig. 43 · 2.4 Adding and Connecting the IP Cameras

Figure 2. 15 Selecting Multiple Channels

3. Import/Export the configuration file of the IP cameras.

Import the configuration file of IP cameras to the device:

Connect the backup device on which the configuration file is stored to the device.

1. Click the IP Camera Import/Export tab.
Page 42 of the Hikvision DS-8004HFI-ST user manual — 2.4 Adding and Connecting the IP Cameras
Page 42 · click to enlarge
Page 42
Hikvision DS-8004HFI-ST — 2.4 Adding and Connecting the IP Cameras diagram (page 42)
Fig. 44 · 2.4 Adding and Connecting the IP Cameras

Figure 2. 16 Import IP Camera Configuration File

2. Select the backup device from the drop-down list and you can click the Refresh button to get the latest

information of the backup device.

3. Select the configuration file of IP camera from the list.
4. Click the Import button to import the IP cameras to the device.
5. Click OK on the pop-up message box after the importing process is complete. The imported IP

cameras will be displayed on the IP Camera Management interface.

Hikvision DS-8004HFI-ST — 2.4 Adding and Connecting the IP Cameras diagram (page 42)
Fig. 45 · 2.4 Adding and Connecting the IP Cameras

Figure 2. 17 Attention-Importing Succeeded

Export the configuration file of IP cameras to backup device:

Connect the backup device on which the configuration file is stored to the device.

1. Click the IP Camera Import/Export tab.
Page 43 of the Hikvision DS-8004HFI-ST user manual — 2.4.4 Configuring the Connected IP Cameras
Page 43 · click to enlarge
Page 43
Hikvision DS-8004HFI-ST — 2.4.4 Configuring the Connected IP Cameras diagram (page 43)
Fig. 46 · 2.4.4 Configuring the Connected IP Cameras

Figure 2. 18 Export IP Camera Configuration File

2. Select the backup device from the drop-down list and you can click the Refresh button to get the latest

information of the backup device.

3. Click the Export button to export the configuration file of IP cameras to the backup device.
4. Click OK on the pop-up message box after the exporting process is complete. The configuration file of

IP cameras will be displayed on a list.

Hikvision DS-8004HFI-ST — 2.4.4 Configuring the Connected IP Cameras diagram (page 43)
Fig. 47 · 2.4.4 Configuring the Connected IP Cameras

Figure 2. 19 Attention-Exporting Succeeded

2.4.4 Configuring the Connected IP Cameras

Editing the connected IP cameras

The detailed information of the added IP cameras will be displayed on a list, and you can configure the basic

setting of the cameras if needed.

1. Click the icon

on the camera list to enter the Edit IP Camera interface.

Page 44 of the Hikvision DS-8004HFI-ST user manual — 2.4.4 Configuring the Connected IP Cameras
Page 44 · click to enlarge
Page 44
Hikvision DS-8004HFI-ST — 2.4.4 Configuring the Connected IP Cameras diagram (page 44)
Fig. 48 · 2.4.4 Configuring the Connected IP Cameras

Figure 2. 20 Edit IP Camera

2. Edit the camera information, such as the IP address, protocol, port, etc.
3. Click the button OK to save the new settings.
4. To delete the added camera, click the icon

Or check the corresponding checkbox and click the button Delete.

Table 2. 1 Description of the icons

Add the online IP camera automatically.

Edit the basic parameters of the added IP camera.

Delete the added IP camera.

Get the live view of the added IP camera.

Upgrade the added IP camera.

Configuring the custom protocols

Custom protocols can be set for the network cameras which are not configured with the standard protocols.

1. Click the button Protocol on the Custom Adding interface to open the Protocol Management page.
Hikvision DS-8004HFI-ST — 2.4.4 Configuring the Connected IP Cameras diagram (page 44)
Fig. 49 · 2.4.4 Configuring the Connected IP Cameras

Figure 2. 21 Protocol Management Interface

2. There are 16 custom protocols provided in the system. Select a custom protocol from the drop-down list, and

configure its corresponding parameters.

;

Page 45 of the Hikvision DS-8004HFI-ST user manual — 2.4.4 Configuring the Connected IP Cameras
Page 45 · click to enlarge
Page 45

Before customizing the protocol for the network camera, you have to contact the manufacturer of the

network camera to consult the URL (uniform resource locator) for getting main stream and sub-stream.

The format of the URL is: [Type]://[IP Address of the network camera]:[Port]/[Path].

Example: rtsp://192.168.1.55:554/ch1/main/av_stream.

  • Protocol Name: Edit the name for the custom protocol.
  • Enable Sub-stream: If the network camera does not support sub-stream or the sub-stream is not needed,

leave the checkbox empty.

  • Type: The network camera adopting custom protocol must support getting stream through standard

RTSP.

  • Transfer Protocol: Select the transfer protocol for the custom protocol.
  • Port: Set the port No. for the custom protocol.
  • Path: Set the resource path for the custom protocol. E.g., ch1/main/av_stream.
3. Click Apply to save the settings and click OK exit.

After added successfully, the custom protocol will be displayed in the drop-down list of protocol on the

Custom Adding interface.

Page 46 of the Hikvision DS-8004HFI-ST user manual — Chapter 3 Live View
Page 46 · click to enlarge
Page 46

Chapter 3 Live View

Page 47 of the Hikvision DS-8004HFI-ST user manual — 3.1 Introduction of Live View
Page 47 · click to enlarge
Page 47

3.1 Introduction of Live View

Live view shows you the video image getting from each camera in real time. The device automatically enters Live

View mode when powered on. It is also at the very top of the menu hierarchy, thus right-clicking the mouse

repeatedly (depending on which menu you’re on) brings you to the Live View mode.

In the live view mode, there are icons in the upper-right corner of the live view window, or in the lower-left corner

of the screen for each channel, showing the status of the record and alarm in the channel, so that you can know

whether the channel is recorded, or whether there are alarms occur as soon as possible.

Table 3. 1 Description of Live View Icons

Alarm (video loss, tampering, motion detection or sensor alarm)

Record (manual recording, continuous recording, motion detection or sensor alarm

Event/Exception (motion detection, sensor alarm or exception information. For details,

see Chapter 8.6 Handling Exceptions.)

Sensor alarm is not supported by DS-7200HWI-SV series.

Show 4 more labels / short text on this page
Live View Icons · Icons Description · triggered recording) · Alarm & Record
Page 48 of the Hikvision DS-8004HFI-ST user manual — 3.2.1 Front Panel Operation
Page 48 · click to enlarge
Page 48

3.2 Operations in Live View Mode

Table 3. 2 Priorities of Outputs for DS-9200/9100/9000/8100/8000HWI-ST & DS-7200 Series

Hikvision DS-8004HFI-ST — 3.2 Operations in Live View Mode diagram (page 48)
Fig. 50 · 3.2 Operations in Live View Mode

Table 3. 3 Priorities of Outputs for Other Models

Hikvision DS-8004HFI-ST — 3.2 Operations in Live View Mode diagram (page 48)
Fig. 51 · 3.2 Operations in Live View Mode

√ means the interface is in use, × means the interface is out of use or the connection is invalid. And the

HDMI, VGA and CVBS can be used at the same time.

When the aux output is enabled, you can do some basic operation in the live view mode for the Aux output, while

no operation is allowed for the main output.

3.2.1 Front Panel Operation

Front panel operation is not supported by 7200HWI-SV series.

Table 3. 4 Front Panel Operation in Live View

Hikvision DS-8004HFI-ST — 3.2.1 Front Panel Operation diagram (page 48)
Fig. 52 · 3.2.1 Front Panel Operation

Show single screen Press the corresponding Alphanumeric button. E.g. Press 2 to display only the screen

Page 49 of the Hikvision DS-8004HFI-ST user manual — 3.2.2 Using the Mouse in Live View
Page 49 · click to enlarge
Page 49

3.2.2 Using the Mouse in Live View

Hikvision DS-8004HFI-ST — 3.2.2 Using the Mouse in Live View diagram (page 49)
Fig. 53 · 3.2.2 Using the Mouse in Live View

Figure 3. 1 Right-click Menu

Table 3. 5 Mouse Operation in Live View

Hikvision DS-8004HFI-ST — 3.2.2 Using the Mouse in Live View diagram (page 49)
Fig. 54 · 3.2.2 Using the Mouse in Live View

Common Menu Quick access to the sub-menus which you frequently visit.

Menu Enter the main menu of the system by right clicking the mouse.

Single Screen Switch to the single full screen by choosing channel number from the drop-down list.

Multi-screen Adjust the screen layout by choosing from the drop-down list.

Start Recording Start all-day normal recording or motion detection recording for all channels.

Add IP Camera Add IP camera to the device.

Playback Play back the video of the selected channel.

PTZ Control Enter the PTZ control panel in live view mode.

Output Mode Set the video output mode to Standard, Bright, Gentle or Vivid.

The dwell time of the live view configuration must be set before using Start Auto-switch. Refer to Chapter

3.3 for dwell time settings.

If you enter Aux monitor mode and the Aux monitor is not connected, the mouse operation is disabled; you

need to switch back to the Main output with the MAIN/AUX button and Enter button on the front panel or

remote.

Add IP Camera is only available for the HDVR series.

Page 50 of the Hikvision DS-8004HFI-ST user manual — 3.2.4 Quick Setting Toolbar in Live View Mode
Page 50 · click to enlarge
Page 50

3.2.3 Using an Auxiliary Monitor

Certain features of the Live View are also available while in an Aux monitor. These features include:

  • Single Screen: Switch to a full screen display of the selected camera. Camera can be selected from a

drop-down list.

  • Multi-screen: Switch different display layout options. Layout options can be selected from a drop-down list.
  • Previous Screen: When displaying less than the maximum number of cameras in Live View, clicking this

feature will switch to the previous set of displays.

  • Next Screen: When displaying less than the maximum number of cameras in Live View, clicking this

feature will switch to the next set of displays.

  • Playback: Enter into Playback mode.
  • PTZ: Enter PTZ control panel in live view mode.
  • Output Mode : Set the video output mode to Standard, Bright, Gentle or Vivid.
  • Main Monitor: Enter Main operation mode.

In the live view mode of the main output monitor, the menu operation is not available when Aux output mode is

enabled.

3.2.4 Quick Setting Toolbar in Live View Mode

Click on the live view window, a quick setting toolbar will be shown on the bottom as follows:

The Live View Strategy icon

are only available for network cameras.

Hikvision DS-8004HFI-ST — 3.2.4 Quick Setting Toolbar in Live View Mode diagram (page 50)
Fig. 55 · 3.2.4 Quick Setting Toolbar in Live View Mode

Figure 3. 2 Quick Setting Toolbar

Table 3. 6 Description of Quick Setting Toolbar Icons

Hikvision DS-8004HFI-ST — 3.2.4 Quick Setting Toolbar in Live View Mode diagram (page 50)
Fig. 56 · 3.2.4 Quick Setting Toolbar in Live View Mode

Instant Playback only shows the record in last five minutes. If no record is found, it means there is no record

file during the last five minutes.

and Information icon

Page 51 of the Hikvision DS-8004HFI-ST user manual — 3.2.3 Using an Auxiliary Monitor
Page 51 · click to enlarge
Page 51

Digital Zoom function makes the camera zoom in on selected area, thus to get a close view of the picture. You

can click-and-drag the mouse to select the area for zooming in.

Hikvision DS-8004HFI-ST — 3.2.3 Using an Auxiliary Monitor diagram (page 51)
Fig. 57 · 3.2.3 Using an Auxiliary Monitor

Figure 3. 3 Digital Zoom

Image Settings icon can be selected to enter the Image Settings menu.

For Analog Cameras:

Four modes are selectable according to the real situation:

  • Standard: for general lighting conditions (default).
  • Indoor: the image is relatively smoother.
  • Dim Light: the image is smoother than the other two modes.
  • Outdoor: the image is relatively clearer and sharper. The degree of contrast and saturation is high.
Hikvision DS-8004HFI-ST — 3.2.3 Using an Auxiliary Monitor diagram (page 51)
Fig. 58 · 3.2.3 Using an Auxiliary Monitor
Hikvision DS-8004HFI-ST — 3.2.3 Using an Auxiliary Monitor diagram (page 51)
Fig. 59 · 3.2.3 Using an Auxiliary Monitor

Figure 3. 4 Image Settings for Analog Camera

You can adjust the image parameters, including brightness, contrast, saturation, hue, sharpness and denoising. You

can also click Default to restore the default settings and click Copy to copy the image settings to other analog

channels.

For analog cameras connected to DS-9200 HWI-ST series device, the defog mode is available. The defog function

is useful in foggy environment and 3 types of defog modes are selectable: Auto (default), Manual and Disable. A

correct and natural image will be provided with the defog function enabled.

Page 52 of the Hikvision DS-8004HFI-ST user manual — 3.2.3 Using an Auxiliary Monitor
Page 52 · click to enlarge
Page 52
Hikvision DS-8004HFI-ST — 3.2.3 Using an Auxiliary Monitor diagram (page 52)
Fig. 60 · 3.2.3 Using an Auxiliary Monitor
Hikvision DS-8004HFI-ST — 3.2.3 Using an Auxiliary Monitor diagram (page 52)
Fig. 61 · 3.2.3 Using an Auxiliary Monitor

Figure 3. 5 A Comparison of the Details Before and After Defogging

For Network Cameras:

You can customize the brightness, contrast, saturation and hue of network cameras.

Hikvision DS-8004HFI-ST — 3.2.3 Using an Auxiliary Monitor diagram (page 52)
Fig. 62 · 3.2.3 Using an Auxiliary Monitor

Figure 3. 6 Image Settings- Customize for Network Camera

Live View Strategy icon can be selected to enter the Live View Strategy menu. You can set the live view performance to real-time, balanced or fluency.

This feature is only available for network cameras.

Page 53 of the Hikvision DS-8004HFI-ST user manual — 3.2.3 Using an Auxiliary Monitor
Page 53 · click to enlarge
Page 53
Hikvision DS-8004HFI-ST — 3.2.3 Using an Auxiliary Monitor diagram (page 53)
Fig. 63 · 3.2.3 Using an Auxiliary Monitor

Figure 3. 7 Live View Strategy

Information icon can be selected to show the real-time status of the network camera, including the frame rate, bitrate and resolution.

Hikvision DS-8004HFI-ST — 3.2.3 Using an Auxiliary Monitor diagram (page 53)
Fig. 64 · 3.2.3 Using an Auxiliary Monitor

Figure 3. 8 Information

Page 54 of the Hikvision DS-8004HFI-ST user manual — 3.3 Adjusting Live View Settings
Page 54 · click to enlarge
Page 54

3.3 Adjusting Live View Settings

Live View settings can be customized to meet different needs. You can configure the output interface, number of

display window, dwell time for screen display, audio output settings, etc.

We use the interface of DS-9100HFI-ST series (unless otherwise stated) as the example to describe the following

settings.

1. Enter the Live View Settings interface.

Menu > Configuration > Live View

Hikvision DS-8004HFI-ST — 3.3 Adjusting Live View Settings diagram (page 54)
Fig. 65 · 3.3 Adjusting Live View Settings

Figure 3. 9 Live View-General

The settings available in this menu include:

  • Video Output Interface: Designates the output to configure the settings for. The interfaces

include HDMI (depends on the model), VGA, Main CVBS and Spot Output.

  • Live View Mode: Designates the display mode to be used for Live View.
  • Dwell Time: The time in seconds to dwell between switching of channels when enabling

auto-switch in Live View.

  • Enable Audio Output: Enables/disables audio output for the selected video output.
  • Volume: Adjust the volume of live view, playback and two-way audio for the selected output

interface.

  • Event Output: Designates the output to show event video.
  • Full Screen Monitoring Dwell Time: The time in seconds to show alarm event screen.
2. Setting Camera Order
Page 55 of the Hikvision DS-8004HFI-ST user manual — 3.3 Adjusting Live View Settings
Page 55 · click to enlarge
Page 55
Hikvision DS-8004HFI-ST — 3.3 Adjusting Live View Settings diagram (page 55)
Fig. 66 · 3.3 Adjusting Live View Settings

Figure 3. 10 Live View- Camera Order

To set the camera order:

1. Click the View tab.
2. Select a Video Output Interface and select a screen layout

. 3) Select the small window, and double-click on the channel number to display the channel on the

window.

means the channel will not be displayed.

You can also click

to start live view of all channels in order and click

to stop live view of all

to go to the previous or next page. 4) Click Apply to save the setting.

channels. Click

You can also click-and-drag the camera to the desired window on the live view interface to set the camera

order.

or

Page 56 of the Hikvision DS-8004HFI-ST user manual — 3.4 Channel-zero Encoding
Page 56 · click to enlarge
Page 56

3.4 Channel-zero Encoding

Sometimes you need to get a remote view of many channels in real time from web browser or CMS (Client

Management System) software, in order to decrease the bandwidth requirement without affecting the image quality,

channel-zero encoding is provided as an option for you.

1. Enter the Live View Settings interface.

Menu > Configuration > Live View

2. Click the Channel-Zero Encoding tab.
Hikvision DS-8004HFI-ST — 3.4 Channel-zero Encoding diagram (page 56)
Fig. 67 · 3.4 Channel-zero Encoding

Figure 3. 11 Live View- Channel-Zero Encoding

3. Check

checkbox to enable channel-zero encoding.

4. Configure the Frame Rate, Max. Bitrate Mode and Max. Bitrate.

After you set the channel-zero encoding, you can get a view in the remote client or web browser of all the channels

in one screen.

Page 57 of the Hikvision DS-8004HFI-ST user manual — 3.5 Manual Video Quality Diagnostics
Page 57 · click to enlarge
Page 57

3.5 Manual Video Quality Diagnostics

The video quality of the analog channels can be diagnosed manually and you can view the diagnostic results from

a list.

1. Enter the Manual Video Quality Diagnostics interface.

Menu > Manual > Manual Video Quality Diagnostics

2. Check the checkboxes to select the channels for diagnostics.
3. Click the button Diagnose , and the results will be displayed on a list. You can view the video status and

diagnostics time of the selected channels.

Hikvision DS-8004HFI-ST — 3.5 Manual Video Quality Diagnostics diagram (page 57)
Fig. 68 · 3.5 Manual Video Quality Diagnostics

Figure 3. 12 Diagnostics Result

Connect the analog signal to the device for the video quality diagnostics.

Three exception types can be diagnosed: Blurred Image, Abnormal Brightness and Color Cast.

Page 58 of the Hikvision DS-8004HFI-ST user manual — 3.6 User Logout
Page 58 · click to enlarge
Page 58

3.6 User Logout

After logging out, the monitor turns to the live view mode and if you want to do some operation, you need to enter

user name and password to log in again.

3. Enter the Shutdown menu.

Figure 3. 13 Shutdown

4. Click Logout .

After you have logged out the system, menu operation on the screen is invalid. It is required a user name and

password to login the system.

Menu > Shutdown

Page 59 of the Hikvision DS-8004HFI-ST user manual — Chapter 4 PTZ Control
Page 59 · click to enlarge
Page 59

Chapter 4 PTZ Control

Page 60 of the Hikvision DS-8004HFI-ST user manual — 4.1 Configuring PTZ Settings
Page 60 · click to enlarge
Page 60

4.1 Configuring PTZ Settings

Follow the procedure to set the parameters for PTZ. The configuring of the PTZ parameters should be done before

you control the PTZ camera.

Before you start:

Make sure that the PTZ camera and the device are connected properly via RS-485 interface.

1. Enter the PTZ Settings interface.

Menu > Camera > PTZ

Hikvision DS-8004HFI-ST — 4.1 Configuring PTZ Settings diagram (page 60)
Fig. 69 · 4.1 Configuring PTZ Settings

Figure 4. 1 PTZ Settings

2. Select the camera for PTZ setting from the drop-down list.
3. Click the RS-485 Settings button and then configure the RS-485 parameters of the device.
Hikvision DS-8004HFI-ST — 4.1 Configuring PTZ Settings diagram (page 60)
Fig. 70 · 4.1 Configuring PTZ Settings

Figure 4. 2 RS-485 Settings

All the parameters should be exactly the same as the PTZ camera parameters. Only PTZ Protocol can be

Page 61 of the Hikvision DS-8004HFI-ST user manual — 4.1 Configuring PTZ Settings
Page 61 · click to enlarge
Page 61

configured for network cameras.

Example: If the PTZ camera has a Baud rate as 115200, you should input 115200 in the Baud Rate field.

4. Click Copy if you want to configure same settings to other analog PTZ cameras.
5. Click Apply to save the settings.
Page 62 of the Hikvision DS-8004HFI-ST user manual — 4.2.1 Customizing Presets
Page 62 · click to enlarge
Page 62

4.2 Setting PTZ Presets, Patrols & Patterns

Before you start:

Make sure that the presets, patrols and patterns should be supported by PTZ protocols.

We use the interface of DS-9100HFI-ST series (unless otherwise stated) as the example to describe the following

settings.

Enter the PTZ Settings interface (Menu > Camera > PTZ).

Figure 4. 3 PTZ Settings

4.2.1 Customizing Presets

A preset is a predefined image position which contains information of pan, tilt, focus and other parameters. You

can customize the presets and the presets can be used with the event triggered action.

1. Select the camera for PTZ setting from the drop-down list.
2. Use the directional and zoom / focus / iris buttons on the PTZ control panel to steer the camera to the desired

view.

3. Input the preset No. (1~255) in the Preset text field, and then click the Set button under the Preset item to

save the preset.

4. Repeat the steps 3-4 to save more presets.
5. You can click the Clear button under the Preset item to clear the selected preset or click the Clear All button

to clear all the presets.

Page 63 of the Hikvision DS-8004HFI-ST user manual — 4.2.3 Customizing Patrols
Page 63 · click to enlarge
Page 63

4.2.2 Calling Presets

The view angle of the PTZ camera will be moved to the predefined position when you call a preset.

1. Click the button

in the lower-right corner of the PTZ setting interface;

or press the PTZ button on the front panel;

or click the PTZ Control icon

in the quick setting toolbar during the live view process,

or click PTZ Control on the right-click menu to open the PTZ control panel in live view mode.

2. Select the PTZ camera from the drop-down list for control.
3. Click the icon on the panel and then click the General tab to enter the general PTZ control interface.
4. Input the preset No. in the corresponding text field, and then click the Call Preset button to call it.
Hikvision DS-8004HFI-ST — 4.2.2 Calling Presets diagram (page 63)
Fig. 71 · 4.2.2 Calling Presets

Figure 4. 4 PTZ Control Panel-Call Preset

4.2.3 Customizing Patrols

A patrol is a scanning track specified by a group of user-defined key points, with the scanning speed between two

key points and the duration time at each key point separately programmable. The key points are corresponding to

the presets.

1. Select the camera for PTZ setting from the drop-down list.
2. Select patrol number from the drop-down list.
3. Click the button Set under the Patrol item to open KeyPoint settings interface.
4. Configure key point parameters, such as the preset No., duration of staying for one key point and speed of

patrol. The key point is corresponding to the preset. The Preset determines the order at which the PTZ will

follow while cycling through the patrol. The Duration refers to the time span to stay at the corresponding

key point. The Speed defines the speed at which the PTZ will move from one key point to the next.

Page 64 of the Hikvision DS-8004HFI-ST user manual — 4.2.4 Calling Patrols
Page 64 · click to enlarge
Page 64
Hikvision DS-8004HFI-ST — 4.2.4 Calling Patrols diagram (page 64)
Fig. 72 · 4.2.4 Calling Patrols

Figure 4. 5 Key point Configuration

5. Click Add to save the current key point, and then repeat the above steps to set the next one.
6. Click OK to save the patrol settings
7. You can click the Clear button under the Patrol item to clear the selected patrol or click the Clear All button

to clear all the patrol.

4.2.4 Calling Patrols

The PTZ camera will move according to the predefined patrol path when you call a patrol.

1. Click the button

in the lower-right corner of the PTZ setting interface;

or press the PTZ button on the front panel;

or click the PTZ Control icon

in the quick setting toolbar during the live view process,

or click PTZ Control on the right-click menu to open the PTZ control panel in live view mode.

2. Select the PTZ camera from the drop-down list for control.
3. Click the icon on the panel and then click the General tab to enter the general PTZ control interface.
4. Select the patrol from the corresponding drop-down list, and then click the Call Patrol button to start the

patrol.

5. To stop the patrol, you can click the button Stop Patrol on the panel.

Figure 4. 6 Control Panel-Call Patrol

Page 65 of the Hikvision DS-8004HFI-ST user manual — 4.2.7 Customizing Linear Scan
Page 65 · click to enlarge
Page 65

4.2.5 Customizing Patterns

A pattern is a memorized, repeating series of pan, tilt, zoom, and preset functions.

1. Select the camera for PTZ setting from the drop-down list.
2. Select the pattern number from the drop-down list.
3. Click the Start button under the Pattern item and then click the eight directional buttons under the image to

move the PTZ camera.

4. Click the Stop button, and the movement of PTZ is recorded as the pattern.

4.2.6 Calling Patterns

The PTZ camera will move according to the predefined pattern path when you call a pattern.

1. Click the button

in the lower-right corner of the PTZ setting interface;

or press the PTZ button on the front panel;

or click the PTZ Control icon

in the quick setting toolbar during the live view process;

or click PTZ Control on the right-click menu to open the PTZ control panel in live view mode.

2. Select the PTZ camera from the drop-down list for control.
3. Click the icon on the panel and then click the General tab to enter the general PTZ control interface.
4. Select the patrol from the corresponding drop-down list, and then click the Call Pattern button to start the

pattern.

5. To stop the pattern, you can click the button Stop Pattern on the panel.

Figure 4. 7 Control Panel-Call Pattern

4.2.7 Customizing Linear Scan

Page 66 of the Hikvision DS-8004HFI-ST user manual — 4.2.9 One-touch Park
Page 66 · click to enlarge
Page 66

Two limit points can be set for the view of the PTZ camera, and then the PTZ camera can horizontally auto scan

between the two predefined limits.

This function requires the support of the connected PTZ camera.

1. Select the camera for PTZ setting from the drop-down list.
2. Use the directional and zoom / focus / iris buttons on the PTZ control panel to steer the camera to the desired

view, and click the button Left Limit / Right Limit to set the left / right limit point.

4.2.8 Calling Linear Scan

The PTZ camera will horizontally auto scan between the two predefined limit points.

1. Click the button

in the lower-right corner of the PTZ setting interface;

or press the PTZ button on the front panel;

or click the PTZ Control icon

in the quick setting toolbar during the live view process;

or click PTZ Control on the right-click menu to open the PTZ control panel in live view mode.

2. Select the PTZ camera from the drop-down list for control.
3. Click the icon on the panel and then click the One-touch tab to enter the One-touch control interface.
4. Click the Linear Scan button to start the linear scan.
5. To stop the linear scan, you can click the Linear Scan button again on the panel.
6. You can click the Restore button and then reboot the PTZ camera to clear the limit points information.
Hikvision DS-8004HFI-ST — 4.2.8 Calling Linear Scan diagram (page 66)
Fig. 73 · 4.2.8 Calling Linear Scan

Figure 4. 8 Control Panel-Call Linear Scan

4.2.9 One-touch Park

The one-touch park function allows the PTZ camera to start a predefined action (park action: scan, preset, pattern,

etc.) automatically after a period of inactivity (park time).

Page 67 of the Hikvision DS-8004HFI-ST user manual — 4.3 PTZ Control Panel
Page 67 · click to enlarge
Page 67

Before you start:

Connect analog speed dome or network speed dome which supports one-touch park function.

For analog speed dome, it must be connected via Hikvision protocol.

1. Click the button

in the lower-right corner of the PTZ setting interface;

or press the PTZ button on the front panel;

or click the PTZ Control icon

in the quick setting toolbar during the live view process;

or click PTZ Control on the right-click menu to open the PTZ control panel in live view mode.

2. Select the PTZ camera from the drop-down list for control.
3. Click the icon on the panel and then click the One-touch tab to enter the One-touch control interface.
4. There are 3 one-touch park types selectable, click the corresponding button to activate the park action.

Park (Quick Patrol): The PTZ camera starts the quick patrol (from preset 1 to preset 32 in order)

automatically after the park time. The undefined preset will be skipped.

Park (Patrol 1): The PTZ camera moves according to the path of predefined patrol 1 after the park time.

Park (Preset 1): The PTZ camera moves to the location of predefined preset 1 after the park time.

5. Click the button again to inactivate the corresponding park action.

Figure 4. 9 Control Panel-Call Linear Scan

The park time can only be set through the local menu of PTZ camera and the default value is 5s.

4.3 PTZ Control Panel

To enter the PTZ control Panel, there are 2 ways supported:

Option1:

In the PTZ settings interface, click the PTZ button on the lower-right corner.

Option2:

In the Live View mode, you can press the PTZ Control button on the front panel or on the remote control, or click

the PTZ Control icon

in the quick setting toolbar, or click PTZ Control on the right-click menu to enter the PTZ control panel.

Page 68 of the Hikvision DS-8004HFI-ST user manual — 4.3 PTZ Control Panel
Page 68 · click to enlarge
Page 68

Click the Configuration button on the panel, and you can enter the PTZ Settings interface.

In PTZ control mode, the PTZ panel will be displayed when a mouse is connected with the device. If no mouse is

icon appears in the lower-left corner of the window, indicating that this camera is in PTZ

control mode.

Hikvision DS-8004HFI-ST — 4.3 PTZ Control Panel diagram (page 68)
Fig. 74 · 4.3 PTZ Control Panel

Figure 4. 10 PTZ Panel

Table 4. 1 Description of the PTZ panel icons

Hikvision DS-8004HFI-ST — 4.3 PTZ Control Panel diagram (page 68)
Fig. 75 · 4.3 PTZ Control Panel

connected, the

Page 69 of the Hikvision DS-8004HFI-ST user manual — Chapter 5 Record and Capture Settings
Page 69 · click to enlarge
Page 69

Chapter 5 Record and Capture Settings

Page 70 of the Hikvision DS-8004HFI-ST user manual — 5.1 Configuring Encoding Parameters
Page 70 · click to enlarge
Page 70

Sensor alarm is not supported by DS-7200HWI-SV series. The interfaces of the device are subject to the

actual model.

5.1 Configuring Encoding Parameters

By configuring the encoding parameters you can define the parameters which affect the image quality, such as

transmission stream type, the resolution, etc.

Before you start:

1. Make sure that the HDD has already been installed. If not, please install a HDD and click Init to initialize it.

(Menu > HDD > General)

Hikvision DS-8004HFI-ST — 5.1 Configuring Encoding Parameters diagram (page 70)
Fig. 76 · 5.1 Configuring Encoding Parameters

Figure 5. 1 HDD- General

2. Check the storage mode of the HDD
1. Click Advanced to check the storage mode of the HDD.
2. If the HDD mode is Quota , please set the maximum record capacity and maximum picture capacity.

For detailed information, see Chapter 11.5 Configuring Quota Mode.

3. If the HDD mode is Group , you should set the HDD group. For detailed information, see Chapter 5.9

Configuring HDD Group for Recording and Capture.

1. Enter the Record settings interface to configure the encoding parameters:

Menu > Record > Parameters

Hikvision DS-8004HFI-ST — 5.1 Configuring Encoding Parameters diagram (page 70)
Fig. 77 · 5.1 Configuring Encoding Parameters

Figure 5. 2 Record Parameters

2. Encoding Parameters for Recording
Page 71 of the Hikvision DS-8004HFI-ST user manual — 5.1 Configuring Encoding Parameters
Page 71 · click to enlarge
Page 71
1. Click the Record tab to configure the record parameters, such as stream type, resolution, bitrate type,

video quality, frame rate, etc.

2. Click More Settings to configure more parameters.
Hikvision DS-8004HFI-ST — 5.1 Configuring Encoding Parameters diagram (page 71)
Fig. 78 · 5.1 Configuring Encoding Parameters

Figure 5. 3 Record Encoding (when HDD Mode is Group)

Hikvision DS-8004HFI-ST — 5.1 Configuring Encoding Parameters diagram (page 71)
Fig. 79 · 5.1 Configuring Encoding Parameters

Figure 5. 4 Recording Encoding (when HDD Mode is Quota or Frame Extracting)

  • Pre-record: The time you set to record before the scheduled time or event. For example, when an

alarm triggered the recording at 10:00, if you set the pre-record time as 5 seconds, the camera

records it at 9:59:55.

  • Post-record: The time you set to record after the event or the scheduled time. For example, when

an alarm triggered the recording ends at 11:00, if you set the post-record time as 5 seconds, it

records till 11:00:05.

  • Expired Time: The time for keeping the record files in the HDDs, once exceeded, the files will be

deleted. The files will be saved permanently if the value is set as 0. The actual keeping time for the

files should be determined by the capacity of the HDDs.

  • Redundant Record/ Capture: Enabling redundant record or capture means you save the record

and captured picture in the redundant HDD. See Chapter 5.8 Configuring Redundant Recording/

Capture.

  • Record Audio: Enable this feature to record the sound and disable it to record the video without

sound.

  • Video Stream: Main stream and sub-stream are selectable for recording. When you select

sub-stream, you can record for a longer time with the same storage space

The Redundant Record/Capture option is only available when the HDD mode is Group.

Redundant HDD is required for the redundant record/capture function. For detailed information, see

Chapter 11.4.2 Setting HDD Property.

For network cameras, the parameters of Main Stream (Event) are not editable.

For DS-9100/9000/8100/8000HWI-ST & DS-7200HWI-SV series, you can enable/disable the WD1

Page 72 of the Hikvision DS-8004HFI-ST user manual — 5.1 Configuring Encoding Parameters
Page 72 · click to enlarge
Page 72

mode.

3. Click Apply to save the settings.
4. Optionally, you can click Copy to copy the settings to other analog channels if needed.
3. Encoding Parameters for Sub-stream
1. Click the Substream tab to configure the parameters of sub-stream, such as stream type, resolution,

frame rate, etc.

Hikvision DS-8004HFI-ST — 5.1 Configuring Encoding Parameters diagram (page 72)
Fig. 80 · 5.1 Configuring Encoding Parameters

Figure 5. 5 Sub-stream Encoding

2. Click Apply to save the settings.
3. Optionally, you can click Copy to copy the settings to other analog channels if needed.
4. Encoding Parameters for Capture
1. Click the Capture tab to configure the capture parameters, such as resolution, picture quality, etc.
Hikvision DS-8004HFI-ST — 5.1 Configuring Encoding Parameters diagram (page 72)
Fig. 81 · 5.1 Configuring Encoding Parameters

Figure 5. 6 Capture Encoding

2. You can configure the continuous and event parameters separately.
3. Click Apply to save the settings.
4. Optionally, you can click Copy to copy the settings to other analog channels if needed.

The interval is the time period between two capturing actions and the interval can be set as 1s, 2s, 3s,

4s, 5s, 10min, 30min, 1h, 12h and 24h. You can configure all the parameters on this menu on your

demand.

5. Configure the overwrite mode of the HDD (Menu>Record>Advanced>Advanced). Check

enable the overwrite mode, and then the record files will be overwritten when the HDD becomes full.

Otherwise, the recording will stop when the HDD becomes full.

Hikvision DS-8004HFI-ST — 5.1 Configuring Encoding Parameters diagram (page 72)
Fig. 82 · 5.1 Configuring Encoding Parameters

Figure 5. 7 Overwrite Mode

checkbox to

Page 73 of the Hikvision DS-8004HFI-ST user manual — 5.1 Configuring Encoding Parameters
Page 73 · click to enlarge
Page 73
6. Configure the two-way audio record (Menu>Record>Advanced>Two-way Audio). Check

enable the two-way audio record and select the camera from the drop-down list. Then, the two-way audio

record will be bound to the selected camera as the audio input.

The two-way audio record can only be bound to the analog cameras.

The bound two-way audio record will overlap the original audio input during the two-way audio.

Hikvision DS-8004HFI-ST — 5.1 Configuring Encoding Parameters diagram (page 73)
Fig. 83 · 5.1 Configuring Encoding Parameters

Figure 5. 8 Two-way Audio Record

checkbox to

Page 74 of the Hikvision DS-8004HFI-ST user manual — 5.2 Configuring Record/Capture Schedule
Page 74 · click to enlarge
Page 74

5.2 Configuring Record/Capture Schedule

Set the record schedule, and then the camera automatically starts/stops recording according to the configured

schedule.

In this chapter, we take the record schedule procedure as an example, and the same procedure can be applied

to configure schedule for both continuous recording and capture. To schedule the automatic capture, you

need to choose the Capture tab in the Schedule interface.

We use the interface of DS-9000HFI-ST series (unless otherwise stated) as example to describe the following

settings.

1. Enter the Record Schedule interface.

Menu > Record > Schedule

Hikvision DS-8004HFI-ST — 5.2 Configuring Record/Capture Schedule diagram (page 74)
Fig. 84 · 5.2 Configuring Record/Capture Schedule

Figure 5. 9 Record Schedule

Hikvision DS-8004HFI-ST — 5.2 Configuring Record/Capture Schedule diagram (page 74)
Fig. 85 · 5.2 Configuring Record/Capture Schedule

Recording triggered by all event detection

Recording triggered by motion detection

Recording triggered by alarm

Recording triggered by motion detection or alarm Recording triggered by motion detection and alarm Delete the schedule

Figure 5. 10 Record Type

The VCA settings and VCA event triggered recording / capture are supported by the analog cameras

01~04 or the smart IP cameras connected to the HDVR only.

To enable Motion, Alarm, M | A (motion or alarm), M & A (motion and alarm) and VCA (Video

Content Analysis) triggered recording, you must configure the motion detection settings, alarm input

settings or VCA settings as well. For detailed information, refer to Chapter 8.1, Chapter 8.2 and

Chapter 8.5.

2. Click the Record tab, select the camera for schedule settings, and then check the checkbox of Enable

Normal recording

Page 75 of the Hikvision DS-8004HFI-ST user manual — 5.2 Configuring Record/Capture Schedule
Page 75 · click to enlarge
Page 75

Schedule.

There are two ways to configure the record schedule for the selected camera.

Task 1Edit the Schedule
1. Click Edit.
2. In the message box, you can choose the day which you want to set schedule.
3. To set an all-day recording for the schedule, check the checkbox of All Day , and then select the

recording type from the drop-down list, including Continuous, Motion, Alarm, Motion | Alarm, Motion

& Alarm and VCA.

4. To set recording for different time periods, leave the checkbox of All Day blank, specify the start / end

time, and then select the recording type for the corresponding time period.

Up to 8 time periods can be configured for each day. And the time periods cannot be overlapped

each other.

5. Repeat the above steps 3)-4) to schedule recording/capture for other days in the week. Optionally, you

can also click Copy and copy the current schedule settings to other days.

6. Click OK to save settings and exit.
Hikvision DS-8004HFI-ST — 5.2 Configuring Record/Capture Schedule diagram (page 75)
Fig. 86 · 5.2 Configuring Record/Capture Schedule

Figure 5. 11 Edit the Schedule

The Holiday option is available when you enable holiday schedule in Holiday settings. Refer to

Chapter 5.7 Configuring Holiday Record and Capture.

Page 76 of the Hikvision DS-8004HFI-ST user manual — 5.2 Configuring Record/Capture Schedule
Page 76 · click to enlarge
Page 76
Hikvision DS-8004HFI-ST — 5.2 Configuring Record/Capture Schedule diagram (page 76)
Fig. 87 · 5.2 Configuring Record/Capture Schedule

Figure 5. 12 Holiday Settings

Task 2Draw the Schedule
1. Click to select a record type, including Continuous, Motion, Alarm, M | A, M & A, VCA and None.
2. Use the mouse to drag and draw time periods.

Up to 8 periods can be configured for each day.

Hikvision DS-8004HFI-ST — 5.2 Configuring Record/Capture Schedule diagram (page 76)
Fig. 88 · 5.2 Configuring Record/Capture Schedule

Figure 5. 13 Draw the Schedule

3. Repeat the above steps to set schedule for other channels. Optionally, you can click Copy and copy the

current schedule settings to other channels.

4. Click Apply in the Record/Capture Schedule interface to save the settings.
Page 77 of the Hikvision DS-8004HFI-ST user manual — 5.3 Configuring Motion Detection Recording
Page 77 · click to enlarge
Page 77

5.3 Configuring Motion Detection Recording

and Capture

Follow the steps to set the motion detection parameters. In the live view mode, once a motion detection event takes

place, the device can analyze it and do many actions to handle it. Enabling motion detection function can trigger

certain channels to start recording/capture, or trigger full screen monitoring, audible warning, notify the

surveillance center and so on. In this chapter, you can follow the steps to schedule a record which triggered by the

detected motion.

1. Enter the Motion Detection interface.

Menu > Camera > Motion

Hikvision DS-8004HFI-ST — 5.3 Configuring Motion Detection Recording diagram (page 77)
Fig. 89 · 5.3 Configuring Motion Detection Recording

Figure 5. 14 Motion Detection

2. Configure Motion Detection:
1. Choose camera you want to configure.
2. Check

checkbox to enable motion detection.

3. Drag and draw the area for motion detection by mouse. If you want to set the motion detection for all

the area shot by the camera, click Full Screen. To clear the motion detection area, click Clear.

4. Click

to configure the motion detection settings in the pop-up message box.

Hikvision DS-8004HFI-ST — 5.3 Configuring Motion Detection Recording diagram (page 77)
Fig. 90 · 5.3 Configuring Motion Detection Recording

Figure 5. 15 Motion Detection Settings

IP Camera is supported by HDVR series only.

5. Select the channels which you want the motion detection event to trigger recording.
6. Click Apply to save the settings.
Page 78 of the Hikvision DS-8004HFI-ST user manual — 5.3 Configuring Motion Detection Recording and Capture
Page 78 · click to enlarge
Page 78
7. Click OK to back to the upper level menu.
8. Click Apply in the Motion Detection interface to save the settings.
9. Exit the Motion Detection interface.
3. Enter Record/Capture Schedule settings interface (Menu> Record> Schedule>Record/Capture Schedule),

and then set Motion as the record type. For details, see step 2 in Chapter 5.2 Configuring Record/Capture

Schedule.

Page 79 of the Hikvision DS-8004HFI-ST user manual — 5.4 Configuring Alarm Triggered Recording
Page 79 · click to enlarge
Page 79

5.4 Configuring Alarm Triggered Recording

and Capture

Follow the procedure to configure alarm triggered recording or capture.

Sensor alarm is not supported by DS-7200HWI-SV series.

We use the interface of DS-9100HFI-ST series (unless otherwise stated) as example to describe the following

settings.

1. Enter the Alarm setting interface.

Menu > Configuration > Alarm

Hikvision DS-8004HFI-ST — 5.4 Configuring Alarm Triggered Recording diagram (page 79)
Fig. 91 · 5.4 Configuring Alarm Triggered Recording

Figure 5. 16 Alarm Settings

2. Click Alarm Input tab.
Hikvision DS-8004HFI-ST — 5.4 Configuring Alarm Triggered Recording diagram (page 79)
Fig. 92 · 5.4 Configuring Alarm Triggered Recording

Figure 5. 17 Alarm Settings-Alarm Input

1. Select Alarm Input No. and configure alarm parameters.
2. Edit the alarm name as desired and choose N.O (normally open) or N.C (normally closed) for alarm

type.

3. Check

checkbox to enable the alarm input.

4. Click

to configure the alarm settings.

Page 80 of the Hikvision DS-8004HFI-ST user manual — 5.4 Configuring Alarm Triggered Recording and Capture
Page 80 · click to enlarge
Page 80
Hikvision DS-8004HFI-ST — 5.4 Configuring Alarm Triggered Recording and Capture diagram (page 80)
Fig. 93 · 5.4 Configuring Alarm Triggered Recording and Captur…

Figure 5. 18 Alarm Input Settings

IP Camera is supported by HDVR series only.

5. Check the checkbox

to choose the alarm triggered recording/capture channel.

6. Click Apply to save settings.
7. Click OK to back to the upper level menu.
8. Click Apply in the Alarm Input interface to save the settings.
9. Repeat the above steps to configure parameters of other alarm inputs. Optionally, you can click Copy

to copy the current settings to other alarm inputs.

3. Enter Record/Capture Schedule settings interface (Menu> Record> Schedule>Record/Capture Schedule),

and then set Alarm as the record type. For details, see step 2 in Chapter 5.2 Configuring Record/Capture

Schedule.

Page 81 of the Hikvision DS-8004HFI-ST user manual — 5.5 Configuring VCA Recording and Capture
Page 81 · click to enlarge
Page 81

5.5 Configuring VCA Recording and Capture

The event triggered recording can be configured through the menu. Then events include the motion detection,

alarm and VCA events (face detection/face capture, line crossing detection, intrusion detection, region entrance

detection, region exiting detection, loitering detection, people gathering detection, fast moving detection, parking

detection, unattended baggage detection, object removal detection, audio loss exception detection, sudden change

of sound intensity detection, and defocus detection).

The VCA settings and VCA event triggered recording / capture are supported by the analog cameras 01~04

or the smart IP cameras connected to the HDVR only.

1. Enter the VCA settings interface and select a camera for the VCA settings.

Menu > Camera > VCA

Hikvision DS-8004HFI-ST — 5.5 Configuring VCA Recording and Capture diagram (page 81)
Fig. 94 · 5.5 Configuring VCA Recording and Capture

Figure 5. 19 VCA Settings

2. Configure the detection rules for VCA events. For details, see the step 2 in Chapter 8.5 Detecting VCA

Alarm.

3. Click the icon

to configure the alarm linkage actions for the VCA events.

Select Trigger Channel tab and select one or more channels which will start to record/capture when VCA

alarm is triggered.

4. Click Apply to save the settings
Page 82 of the Hikvision DS-8004HFI-ST user manual — 5.5 Configuring VCA Recording and Capture
Page 82 · click to enlarge
Page 82
Hikvision DS-8004HFI-ST — 5.5 Configuring VCA Recording and Capture diagram (page 82)
Fig. 95 · 5.5 Configuring VCA Recording and Capture

Figure 5. 20 Set Trigger Camera of VCA Alarm

The PTZ Linking function is only available for the VCA settings of IP cameras.

5. Enter Record/Capture Schedule settings interface (Menu> Record> Schedule>Record/Capture Schedule),

and then set VCA as the record type. For details, see step 2 in Chapter 5.2 Configuring Record/Capture

Schedule.

Page 83 of the Hikvision DS-8004HFI-ST user manual — 5.6 Configuring Manual Recording and
Page 83 · click to enlarge
Page 83

5.6 Configuring Manual Recording and

Continuous Capture

Follow the steps to set parameters for the manual recording and continuous capture. Using manual recording and

continuous capture, you need to manually cancel the record and capture. The manual recording and manual

continuous capture is prior to the scheduled recording and capture.

1. Enter the Manual settings interface.

Or press the REC/SHOT button on the front panel.

Hikvision DS-8004HFI-ST — 5.6 Configuring Manual Recording and diagram (page 83)
Fig. 96 · 5.6 Configuring Manual Recording and

Figure 5. 21 Manual Record

IP Camera is supported by HDVR series only.

2. Enable manual record
1. Select Record tab on the left bar.
2. Click the status button before camera No. to change
3. Disable manual record.

Click the status button to change

After rebooting, all the manual records enabled will be canceled.

4. Start all-day normal recording or all-day motion detection recording of all channels.
1. Click
2. Confirm the pop-up message box to enable all-day continuous recording or all-day motion detection

recording of all channels.

5. Enabling and disabling the continuous capture.
1. Select Continuous Capture tab on the left bar.
Show 5 more labels / short text on this page
Menu> Manual · to · to · for · or
Page 84 of the Hikvision DS-8004HFI-ST user manual — 5.6 Configuring Manual Recording and Continuous Capture
Page 84 · click to enlarge
Page 84
Hikvision DS-8004HFI-ST — 5.6 Configuring Manual Recording and Continuous Capture diagram (page 84)
Fig. 97 · 5.6 Configuring Manual Recording and Continuous Capt…

Figure 5. 22 Continuous Capture

IP Camera is supported by HDVR series only.

2. Click the status button before camera number to change

to enable continuous capture.

3. Or click the status button to change

to disable continuous capture.

After rebooting, all the continuous capture will be canceled.

to · to

Page 85 of the Hikvision DS-8004HFI-ST user manual — 5.7 Configuring Holiday Recording and
Page 85 · click to enlarge
Page 85

5.7 Configuring Holiday Recording and

Capture

You may want to have different plan for recording and capture on holiday. Follow the steps to configure the record

or capture schedule on holiday for that year.

The priority of holiday schedule is higher than any other schedule.

1. Enter the Record setting interface.
2. Choose Holiday on the left bar.
Hikvision DS-8004HFI-ST — 5.7 Configuring Holiday Recording and diagram (page 85)
Fig. 98 · 5.7 Configuring Holiday Recording and

Figure 5. 23 Holiday Settings

3. Enable editing holiday schedule.
1. Click

to enter the Edit interface.

Hikvision DS-8004HFI-ST — 5.7 Configuring Holiday Recording and diagram (page 85)
Fig. 99 · 5.7 Configuring Holiday Recording and

Figure 5. 24 Edit Holiday Settings

2. Check

checkbox to enable the holiday schedule.

3. Select Mode from the drop-down list.

Menu > Record

Page 86 of the Hikvision DS-8004HFI-ST user manual — 5.7 Configuring Holiday Recording and Capture
Page 86 · click to enlarge
Page 86

There are three different modes for the date format to configure holiday schedule, including Date,

Week and Month.

4. Set the start and end date.
5. Click Apply to save settings.
6. Click OK to exit the Edit interface.
4. Enter Record/Capture Schedule settings interface (Menu>Record>Schedule>Record/Capture Schedule). For

detailed information about record schedule settings, refer to step 2 in Chapter 5.2 Configuring

Record/Capture Schedule.

You need to select schedule type as Holiday or draw the schedule for the Holiday.

Hikvision DS-8004HFI-ST — 5.7 Configuring Holiday Recording and Capture diagram (page 86)
Fig. 100 · 5.7 Configuring Holiday Recording and Capture

Figure 5. 25 Edit Schedule- Holiday

Page 87 of the Hikvision DS-8004HFI-ST user manual — 5.8 Configuring Redundant Recording and
Page 87 · click to enlarge
Page 87

5.8 Configuring Redundant Recording and

Capture

The record files and captured pictures are stored not only in the R/W (read/write) HDD but also in the redundant

HDD when the Redundant Record/Capture function is enabled, thus enhancing the data safety and reliability

effectively.

The storage mode of the HDD needs to be set as Group. For details, see Chapter 11.4 Managing HDD Group.

There should be at least another HDD which is in R/W mode.

1. Enter HDD Information interface.

Menu > HDD > General

Hikvision DS-8004HFI-ST — 5.8 Configuring Redundant Recording and diagram (page 87)
Fig. 101 · 5.8 Configuring Redundant Recording and

Figure 5. 26 HDD General

2. Select the HDD and click

to enter the Local HDD Settings interface.

1. Set the HDD property to Redundancy.
Hikvision DS-8004HFI-ST — 5.8 Configuring Redundant Recording and diagram (page 87)
Fig. 102 · 5.8 Configuring Redundant Recording and

Figure 5. 27 HDD General-Editing

2. Click Apply to save the settings.
3. Click OK to back to the upper level menu.
3. Enter the Record setting interface.

Menu > Record > Parameters

Page 88 of the Hikvision DS-8004HFI-ST user manual — 5.8 Configuring Redundant Recording and Capture
Page 88 · click to enlarge
Page 88
1. Select Record.
2. Select Camera you want to configure.
3. Click More Settings to configure more parameters.

Figure 5. 28 More Settings Interface

4. Check

checkbox to enable redundant recording and capture.

5. Click Apply to save settings.

Repeat the above steps2)-4) for configuring other channels. If the setting can also be applied to other analog

channels, click Copy and then choose the channel(s).

Page 89 of the Hikvision DS-8004HFI-ST user manual — 5.9 Configuring HDD Group for Recording and
Page 89 · click to enlarge
Page 89

5.9 Configuring HDD Group for Recording and

Capture

You can group the HDDs and save the record files and captured pictures in certain HDD group.

1. Enter HDD setting interface.

Figure 5. 29 HDD General

2. Select Advanced on the left bar.

Check whether the storage mode of the HDD is Group. If not, set it to Group. For detailed information, please

refer to Chapter 11.4 Managing HDD Group.

3. Select General in the left bar and click

to enter editing interface.

4. Configuring HDD group.
1. Choose a group number for the HDD group.
2. Click Apply and then in the pop-up message box, click Yes to save your settings.
3. Click OK to back to the upper level menu.

Repeat the above steps3-4 to configure more HDD groups.

5. Choose the channels of which you want to save the record files and captured pictures in the HDD group.
1. Select Advanced on the left bar.
Hikvision DS-8004HFI-ST — 5.9 Configuring HDD Group for Recording and diagram (page 89)
Fig. 103 · 5.9 Configuring HDD Group for Recording and

Figure 5. 30 HDD Advanced for HDVR Series

IP Camera is supported by HDVR series only.

2. Choose Group number in the drop-down list of Record on HDD Group .

Menu > HDD

Page 90 of the Hikvision DS-8004HFI-ST user manual — 5.9 Configuring HDD Group for Recording and Capture
Page 90 · click to enlarge
Page 90
3. Check the channels you want to save in this group.
4. Click Apply to save settings.

After having configured the HDD groups, you can configure the Recording and Capture settings by following the

procedure provided in Chapter 5.2-5.8.

Page 91 of the Hikvision DS-8004HFI-ST user manual — 5.10.1 Locking the Record Files
Page 91 · click to enlarge
Page 91

5.10 Files Protection

You can lock the recorded files or set the HDD property to Read-only to protect the record files from being

overwritten.

We use the interface of DS-9000HFI-RT series (unless otherwise stated) as example to describe the following

settings.

5.10.1 Locking the Record Files

Task 1Lock File when Playback
1. Enter the Normal Playback/Event Playback/Tag Playback interface. For details, see Chapter 6.1.2 ~ Chapter

6.1.4.

Hikvision DS-8004HFI-ST — 5.10.1 Locking the Record Files diagram (page 91)
Fig. 104 · 5.10.1 Locking the Record Files

Figure 5. 31 Playback

2. Click the

button on the toolbar, and the current record file in playback will be locked.

In multi-channel playback mde, click the

button and all the record files related to the playback channels will be locked.

3. Click the

button on the toolbar, select Locked File tab, and you can view and export the locked files.

Page 92 of the Hikvision DS-8004HFI-ST user manual — 5.10 Files Protection
Page 92 · click to enlarge
Page 92
Hikvision DS-8004HFI-ST — 5.10 Files Protection diagram (page 92)
Fig. 105 · 5.10 Files Protection

Figure 5. 32 Locked File Management

4. You can click the icon

on the Locked File Management interface to unlock the selected record file.

Task 2Lock File when Export
1. Enter Export setting interface.
Hikvision DS-8004HFI-ST — 5.10 Files Protection diagram (page 92)
Fig. 106 · 5.10 Files Protection

Figure 5. 33 Export Interface

2. Check the checkbox

to select the channels.

3. Select the record type, file type and then specify the start/end time for search.
4. Click Search to show the results.
5. Click the List tab.

Menu > Export

Page 93 of the Hikvision DS-8004HFI-ST user manual — 5.10.2 Setting HDD property to Read-only
Page 93 · click to enlarge
Page 93
Hikvision DS-8004HFI-ST — 5.10.2 Setting HDD property to Read-only diagram (page 93)
Fig. 107 · 5.10.2 Setting HDD property to Read-only

Figure 5. 34 Export- Search Result

6. Protect the record files.
1. Select the record file to be protected, and then click the

icon. The icon turns to

the file is locked.

2. Click the icon

to unlock the file and the file is not protected.

5.10.2 Setting HDD property to Read-only

To edit HDD property, you need to set the storage mode of the HDD to Group. See Chapter 11.4 Managing HDD

Group.

1. Enter HDD setting interface.

Figure 5. 35 HDD General

2. Click

to edit the HDD you want to protect.

3. Set the HDD to Read-only.
4. Click OK to save settings and back to the upper level menu.

You can’t save any files in a Read-only HDD. If you want to save files in the HDD, change the property to

, indicating that · Menu > HDD

Page 94 of the Hikvision DS-8004HFI-ST user manual — 5.10.2 Setting HDD property to Read-only
Page 94 · click to enlarge
Page 94

R/W.

If there is only one HDD and is set to Read-only, the device can’t record any files. Only live view mode is

available.

If you set the HDD to Read-only when the device is saving files in it, then the file will be saved in next R/W

HDD. If there is only one HDD, the recording will be stopped.

Page 95 of the Hikvision DS-8004HFI-ST user manual — Chapter 6 Playback
Page 95 · click to enlarge
Page 95

Chapter 6 Playback

Page 96 of the Hikvision DS-8004HFI-ST user manual — 6.1.1 Playing Back by Time
Page 96 · click to enlarge
Page 96

6.1 Playing Back Record Files

We use the interface of DS-9000HFI-ST series (unless otherwise stated) as the example to describe the following

settings.

6.1.1 Playing Back by Time

Play back the recorded video files of a specific channel in the live view mode. Channel switch is supported.

Instant Playback by Channel:

Choose a channel in live view mode using the mouse and click the

button in the quick setting toolbar.

Only record files recorded during the last five minutes on this channel will be played back.

Hikvision DS-8004HFI-ST — 6.1.1 Playing Back by Time diagram (page 96)
Fig. 108 · 6.1.1 Playing Back by Time

Figure 6. 1 Instant Playback Interface

Normal Playback by Channel

1. Enter the Playback interface.

Mouse: Right-click a live view window and click Playback on the pop-up menu to enter the playback

interface.

Front Panel: Press PLAY button to play back record files of the channel under single-screen live view mode.

Pressing numerical buttons will switch playback to the corresponding channels during playback process.

Front panel operation is not supported by 7200HWI-SV series.

2. The playback starts from 5 minutes before by default.
Page 97 of the Hikvision DS-8004HFI-ST user manual — 6.1 Playing Back Record Files
Page 97 · click to enlarge
Page 97
Hikvision DS-8004HFI-ST — 6.1 Playing Back Record Files diagram (page 97)
Fig. 109 · 6.1 Playing Back Record Files

Figure 6. 2 Playback Interface

indicates the start time and end time of the record files.

represents normal recording (manual or schedule);

represents event recording (motion, alarm, motion

| alarm, motion & alarm, VCA).

Playback progress bar: use the mouse to click any point of the progress bar to locate special frames, and a

thumbnail of the specified frame will be displayed.

3. Check the checkboxes to select the channel(s), and then the video from the selected channels will be played

back synchronously. Up to 16 channels can be set for synchronous playback.

Click the Max. Camera for Playback tab, and you can play back the video from 16 channels at a time.

Click the Min. Camera for Playback tab, and you can play back the video from only one channel.

Normal Playback by Time

The time bar indicates the time duration for the record file. Click on the time bar to play back the video of the

specified time.

1. Enter Playback interface.
2. Select Normal from the drop-down list in the upper-left corner of the page to enter the Normal Playback

interface.

3. Check

checkbox of channel(s) in the channel list.

4. Double-click to select a date on the calendar to play back the record file.

The · Menu > Playback

Page 98 of the Hikvision DS-8004HFI-ST user manual — 6.1 Playing Back Record Files
Page 98 · click to enlarge
Page 98

If there are normal recordings (manual or schedule) for that camera in that day, on the calendar, the

icon for that day is displayed as

; If there are event triggered recordings (motion, alarm, motion | alarm, motion & alarm VCA) for that camera in that day, in the calendar, the icon for that day is

. The event triggered recordings will be displayed prior to the normal recordings on the calendar when

; Otherwise it is displayed as

both the two types of recordings are available in that day.

Hikvision DS-8004HFI-ST — 6.1 Playing Back Record Files diagram (page 98)
Fig. 110 · 6.1 Playing Back Record Files

Figure 6. 3 Playback Calendar

In the Playback interface:

The toolbar in the bottom part of Playback interface can be used to control playing process.

Hikvision DS-8004HFI-ST — 6.1 Playing Back Record Files diagram (page 98)
Fig. 111 · 6.1 Playing Back Record Files

Figure 6. 4 Interface of Playback by Time

Hikvision DS-8004HFI-ST — 6.1 Playing Back Record Files diagram (page 98)
Fig. 112 · 6.1 Playing Back Record Files

Figure 6. 5 Toolbar of Playback by Time

displayed as

Page 99 of the Hikvision DS-8004HFI-ST user manual — 6.1.2 Playing Back by Event Search
Page 99 · click to enlarge
Page 99

indicates the start time and end time of the record files.

represents normal recording (manual or schedule);

represents event recording (motion, alarm, motion

| alarm, motion & alarm, VCA).

Playback progress bar: use the mouse to click any point of the progress bar to locate special frames, and a

thumbnail of the specified frame will be displayed.

Table 6. 1 Detailed Explanation of Playback-by-time Interface

Hikvision DS-8004HFI-ST — 6.1.2 Playing Back by Event Search diagram (page 99)
Fig. 113 · 6.1.2 Playing Back by Event Search

6.1.2 Playing Back by Event Search

Before you start:

Configure the event (motion, alarm input and VCA) triggered record schedule. For details, see Chapter

5.3~Chapter 5.5.

Play back record files on one or several channels searched out by event type (e.g., alarm input, motion detection

and VCA).

1. Enter the playback interface.
2. Select Event from the drop-down list in the upper-left corner of the page to enter the Event Playback

interface.

3. Select Alarm Input, Motion or VCA as the event type, and specify the start time and end time for search.
4. Click Search , and the record files matching the search conditions will be displayed on a list.

The · Menu > Playback

Page 100 of the Hikvision DS-8004HFI-ST user manual — 6.1.2 Playing Back by Event Search
Page 100 · click to enlarge
Page 100
Hikvision DS-8004HFI-ST — 6.1.2 Playing Back by Event Search diagram (page 100)
Fig. 114 · 6.1.2 Playing Back by Event Search

Figure 6. 6 Result of Video Search by Alarm Input

5. Click

button to play back the record files.

You can click Back to return to the search interface.

Pre-play and post-play can be configured for the playback of event triggered record files.

Pre-play: The time you set to play back before the event. For example, when an alarm triggered the

recording at 10:00, if you set the pre-play time as 5 seconds, the video plays back from 9:59:55.

Post-play: The time you set to play back after the event. For example, when an alarm triggered the recording

ends at 11:00, if you set the post-play time as 5 seconds, the video plays back till 11:00:05.

If there is only one channel is triggered by an alarm input, clicking

button takes you to Full-screen

Playback interface of this channel.

If several channels are triggered, clicking

button takes you to the interface. Check

select one channel for playback or select multiple channels for synchronous playback.

For DVR series, 4-ch, 8-ch and 16-ch devices support 4-ch, 8-ch and 16-ch synchronous playback

respectively. While for HDVR series, 4-ch, 8-ch, 16-ch devices support 8-ch, 16-ch and 16-ch synchronous

playback respectively.

checkbox to

Page 101 of the Hikvision DS-8004HFI-ST user manual — 6.1.3 Playing Back by Tag
Page 101 · click to enlarge
Page 101
Hikvision DS-8004HFI-ST — 6.1.3 Playing Back by Tag diagram (page 101)
Fig. 115 · 6.1.3 Playing Back by Tag

Figure 6. 7 Select Channels for Synchronous Playback

6. Event playback interface.

The toolbar in the bottom part of Playback interface can be used to control playing process.

Hikvision DS-8004HFI-ST — 6.1.3 Playing Back by Tag diagram (page 101)
Fig. 116 · 6.1.3 Playing Back by Tag

Figure 6. 8 Interface of Playback by Event

6.1.3 Playing Back by Tag

Default tags and customized tags can be added to mark the record files, and you can search the added tags and play

back the marked record files through tag playback.

Before you start:

Page 102 of the Hikvision DS-8004HFI-ST user manual — 6.1.3 Playing Back by Tag
Page 102 · click to enlarge
Page 102
1. Enter the Normal Playback or Event Playback interface. For details, see Chapter 6.1.2 and Chapter 6.1.3 .
Hikvision DS-8004HFI-ST — 6.1.3 Playing Back by Tag diagram (page 102)
Fig. 117 · 6.1.3 Playing Back by Tag

Figure 6. 9 Interface of Playback by Time

2. Click the icon

at the bottom of the interface to add the default tag.

and input the tag name to add the customized tag.

, select the Tag tab, and you can view, edit and delete the added tag(s).

Up to 64 tags can be added to a single video file.

Hikvision DS-8004HFI-ST — 6.1.3 Playing Back by Tag diagram (page 102)
Fig. 118 · 6.1.3 Playing Back by Tag

Figure 6. 10 Tag Management Interface

Click the icon · Click the icon

Page 103 of the Hikvision DS-8004HFI-ST user manual — 6.1.4 Playing Back by Smart Playback
Page 103 · click to enlarge
Page 103
1. Enter Playback interface.
2. Select Tag from the drop-down list in the upper-left corner of the page to enter the Tag Playback interface.
3. Select the channels from the list, and specify the start time and end time for search.
4. Optionally, you can input the keyword of the tag name in the Keyword text field to narrow the search.
5. Click Search , and the tags matching the search conditions will be displayed on a list.
6. Click

button to play back the file.

You can click the Back button to back to the search interface.

Pre-play and post-play time can be set according to actual needs.

Pre-play time and post-play time is added to the time point of the tag.

Hikvision DS-8004HFI-ST — 6.1.4 Playing Back by Smart Playback diagram (page 103)
Fig. 119 · 6.1.4 Playing Back by Smart Playback

Figure 6. 11 Interface of Playback by Tag

6.1.4 Playing Back by Smart Playback

The smart playback function provides an easy way to get through the less effective information. When you select

the smart playback mode, the system will analyze the video containing the motion or VCA information, mark it

with green color and play it in the normal speed while the video without motion will be played in the 16-time

speed. The smart playback rules and areas are configurable.

Before you start:

To get the smart search result, the corresponding event type must be enabled and configured on the IP camera.

Here we take the intrusion detection as an example.

1. Log in the IP camera by the web browser, and enable the intrusion detection by checking the checkbox of it.

Menu > Playback

Page 104 of the Hikvision DS-8004HFI-ST user manual — 6.1.4 Playing Back by Smart Playback
Page 104 · click to enlarge
Page 104

You may enter the motion detection configuration interface by Configuration > Advanced Configuration >

Events > Intrusion Detection.

Hikvision DS-8004HFI-ST — 6.1.4 Playing Back by Smart Playback diagram (page 104)
Fig. 120 · 6.1.4 Playing Back by Smart Playback

Figure 6. 12 Setting Intrusion Detection on IP Camera

2. Configure the required parameters of intrusion detection, including area, arming schedule and linkage

methods. Refer to the user manual of smart IP camera for detailed instructions.

1. Enter the Playback interface.
2. Select the Smart in the drop-down list on the top-left side.
3. Select a camera in the camera list.
4. select a date in the calendar and click the

button to play.

Hikvision DS-8004HFI-ST — 6.1.4 Playing Back by Smart Playback diagram (page 104)
Fig. 121 · 6.1.4 Playing Back by Smart Playback
Hikvision DS-8004HFI-ST — 6.1.4 Playing Back by Smart Playback diagram (page 104)
Fig. 122 · 6.1.4 Playing Back by Smart Playback

Figure 6. 13 Smart Playback Interface

Table 6. 2 Detailed Explanation of Smart Playback Toolbar

Hikvision DS-8004HFI-ST — 6.1.4 Playing Back by Smart Playback diagram (page 104)
Fig. 123 · 6.1.4 Playing Back by Smart Playback

Menu>Playback

Page 105 of the Hikvision DS-8004HFI-ST user manual — 6.1.4 Playing Back by Smart Playback
Page 105 · click to enlarge
Page 105
5. Set the rules and areas for smart search of VCA event or motion event

button , and click on the image to specify the start point and end point of the line.

button, and specify 4 points to set a quadrilateral region for intrusion detection. Only one

region can be set.

button and then click and draw the mouse to set the detection area manually. You can also

button to set the full screen as the detection area.

6. Click

to configure the smart settings.

Hikvision DS-8004HFI-ST — 6.1.4 Playing Back by Smart Playback diagram (page 105)
Fig. 124 · 6.1.4 Playing Back by Smart Playback

Skip the Non-Related Video: The non-related video will not be played if this function is enabled.

Play Non-Related Video at: Set the speed to play the non-related video. Max./8/4/1 are selectable.

Play Related Video at: Set the speed to play the related video. Max./8/4/1 are selectable.

Pre-play and post-play is not available for the motion event type.

7. Click

to search and play the matched video files.

8. (Optional) You can click

to filter the searched video files by setting the target characters, including the

gender and age of the human and whether he/she wears glasses.

Hikvision DS-8004HFI-ST — 6.1.4 Playing Back by Smart Playback diagram (page 105)
Fig. 125 · 6.1.4 Playing Back by Smart Playback

Figure 6. 14 Set Result Filter

Show 7 more labels / short text on this page
Line Crossing Detection · Select the · Intrusion Detection · Click the · Motion Detection · Click the · click the
Page 106 of the Hikvision DS-8004HFI-ST user manual — 6.1.5 Playing Back by Searching System Log
Page 106 · click to enlarge
Page 106

6.1.5 Playing Back by Searching System Log

You can also play back record file(s) after searching system logs.

1. Enter Log Information interface.
Hikvision DS-8004HFI-ST — 6.1.5 Playing Back by Searching System Log diagram (page 106)
Fig. 126 · 6.1.5 Playing Back by Searching System Log

Figure 6. 15 Log Search Interface

2. Specify the start time and end time for search.
3. Select the major type of the log from the drop-down list. 4 major types are selectable: Alarm, Exception,

Operation and Information.

4. Check the checkboxes to select the minor type of the log for search.
5. Click Search , and the logs matching the search conditions will be displayed on a list.
Hikvision DS-8004HFI-ST — 6.1.5 Playing Back by Searching System Log diagram (page 106)
Fig. 127 · 6.1.5 Playing Back by Searching System Log

Figure 6. 16 Result of System Log Search

6. Select a log with record file and click

button to enter Playback interface.

If there is no record file at the time point of the log, the message box “No result found” will pop up.

Menu>Maintenance>Log Information>Log Search

Page 107 of the Hikvision DS-8004HFI-ST user manual — 6.1.6 Playing Back by Sub-periods
Page 107 · click to enlarge
Page 107
Hikvision DS-8004HFI-ST — 6.1.6 Playing Back by Sub-periods diagram (page 107)
Fig. 128 · 6.1.6 Playing Back by Sub-periods

Figure 6. 17 Interface of Playback by Log

6.1.6 Playing Back by Sub-periods

The video files can be played in multiple sub-periods simultaneously on the screens.

1. Enter Playback interface.
2. Select Sub-periods from the drop-down list in the upper-left corner of the page to enter the Sub-periods

Playback interface.

3. Select a date and start playing the video file.
4. Select the Split-screen Number from the dropdown list. Up to 16 screens are configurable.
Hikvision DS-8004HFI-ST — 6.1.6 Playing Back by Sub-periods diagram (page 107)
Fig. 129 · 6.1.6 Playing Back by Sub-periods

Figure 6. 18 Interface of Sub-periods Playback

According to the defined number of split-screens, the video files on the selected date can be divided into

average segments for playback. E.g., if there are video files existing between 16:00 and 22:00, and the

Menu > Playback

Page 108 of the Hikvision DS-8004HFI-ST user manual — 6.1.8 Playing Back Frame Extracting Record
Page 108 · click to enlarge
Page 108

6-screen display mode is selected, then it can play the video files for 1 hour on each screen simultaneously.

When there is no video for the assigned screen at all, the screen will display as blank screen.

6.1.7 Playing Back External Files

The record files stored in the external storage devices, e.g., USB flash drives, USB HDDs, can be searched and

played back.

Before you start:

Insert the external device(s) with available record files into the device.

1. Enter the Playback interface.
2. Select External File from the drop-down list in the upper-left corner of the page to enter the External File

Playback interface.

The files stored in the extrenal device are listed in the right-side list.

You can click the Refresh button to refresh the file list.

3. Select a record file and click

to play it.

Hikvision DS-8004HFI-ST — 6.1.7 Playing Back External Files diagram (page 108)
Fig. 130 · 6.1.7 Playing Back External Files

Figure 6. 19 Interface of External File Playback

6.1.8 Playing Back Frame Extracting Record

If there are frame extracting record files existing in the HDD, you can search and play back them.

Menu > Playback

Page 109 of the Hikvision DS-8004HFI-ST user manual — 6.1.7 Playing Back External Files
Page 109 · click to enlarge
Page 109

Frame extracting playback is supported by analog cameras only.

The frame extracting record is with low bitrate and the frame rate is 1 fps.

We use the interface of DS-9100HFI-RT series as example to describe the following settings.

1. Enter the Playback interface, and check

checkbox to select the frame extracting mode.

2. Select the record type (Normal, Event and Tag) from the drop-down list and search the corresponding files.

For details, see Chapter 6.1.1~ Chapter 6.1.3.

3. Play back the record files if available.
Hikvision DS-8004HFI-ST — 6.1.7 Playing Back External Files diagram (page 109)
Fig. 131 · 6.1.7 Playing Back External Files

Figure 6. 20 Frame Extracting Record Playback

Menu>Playback

Page 110 of the Hikvision DS-8004HFI-ST user manual — 6.2.2 Digital Zoom
Page 110 · click to enlarge
Page 110

6.2 Auxiliary Functions of Playback

6.2.1 Playing Back Frame by Frame

Play video files frame by frame, in order to view the image details of the video when abnormal events occur.

  • Using a Mouse:

Go to Playback interface. If you choose playback of the record file: click button

until the speed changes

to Single frame and one click on the playback screen represents playback of one frame. If you choose reverse

playback of the record fileclick button

until the speed changes to Single frame and one click on the

in toolbar. • Using the Front Panel:

playback screen represents reverse playback of one frame. It is also feasible to use button

Rotate and hold the outer ring on Jog Shuttle counterclockwise (for DS-8100/8000-ST series only) or click the

button to set the speed to Single frame. One click on button

, one click on the playback screen or Enter

button on the front panel represents playback or reverse playback of one frame.

6.2.2 Digital Zoom

We use the interface of DS-9000HFI-RT series (unless otherwise stated) as example to describe the following

settings.

1. Enter the Playback interface and start the playback. For details, see Chapter 6.1.
2. Click the icon

on the playback control toolbar to enter Digital Zoom mode.

3. Click-and-drag the mouse to draw a red rectangle on the window in the lower-right corner of the interface.

And then the image within it will be enlarged up to 16 times.

4. Right-click to exit the Digital Zoom mode.
Page 111 of the Hikvision DS-8004HFI-ST user manual — 6.2.3 Reverse Playback of Multi-channel
Page 111 · click to enlarge
Page 111
Hikvision DS-8004HFI-ST — 6.2.3 Reverse Playback of Multi-channel diagram (page 111)
Fig. 132 · 6.2.3 Reverse Playback of Multi-channel

Figure 6. 21 Draw Area for Digital Zoom

6.2.3 Reverse Playback of Multi-channel

You can play back record files of multi-channel reversely.

We use the interface of DS-9000 HFI-RT series (unless otherwise stated) as example to describe the following

settings.

1. Enter the Playback interface.
2. Check

checkbox to select the channel(s) and double-click to select a date on the calendar.

Menu>Playback

Page 112 of the Hikvision DS-8004HFI-ST user manual — 6.2.3 Reverse Playback of Multi-channel
Page 112 · click to enlarge
Page 112
Hikvision DS-8004HFI-ST — 6.2.3 Reverse Playback of Multi-channel diagram (page 112)
Fig. 133 · 6.2.3 Reverse Playback of Multi-channel

Figure 6. 22 4-ch Synchronous Playback Interface

If more than one channel is optional, the synchronous playback will be activated.

The record files will be marked by two lines on the process bar. The upper one indicates the record

files of the selected channel; and the lower one indicates the record files of all the selected channels.

3. Click the icon

on the playback control toolbar, and the record files will be played back reversely.

For DVR series, up to 16-ch simultaneous reverse playback is supported. While for Hybrid DVR series, up to

16-ch (with 704*576 resolution) simultaneous reverse playback is supported; up to 8-ch (with 1280*720

resolution) simultaneous reverse playback is supported; up to 4-ch (with 1920*1080P resolution) simultaneous

reverse playback is supported and up to 1-ch (with 2560*1920 resolution) reverse playback is supported.

Page 113 of the Hikvision DS-8004HFI-ST user manual — 6.3 Picture Playback
Page 113 · click to enlarge
Page 113

6.3 Picture Playback

The captured pictures stored in the HDDs of the device can be searched and viewed.

5. Enter Playback interface.
6. Select Picture from the drop-down list in the upper-left corner of the page to enter the Picture Playback

interface.

7. Check

checkbox to select the channel(s) and specify the start time and end time for search.

8. Click Search to enter Search Result interface.

Up to 4000 pictures can be displayed each time.

9. Choose a picture you want to view and click

button.

You can click Back to return to the search interface.

Hikvision DS-8004HFI-ST — 6.3 Picture Playback diagram (page 113)
Fig. 134 · 6.3 Picture Playback

Figure 6. 23 Result of Picture Playback

10. The toolbar in the bottom part of Playback interface can be used to control playing process.

Figure 6. 24 Picture Playback Toolbar

Table 6. 3 Detailed Explanation of Picture-playback Toolbar

Hikvision DS-8004HFI-ST — 6.3 Picture Playback diagram (page 113)
Fig. 135 · 6.3 Picture Playback

Menu > Playback

Page 114 of the Hikvision DS-8004HFI-ST user manual — Chapter 7 Backup
Page 114 · click to enlarge
Page 114

Chapter 7 Backup

Page 115 of the Hikvision DS-8004HFI-ST user manual — 7.1.1 Quick Export
Page 115 · click to enlarge
Page 115

7.1 Backing up Record Files

Before you start:

Please insert the backup device(s) into the device.

7.1.1 Quick Export

Export record files to backup device(s) quickly.

We use the interface of DS-9000HFI-RT series (unless otherwise stated) as example to describe the following

settings.

1. Enter Normal Export interface.

Menu > Export > Normal

2. Select the channel(s) you want to back up and set the search conditions.

The start time and end time for search should be within the same day.

Figure 7. 1 Quick Export Interface

3. Click the button Quick Export , and the Export interface pops up.
4. Select the backup device and the file format from the drop-down list.
5. Click the button Export.

The record files within the start time and end time will be exported to the external storage device (e.g., USB

Flash Drive) after the backup process is complete.

You can click the button

on the Export interface, and you can delete the record file.

Page 116 of the Hikvision DS-8004HFI-ST user manual — 7.1.2 Backing up by Normal Video Search
Page 116 · click to enlarge
Page 116
Hikvision DS-8004HFI-ST — 7.1.2 Backing up by Normal Video Search diagram (page 116)
Fig. 136 · 7.1.2 Backing up by Normal Video Search

Figure 7. 2 Checkup of Quick Export Result

7.1.2 Backing up by Normal Video Search

The record files can be backed up to various devices, such as USB devices (USB flash drives, USB HDDs, USB

writer), DVD-R/W and eSATA HDD.

We use the interface of DS-9000HFI-RT series (unless otherwise stated) as example to describe the following

settings.

Before you start:

When the backup device is the eSATA HDD, click Menu > Record > Advanced, select eSATA1 from the eSATA

drop-down list, and set the usage as Export. Click Apply to save the settings and click Yes to confirm it.

Backup using USB flash drives, USB HDDs, USB writer and DVD-R/W

1. Enter Normal Export interface.

Menu > Export > Normal

Figure 7. 3 Normal Video Search for Backup

2. Set the search conditions and click the button Search to enter the search result interface. You can click the

to play the record file if you want to view it.

button

Page 117 of the Hikvision DS-8004HFI-ST user manual — 7.1.2 Backing up by Normal Video Search
Page 117 · click to enlarge
Page 117

8 different Record types are selectable: Continuous, Motion, Alarm, Motion | Alarm, Motion & Alarm,

Command Triggered, Manual and Event. The command triggered record is configured by the platform

when the device accessed via the platform.

Two different File types are selectable: Unlocked and Locked.

Figure 7. 4 Result of Normal Video Search for Backup

3. Check the checkboxes to select the record files, and click the button Export to enter the Export interface.

You can also click Export All to select all the record files for backup and enter the Export interface.

The size of the currently selected files is displayed in the lower-left corner of the window.

Hikvision DS-8004HFI-ST — 7.1.2 Backing up by Normal Video Search diagram (page 117)
Fig. 137 · 7.1.2 Backing up by Normal Video Search

Figure 7. 5 Export by Normal Video Search

4. Select the backup device and the file format from respective the drop-down lists.
5. Click the button Export on the Export interface to start the backup process. A prompt message will pop up

after the backup process is complete.

Page 118 of the Hikvision DS-8004HFI-ST user manual — 7.1.3 Backing up by Event Search
Page 118 · click to enlarge
Page 118
Hikvision DS-8004HFI-ST — 7.1.3 Backing up by Event Search diagram (page 118)
Fig. 138 · 7.1.3 Backing up by Event Search

Figure 7. 6 Export Finished

6. The exported record files will be displayed in a list on the Export interface.

to delete the record file.

Figure 7. 7 Checkup of Export Result

7.1.3 Backing up by Event Search

The event triggered recordings can be backed up on USB devices (USB flash drives, USB HDDs, USB writer),

DVD-R/W or eSATA HDD. Quick Backup and Normal Backup are supported.

1. Enter Event Export interface.

Menu > Export > Event

2. Select Alarm Input, Motion or VCA from the drop-down list as the event type, select the channel and specify

the start time and end time for search, and then click the button Search to enter the Search Result interface.

3. Click to select the List tab of the search result interface.

You can click

Page 119 of the Hikvision DS-8004HFI-ST user manual — 7.1.4 Backing up Video Clips
Page 119 · click to enlarge
Page 119
Hikvision DS-8004HFI-ST — 7.1.4 Backing up Video Clips diagram (page 119)
Fig. 139 · 7.1.4 Backing up Video Clips

Figure 7. 8 Result of Event Search

4. Select the record file from the list and click the button Export to enter the Export interface.

Or click the button Export All to select all the record files directly to enter the Export interface.

5. Export the video files. Please refer to step 4 ~ 6 of Chapter 7.1.2 Backing up by Normal Video Search for

details.

7.1.4 Backing up Video Clips

You can also export the video clips directly during Playback, using USB devices (USB flash drives, USB HDDs,

USB writer), DVD-R/W or eSATA HDD.

1. Enter Playback interface and start the playback. For details, see Chapter 6.1.
2. In the playback process, click the icon

in the playback toolbar to start/stop clipping record file(s).

3. Click the

button on the toolbar, select Video Clip tab, and you can view and export the video clips.

Hikvision DS-8004HFI-ST — 7.1.4 Backing up Video Clips diagram (page 119)
Fig. 140 · 7.1.4 Backing up Video Clips

Figure 7. 9 Clips Export

/

Page 120 of the Hikvision DS-8004HFI-ST user manual — 7.1.4 Backing up Video Clips
Page 120 · click to enlarge
Page 120

Up to 30 items of video clips can be selected for backup at one time.

4. Check the checkboxes of clips and click the Export button to export the selected video clips.

You can also click the Export All button to export all the video clips to the backup device.

Figure 7. 10 Export Video Clips

5. Export the video clips. Please refer to step 4 ~ 6 of Chapter 7.1.2 Backing up by Normal Video Search for

details.

Page 121 of the Hikvision DS-8004HFI-ST user manual — 7.2 Backing up Pictures
Page 121 · click to enlarge
Page 121

7.2 Backing up Pictures

Task 1Back up Captured Pictures when Playback

Back up the pictures captured during playback.

1. Enter Playback interface and start the playback. For details, see Chapter 6.1.
Hikvision DS-8004HFI-ST — 7.2 Backing up Pictures diagram (page 121)
Fig. 141 · 7.2 Backing up Pictures

Figure 7. 11 Interface of Playback by Time

2. In the playback process, click the icon

in the playback toolbar to capture the pictures.

3. Click the

button on the toolbar, select Playback Capture tab, and you can view and export the pictures captured when playback.

Hikvision DS-8004HFI-ST — 7.2 Backing up Pictures diagram (page 121)
Fig. 142 · 7.2 Backing up Pictures

Figure 7. 12 Captured Picture Export Interface

Page 122 of the Hikvision DS-8004HFI-ST user manual — 7.2 Backing up Pictures
Page 122 · click to enlarge
Page 122
4. Refer to the step 4 ~ 6 in Chapter 7.1.2 Backing up by Normal Video Search to export the pictures.
Task 2Back up All Types of Captured Pictures

Back up pictures using USB devices (USB flash drives, USB HDDs, USB writer), DVD-R/W or eSATA HDD.

1. Enter Picture Export interface.

Menu > Export > Picture

Hikvision DS-8004HFI-ST — 7.2 Backing up Pictures diagram (page 122)
Fig. 143 · 7.2 Backing up Pictures

Figure 7. 13 Picture Search for Backup

Picture search of IP Camera is supported by HDVR series only.

2. Set the search conditions and click the button Search to enter the search result interface.
3. Click to select the List tab in Search Result interface.
Hikvision DS-8004HFI-ST — 7.2 Backing up Pictures diagram (page 122)
Fig. 144 · 7.2 Backing up Pictures

Figure 7. 14 Result of Picture Search

4. Check the checkboxes to select pictures and click the button Export to enter the Export interface; or click the

button Export All to select all the pictures and enter the Export interface.

5. Export the video clips. Please refer to step 4 ~ 6 of Chapter 7.1.2 Backing up by Normal Video Search for

details.

Page 123 of the Hikvision DS-8004HFI-ST user manual — 7.3 Managing Backup Devices
Page 123 · click to enlarge
Page 123

7.3 Managing Backup Devices

We use the interface of DS-9000HFI-RT series (unless otherwise stated) as example to describe the following

settings.

1. Enter the Export interface of backup device. For details, see Chapter 7.1-7.2.

Figure 7. 15 Management of USB Flash Drives, USB HDDs and eSATA HDDs

Hikvision DS-8004HFI-ST — 7.3 Managing Backup Devices diagram (page 123)
Fig. 145 · 7.3 Managing Backup Devices

Figure 7. 16 Management of USB Writers and DVD-R/W

2. Select a record file/folder/picture in the backup device, click the icon

, and you can delete it.

For USB Flash Drives, USB HDDs and eSATA HDDs:

Click the button New Folder, and you can create a new folder in the backup device.

Click the button Format, and you can format the backup device. Two kinds of file system can be

configurable, including FAT32 and NTFS.

For USB Writers and DVD-R/W:

Click the button Erase, and you can erase the files from a re-writable CD/DVD.

Page 124 of the Hikvision DS-8004HFI-ST user manual — 7.3 Managing Backup Devices
Page 124 · click to enlarge
Page 124

If the inserted device is not recognized, you can perform the following steps:

Click the button Refresh.

Reconnect device.

Check for compatibility from vendor.

Page 125 of the Hikvision DS-8004HFI-ST user manual — 7.4.1 Setting the Hot Spare Device
Page 125 · click to enlarge
Page 125

7.4 Hot Spare Backup

This section is only applicable to the devices of HDVR series.

Before you start:

At least 2 devices are required to be online.

Several devices can form an N+1 hot spare system. The system consists of several working devices and a hot spare

device; when the working device fails, the hot spare device is switched into operation, thus increasing the

reliability of the system.

A bidirectional connection should be built for the working device and hot spare device.

Set a hot spare

Add a hot spare device on normal

Add the normal device on the hot

spare device Start Finish

Figure 7. 17 Building Hot Spare System

7.4.1 Setting the Hot Spare Device

The camera connection will be disabled when the device works in the hot spare mode.

After switching the working mode of the hot spare device to normal mode, restore the defaults of the device

to ensure the normal operation afterwards.

1. Enter the Hot Spare Settings interface of the hot spare device.
2. Select Hot Spare Mode as the working mode.
3. Click the button Apply and reboot the device to activate the settings.

device · device · Menu>Configuration>Hot Spare

Page 126 of the Hikvision DS-8004HFI-ST user manual — 7.4.2 Setting the Working Device
Page 126 · click to enlarge
Page 126
Hikvision DS-8004HFI-ST — 7.4.2 Setting the Working Device diagram (page 126)
Fig. 146 · 7.4.2 Setting the Working Device

Figure 7. 18 Hot Spare Mode Settings

7.4.2 Setting the Working Device

1. Enter the Hot Spare Settings interface of the working device.

Menu > Configuration > Hot Spare

2. Set the working mode of the device as Normal Mode (default).
3. Check the checkbox of Enable , input the IP address and administrator password of the hot spare device.
4. Click the button Apply to connect the hot spare device to the working device.
Hikvision DS-8004HFI-ST — 7.4.2 Setting the Working Device diagram (page 126)
Fig. 147 · 7.4.2 Setting the Working Device

Figure 7. 19 Normal Mode Settings

Page 127 of the Hikvision DS-8004HFI-ST user manual — 7.4.3 Hot Spare Management
Page 127 · click to enlarge
Page 127

7.4.3 Hot Spare Management

1. Enter the Hot Spare Settings interface of the hot spare device again.

The connected working device is displayed on the device list. Check the checkbox to select the working

device from the list, and click the button Add to link the working device to the hot spare device.

Up to 32 working devices can be linked to one hot spare device

Hikvision DS-8004HFI-ST — 7.4.3 Hot Spare Management diagram (page 127)
Fig. 148 · 7.4.3 Hot Spare Management

Figure 7. 20 Link Working Device to Hot Spare Device

2. You can view the working status of the hot spare device on the Working Device Status list.

When the working device works properly, the working status of the hot spare is displayed as No record.

Hikvision DS-8004HFI-ST — 7.4.3 Hot Spare Management diagram (page 127)
Fig. 149 · 7.4.3 Hot Spare Management

Figure 7. 21 Working Status of Hot Spare Device-1

When the working device gets offline, the hot spare device will record the video of the IPCs connected to the

working device for backup.

Hikvision DS-8004HFI-ST — 7.4.3 Hot Spare Management diagram (page 127)
Fig. 150 · 7.4.3 Hot Spare Management

Figure 7. 22 Working Status of Hot Spare Device-2

When the working device comes online, the lost video files will be restored by the record synchronization

Page 128 of the Hikvision DS-8004HFI-ST user manual — 7.4.3 Hot Spare Management
Page 128 · click to enlarge
Page 128

function.

The record synchronization function can be enabled for up to 1 working device at a time.

Hikvision DS-8004HFI-ST — 7.4.3 Hot Spare Management diagram (page 128)
Fig. 151 · 7.4.3 Hot Spare Management

Figure 7. 23 Working Status of Hot Spare Device-3

Page 129 of the Hikvision DS-8004HFI-ST user manual — Chapter 8 Alarm Settings
Page 129 · click to enlarge
Page 129

Chapter 8 Alarm Settings

Page 130 of the Hikvision DS-8004HFI-ST user manual — 8.1 Setting Motion Detection
Page 130 · click to enlarge
Page 130

8.1 Setting Motion Detection

We use the interface of DS-9100HFI-ST series (unless otherwise stated) as example to describe the following

settings.

1. Enter Motion Detection interface and choose a camera you want to set motion detection.
2. Set detection area and sensitivity.

checkbox to enable motion detection, use the mouse to draw detection area(s) and drag the

sensitivity bar to set sensitivity.

Hikvision DS-8004HFI-ST — 8.1 Setting Motion Detection diagram (page 130)
Fig. 152 · 8.1 Setting Motion Detection

Figure 8. 1 Set Detection Area and Sensitivity

3. Click

to configure the motion detection settings. Click Trigger Channel tab and select one or more

channels which will start to record/capture or become full-screen monitoring when motion alarm is triggered.

Click Apply to save the settings.

Hikvision DS-8004HFI-ST — 8.1 Setting Motion Detection diagram (page 130)
Fig. 153 · 8.1 Setting Motion Detection

Figure 8. 2 Set Trigger Camera of Motion Detection

Triggering IP Camera is supported by HDVR series only.

4. Set arming schedule of the channel.

Select Arming Schedule tab and set arming schedule of the channel.

Choose one day of a week and up to eight time periods can be set within each day. Set up arming schedule of

other days of a week. You can also click the button Copy to copy an arming schedule to other days. Click

Apply to save the settings.

Menu> Camera> Motion · Check

Page 131 of the Hikvision DS-8004HFI-ST user manual — 8.1 Setting Motion Detection
Page 131 · click to enlarge
Page 131

Time periods cannot be repeated or overlapped.

Hikvision DS-8004HFI-ST — 8.1 Setting Motion Detection diagram (page 131)
Fig. 154 · 8.1 Setting Motion Detection

Figure 8. 3 Set Arming Schedule of Motion Detection

5. Click Linkage Action tab to set alarm linkage actions of motion detection (please refer to Chapter 8.7 ).
Hikvision DS-8004HFI-ST — 8.1 Setting Motion Detection diagram (page 131)
Fig. 155 · 8.1 Setting Motion Detection

Figure 8. 4 Set Alarm Linkage Actions of Motion Detection

Upload captured pictures to FTP is only supported by DVR series.

Click Apply to save the settings. Click OK to complete the motion detection settings of the channel.

6. If you want to set motion detection for another channel, repeat the above steps or just click Copy in the

Motion Detection interface to copy the above settings to it.

You are not allowed to copy the “Trigger Channel” action and motion detection settings to IP camera.

Page 132 of the Hikvision DS-8004HFI-ST user manual — 8.2 Setting Sensor Alarm
Page 132 · click to enlarge
Page 132

8.2 Setting Sensor Alarm

You can set handling method of an external sensor alarm.

Sensor alarm is not supported by DS-7200HWI-SV series.

1. Enter Alarm Settings interface and select an alarm input.

Figure 8. 5 Alarm Status Interface

2. Select Alarm Input tab to enter Alarm Input Settings interface, edit the name for the alarm input and set the

handling method of the selected alarm input.

checkbox to enable the alarm input and click

to configure the alarm settings.

Figure 8. 6 Alarm Input Settings Interface

3. Select Trigger Channel tab and select one or more channels which will start to record/capture or become

full-screen monitoring when an external alarm is input. Click Apply to save the settings.

4. Select Arming Schedule tab to set the channel’s arming schedule.

Choose one day of a week and up to eight time periods can be set within each day. Set up arming schedule of

other days of a week. You can also click Copy to copy an arming schedule to other days. Click Apply to save

the settings.

Menu> Configuration> Alarm · Check

Page 133 of the Hikvision DS-8004HFI-ST user manual — 8.2 Setting Sensor Alarm
Page 133 · click to enlarge
Page 133

Time periods cannot be repeated or overlapped.

Hikvision DS-8004HFI-ST — 8.2 Setting Sensor Alarm diagram (page 133)
Fig. 156 · 8.2 Setting Sensor Alarm

Figure 8. 7 Set Arming Schedule of Alarm Input

5. Select Linkage Action tab to set alarm linkage actions of the alarm input (please refer to Chapter 8.7 ).
6. If necessary, select PTZ Linking tab and set PTZ linkage of the alarm input.

Set PTZ linking parameters and click Apply to save the settings. Click OK to complete the settings of the

alarm input.

Please check whether the PTZ or speed dome supports PTZ linkage.

One alarm input can trigger presets, patrol or pattern of more than one channel. But presets, patrols and

patterns are exclusive.

Hikvision DS-8004HFI-ST — 8.2 Setting Sensor Alarm diagram (page 133)
Fig. 157 · 8.2 Setting Sensor Alarm

Figure 8. 8 Set PTZ Linking of Alarm Input

7. If you want to set alarm settings of another alarm input, repeat the above steps or just copy the above settings

to it by clicking Copy in Alarm Input Settings interface.

Page 134 of the Hikvision DS-8004HFI-ST user manual — 8.3 Detecting Video Loss
Page 134 · click to enlarge
Page 134

8.3 Detecting Video Loss

Detect video loss of a channel and take alarm linkage action(s).

1. Enter Video Loss interface and select a channel you want to detect.

Menu> Camera> Video Loss

Hikvision DS-8004HFI-ST — 8.3 Detecting Video Loss diagram (page 134)
Fig. 158 · 8.3 Detecting Video Loss

Figure 8. 9 Video Loss Settings Interface

2. Set handling method of video loss.

checkbox to enable video loss alarm, and click

to set handling method of video loss.

3. Set arming schedule of the channel.

Select Arming Schedule tab to set the channel’s arming schedule.

Choose one day of a week and up to eight time periods can be set within each day. Set up arming schedule of

other days of a week. You can also use Copy to copy an arming schedule to other days. Click Apply to save

the settings.

Time periods cannot be repeated or overlapped.

Hikvision DS-8004HFI-ST — 8.3 Detecting Video Loss diagram (page 134)
Fig. 159 · 8.3 Detecting Video Loss

Figure 8. 10 Set Arming Schedule of Video Loss

4. Select Linkage Action tab to set up alarm linkage action of video loss (please refer to Chapter 8.7 ).

Click Apply to save the settings and click OK to complete the video loss settings of the channel.

Check

Page 135 of the Hikvision DS-8004HFI-ST user manual — 8.3 Detecting Video Loss
Page 135 · click to enlarge
Page 135
5. If you want to set video loss handling method for another channel, repeat the above steps or just click Copy

in Video Loss interface to copy the above settings to it.

Copying video loss settings to IP camera is not supported.

Page 136 of the Hikvision DS-8004HFI-ST user manual — 8.4 Detecting Video Tampering
Page 136 · click to enlarge
Page 136

8.4 Detecting Video Tampering

Trigger alarm and take alarm linkage action(s) when the lens is covered.

1. Enter Video Tampering interface and select a channel you want to detect video tampering.

Menu> Camera> Video Tampering

Hikvision DS-8004HFI-ST — 8.4 Detecting Video Tampering diagram (page 136)
Fig. 160 · 8.4 Detecting Video Tampering

Figure 8. 11 Video Tampering Detection Settings Interface

2. Set the video tampering handling method of the channel.

checkbox to enable detecting video tampering.

Drag the sensitivity bar and choose a proper sensitivity level. Use the mouse to draw an area you want to

detect video tampering.

3. Click

to configure the video tampering settings. Set arming schedule and alarm linkage actions of the

channel.

1. Click Arming Schedule tab to set the channel’s arming schedule.
2. Choose one day of a week and up to eight time periods can be set within each day. Set up arming

schedule of other days of a week. You can also click Copy to copy an arming schedule to other days.

Click Apply to save the settings.

Time periods cannot be repeated or overlapped.

Figure 8. 12 Set Arming Schedule of Video Tampering

Check

Page 137 of the Hikvision DS-8004HFI-ST user manual — 8.4 Detecting Video Tampering
Page 137 · click to enlarge
Page 137
4. Select Linkage Action tab to set alarm linkage actions of video tampering alarm. For details, see Chapter

Click Apply to save the settings and click OK to complete the video tampering settings of the channel.

5. If you want to set up linkage actions of video tampering detection alarm for another channel, repeat step two

and three, or just click Copy on Video Tampering Detection Settings interface to copy the above settings to

it.

You cannot copy the video tampering settings to IP channels.

Page 138 of the Hikvision DS-8004HFI-ST user manual — 8.5 Handling Exceptions
Page 138 · click to enlarge
Page 138

8.5 Handling Exceptions

Exception settings refer to the handling method of various exceptions, e.g.

HDD Full: The HDD is full.

HDD Error: Writing HDD error, unformatted HDD, etc.

Network Disconnected: Disconnected network cable.

IP Conflicted: Duplicated IP address.

Illegal Login: Incorrect user ID or password.

Video Signal Exception: Unstable video signal.

Input / Output Video Standard Mismatch: I/O video standards do not match.

Record / Capture Exception: No space for saving recorded files or captured images.

Array Exception: Abnormal virtual disks under array.

Hot Spare ExceptionFor the working device, the exception occurs when the hot spare device is

disconnected; for the hot spare device, the exception occurs when the working device is offline.

Input / Output Video Standard Mismatch and Video Signal Exception are not supported by IP cameras of

HDVR series.

Array Exception is only supported by DS-9100/9000HFI-RT series.

Hot Spare Exception is only supported by HDVR series.

1. Enter Exceptions interface and handle various exceptions.
2. Set the alarm linkage actions. For details, see Chapter 8.7 .
3. Click Apply to save the settings.
Hikvision DS-8004HFI-ST — 8.5 Handling Exceptions diagram (page 138)
Fig. 161 · 8.5 Handling Exceptions

Figure 8. 13 Exception Settings Interface

Menu> Configuration> Exceptions

Page 139 of the Hikvision DS-8004HFI-ST user manual — 8.6 Setting Alarm Linkage Actions
Page 139 · click to enlarge
Page 139

8.6 Setting Alarm Linkage Actions

Alarm linkage actions will be activated when an alarm or exception occurs, including Event Hint Display, Full

Screen Monitoring, Audible Warning (buzzer), Notify Surveillance Center, Send Email, Upload Captured Pictures

to FTP (this function is supported by DVR series only) and Trigger Alarm Output (not supported by the DS-7200

series).

When an event or exception occurs, a hint icon

can be displayed in the lower-left corner of live view interface. You can click the icon to view the details and select the event for display.

1. Enter the Exception settings interface.

Menu > Configuration > Exceptions

2. Check the checkbox of Enable Event Hint .
Hikvision DS-8004HFI-ST — 8.6 Setting Alarm Linkage Actions diagram (page 139)
Fig. 162 · 8.6 Setting Alarm Linkage Actions

Figure 8. 14 Event Hint Settings Interface

3. Click the icon

, and select the event types for display.

4. Click OK to save the new settings.

When an alarm is triggered, the local monitor (HDMI, VGA or BNC monitor) display in full screen the video

image from the alarming channel configured for full screen monitoring.

If alarms are triggered simultaneously in several channels, their full-screen images will be switched at an interval

of 10 seconds (default dwell time). A different dwell time can be set by going to Menu > Configuration >Live

View> Full Screen Monitoring Dwell Time.

Auto-switch will terminate once the alarm stops and you will be taken back to the Live View interface.

You must select during “Trigger Channel” settings the channel(s) you want to make full screen monitoring.

Trigger an audible beep when an alarm is detected.

Sends an exception or alarm signal to remote alarm host when an event occurs. The alarm host refers to the PC

installed with Remote Client.

The alarm signal will be transmitted automatically at detection mode when remote alarm host is configured. Please

refer to Chapter 9.2.7 for details of alarm host configuration.

Show 4 more labels / short text on this page
Event Hint Display · Full Screen Monitoring · Audible Warning · Notify Surveillance Center
Page 140 of the Hikvision DS-8004HFI-ST user manual — 8.6 Setting Alarm Linkage Actions
Page 140 · click to enlarge
Page 140

Send an email with alarm information to a user or users when an alarm is detected.

Please refer to Chapter 9.2.13 for details of Email configuration.

Upload Captured Pictures to FTP

Capture the image when an alarm is triggered and upload the picture to a FTP server.

This function is supported by DVR series only. Please set FTP address and configure the remote FTP server first.

Refer to Chapter 9.2.4 for FTP settings.

Trigger Alarm Output (not supported by DS-7200 series)

Trigger an alarm output when an alarm is triggered.

1. Enter Alarm Output interface.

Menu> Configuration> Alarm> Alarm Output

Select an alarm output and set alarm name and dwell time.

If “Manually Clear” is selected in the drop-down list of Dwell Time, you can clear it only by going to Menu>

Manual> Alarm and clicking Clear All.

Hikvision DS-8004HFI-ST — 8.6 Setting Alarm Linkage Actions diagram (page 140)
Fig. 163 · 8.6 Setting Alarm Linkage Actions

Figure 8. 15 Alarm Output Settings Interface

2. Set arming schedule of the alarm output.

to set the arming schedule of alarm output. Choose one day of a week and up to 8 time periods can

be set within each day.

Time periods cannot be repeated or overlapped.

Send Email · Click

Page 141 of the Hikvision DS-8004HFI-ST user manual — 8.6 Setting Alarm Linkage Actions
Page 141 · click to enlarge
Page 141
Hikvision DS-8004HFI-ST — 8.6 Setting Alarm Linkage Actions diagram (page 141)
Fig. 164 · 8.6 Setting Alarm Linkage Actions

Figure 8. 16 Set Arming Schedule of Alarm Output

3. Repeat the above steps to set up arming schedule of other days of a week. You can also click Copy to copy

an arming schedule to other days. Click OK to complete the settings of the alarm output.

4. You can also click Copy in Alarm Output interface to copy the above settings to another channel.
Hikvision DS-8004HFI-ST — 8.6 Setting Alarm Linkage Actions diagram (page 141)
Fig. 165 · 8.6 Setting Alarm Linkage Actions

Figure 8. 17 Copy Settings of Alarm Output

Page 142 of the Hikvision DS-8004HFI-ST user manual — 8.7 Triggering or Clearing Alarm Output
Page 142 · click to enlarge
Page 142

8.7 Triggering or Clearing Alarm Output

Manually

Sensor alarm can be triggered or cleared manually. If “Manually Clear” is selected in the drop-down list of dwell

time of an alarm output, the alarm can be cleared only by clicking Clear button in the following interface.

Select the alarm output you want to trigger or clear and make related operations.

Menu > Manual > Alarm

Click Trigger / Clear button if you want to trigger or clear an alarm output.

Click Trigger All button if you want to trigger all alarm outputs.

Click Clear All button if you want to clear all alarm output.

Hikvision DS-8004HFI-ST — 8.7 Triggering or Clearing Alarm Output diagram (page 142)
Fig. 166 · 8.7 Triggering or Clearing Alarm Output

Figure 8. 18 Clear or Trigger Alarm Output Manually

Page 143 of the Hikvision DS-8004HFI-ST user manual — Chapter 9 VCA Alarm
Page 143 · click to enlarge
Page 143

Chapter 9 VCA Alarm

Page 144 of the Hikvision DS-8004HFI-ST user manual — 9.1 Face Detection
Page 144 · click to enlarge
Page 144

For IP cameras, all VCA detections must be supported by the connected IP camera.

For analog cameras, only line crossing detection and intrusion detection are supported by the analog camera 1 ~ 4.

9.1 Face Detection

Face detection function detects the face appears in the surveillance scene, and some certain actions can be taken

when the alarm is triggered.

1. Enter the VCA settings interface.

Menu > Camera > VCA

2. Select the camera to configure the VCA.

You can click the checkbox of Save VCA Picture to save the captured pictures of VCA detection.

Hikvision DS-8004HFI-ST — 9.1 Face Detection diagram (page 144)
Fig. 167 · 9.1 Face Detection

Figure 9. 1 Face Detection

3. Select the VCA detection type to Face Detection .
4. Click

to enter the face detection settings interface. Configure the trigger channel, arming schedule and linkage action for the face detection alarm. Please refer to step3~step5 of Chapter 8.1 Setting Motion

Detection for detailed instructions.

5. Click the Rule Settings button to set the face detection rules. You can click-and-drag the slider to set the

detection sensitivity.

Sensitivity: Range [1-5]. The higher the value is, the more easily the face can be detected.

Hikvision DS-8004HFI-ST — 9.1 Face Detection diagram (page 144)
Fig. 168 · 9.1 Face Detection

Figure 9. 2 Set Face Detection Sensitivity

Page 145 of the Hikvision DS-8004HFI-ST user manual — 9.2 Line Crossing Detection
Page 145 · click to enlarge
Page 145
6. Click Apply to activate the settings.

9.2 Line Crossing Detection

This function can be used for detecting people, vehicles and objects cross a set virtual line. The line crossing

direction can be set as bidirectional, from left to right or from right to left. And you can set the duration for the

alarm response actions, such as full screen monitoring, audible warning, etc.

1. Enter the VCA settings interface.
2. Select the camera to configure the VCA.

You can click the checkbox of Save VCA Picture to save the captured pictures of VCA detection.

3. Select the VCA detection type to Line Crossing Detection .
4. Check the Enable checkbox to enable this function.
5. Click

to configure the trigger channel, arming schedule and linkage actions for the line crossing

detection alarm.

6. Click the Rule Settings button to set the line crossing detection rules.
1. Select the direction to AB, A->B or A

A<->B: Only the arrow on the B side shows; when an object going across the configured line with both

direction can be detected and alarms are triggered.

A->B: Only the object crossing the configured line from the A side to the B side can be detected.

B->A: Only the object crossing the configured line from the B side to the A side can be detected.

2. Click-and-drag the slider to set the detection sensitivity.

Sensitivity: Range [1-100]. The higher the value is, the more easily the detection alarm can be triggered.

3. ClickOK to save the rule settings and back to the line crossing detection settings interface.
Hikvision DS-8004HFI-ST — 9.2 Line Crossing Detection diagram (page 145)
Fig. 169 · 9.2 Line Crossing Detection

Figure 9. 3 Set Line Crossing Detection Rules

7. Click

and set two points in the preview window to draw a virtual line.

You can use the

to clear the existing virtual line and re-draw it.

Menu> Camera> VCA

Page 146 of the Hikvision DS-8004HFI-ST user manual — 9.2 Line Crossing Detection
Page 146 · click to enlarge
Page 146

Up to 4 rules can be configured.

Hikvision DS-8004HFI-ST — 9.2 Line Crossing Detection diagram (page 146)
Fig. 170 · 9.2 Line Crossing Detection

Figure 9. 4 Draw Line for Line Crossing Detection

8. Click Apply to activate the settings.
Page 147 of the Hikvision DS-8004HFI-ST user manual — 9.3 Intrusion Detection
Page 147 · click to enlarge
Page 147

9.3 Intrusion Detection

Intrusion detection function detects people, vehicle or other objects which enter and loiter in a pre-defined virtual

region, and some certain actions can be taken when the alarm is triggered.

1. Enter the VCA settings interface.
2. Select the camera to configure the VCA.

You can click the checkbox of Save VCA Picture to save the captured pictures of VCA detection.

3. Select the VCA detection type to Intrusion Detection .
4. Check the Enable checkbox to enable this function.
5. Click

to configure the trigger channel, arming schedule and linkage actions for the line crossing

detection alarm.

6. Click the Rule Settings button to set the intrusion detection rules. Set the following parameters.
1. Threshold: Range [1s-10s], the threshold for the time of the object loitering in the region. When the

duration of the object in the defined detection area is longer than the set time, the alarm will be

triggered.

2. Click-and-drag the slider to set the detection sensitivity.

Sensitivity: Range [1-100]. The value of the sensitivity defines the size of the object which can trigger

the alarm. The higher the value is, the more easily the detection alarm can be triggered.

3. Percentage: Range [1-100]. Percentage defines the ratio of the in-region part of the object which can

trigger the alarm. For example, if the percentage is set as 50%, when the object enters the region and

occupies half of the whole region, the alarm is triggered.

Hikvision DS-8004HFI-ST — 9.3 Intrusion Detection diagram (page 147)
Fig. 171 · 9.3 Intrusion Detection

Figure 9. 5 Set Intrusion Crossing Detection Rules

4. ClickOK to save the rule settings and back to the line crossing detection settings interface.
7. Click

and draw a quadrilateral in the preview window by specifying four vertexes of the detection

region, and right click to complete drawing. Only one region can be configured.

You can use the

to clear the existing virtual line and re-draw it.

Up to 4 rules can be configured.

Menu> Camera> VCA

Page 148 of the Hikvision DS-8004HFI-ST user manual — 9.3 Intrusion Detection
Page 148 · click to enlarge
Page 148
Hikvision DS-8004HFI-ST — 9.3 Intrusion Detection diagram (page 148)
Fig. 172 · 9.3 Intrusion Detection

Figure 9. 6 Draw Area for Intrusion Detection

8. Click Apply to save the settings.
Page 149 of the Hikvision DS-8004HFI-ST user manual — 9.4 Region Entrance Detection
Page 149 · click to enlarge
Page 149

9.4 Region Entrance Detection

Region entrance detection function detects people, vehicle or other objects which enter a pre-defined virtual region

from the outside place, and some certain actions can be taken when the alarm is triggered.

1. Enter the VCA settings interface.
2. Select the camera to configure the VCA.

You can click the checkbox of Save VCA Picture to save the captured pictures of VCA detection.

3. Select the VCA detection type to Region Entrance Detection .
4. Check the Enable checkbox to enable this function.
5. Click

to configure the trigger channel, arming schedule and linkage actions for the line crossing

detection alarm.

6. Click the Rule Settings button to set the sensitivity of the region entrance detection.

Sensitivity: Range [0-100]. The higher the value is, the more easily the detection alarm can be triggered.

7. Click

and draw a quadrilateral in the preview window by specifying four vertexes of the detection

region, and right click to complete drawing. Only one region can be configured.

You can use the

to clear the existing virtual line and re-draw it.

Hikvision DS-8004HFI-ST — 9.4 Region Entrance Detection diagram (page 149)
Fig. 173 · 9.4 Region Entrance Detection

Figure 9. 7 Set Region Entrance Detection

Up to 4 rules can be configured.

Menu> Camera> VCA
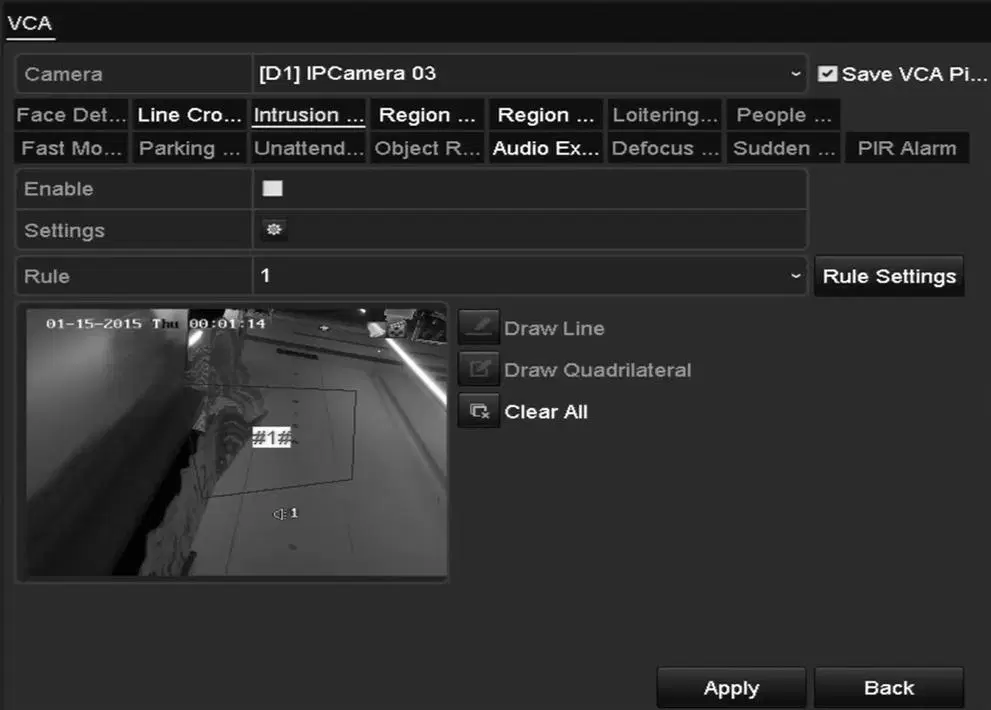
Page 150 of the Hikvision DS-8004HFI-ST user manual — 9.8 Fast Moving Detection
Page 150 · click to enlarge
Page 150
8. Click Apply to save the settings.

9.5 Region Exiting Detection

Region exiting detection function detects people, vehicle or other objects which exit from a pre-defined virtual

region, and some certain actions can be taken when the alarm is triggered.

Please refer to the Chapter 9.5 Region Entrance Detection for operating steps to configure the region exiting

detection.

Up to 4 rules can be configured.

9.6 Loitering Detection

Loitering detection function detects people, vehicle or other objects which loiter in a pre-defined virtual region for

some certain time, and a series of actions can be taken when the alarm is triggered.

Please refer to the Chapter 9.4 Intrusion Detection for operating steps to configure the loitering detection.

The Threshold [1s-10s] in the Rule Settings defines the time of the object loitering in the region. If you set

the value as 5, alarm is triggered after the object loitering in the region for 5s; and if you set the value as 0,

alarm is triggered immediately after the object entering the region.

Up to 4 rules can be configured.

9.7 People Gathering Detection

People gathering detection alarm is triggered when people gather around in a pre-defined virtual region, and a

series of actions can be taken when the alarm is triggered.

Please refer to the Chapter 9.4 Intrusion Detection for operating steps to configure the people gathering

detection.

The Percentage in the Rule Settings defines the gathering density of the people in the region. Usually, when

the percentage is small, the alarm can be triggered when small number of people gathered in the defined

detection region.

Up to 4 rules can be configured.

9.8 Fast Moving Detection

Page 151 of the Hikvision DS-8004HFI-ST user manual — 9.11 Object Removal Detection
Page 151 · click to enlarge
Page 151

Fast moving detection alarm is triggered when people, vehicle or other objects move fast in a pre-defined virtual

region, and a series of actions can be taken when the alarm is triggered.

Please refer to the Chapter 9.4 Intrusion Detection for operating steps to configure the fast moving detection.

The Sensitivity in the Rule Settings defines the moving speed of the object which can trigger the alarm. The

higher the value is, the more easily a moving object can trigger the alarm.

Up to 4 rules can be configured.

9.9 Parking Detection

Parking detection function detects illegal parking in places such as highway, one-way street, etc., and a series of

actions can be taken when the alarm is triggered.

Please refer to the Chapter 9.4 Intrusion Detection for operating steps to configure the parking detection.

The Threshold[5s-20s] in the Rule Settings defines the time of the vehicle parking in the region. If you set

the value as 10, alarm is triggered after the vehicle stay in the region for 10s.

Up to 4 rules can be configured.

9.10 Unattended Baggage Detection

Unattended baggage detection function detects the objects left over in the pre-defined region such as the baggage,

purse, dangerous materials, etc., and a series of actions can be taken when the alarm is triggered.

Please refer to the Chapter 9.4 Intrusion Detection for operating steps to configure the unattended baggage

detection.

The Threshold[5s-20s] in the Rule Settings defines the time of the objects left over in the region. If you set

the value as 10, alarm is triggered after the object is left and stay in the region for 10s. And the Sensitivity

defines the similarity degree of the background image. Usually, when the sensitivity is high, a very small

object left in the region can trigger the alarm.

Up to 4 rules can be configured.

9.11 Object Removal Detection

Object removal detection function detects the objects removed from the pre-defined region, such as the exhibits on

display, and a series of actions can be taken when the alarm is triggered.

Page 152 of the Hikvision DS-8004HFI-ST user manual — 9.12 Audio Exception Detection
Page 152 · click to enlarge
Page 152

Please refer to the Chapter 9.4 Intrusion Detection for operating steps to configure the object removal

detection.

The Threshold [5s-20s] in the Rule Settings defines the time of the objects removed from the region. If you

set the value as 10, alarm is triggered after the object disappears from the region for 10s. And the Sensitivity

defines the similarity degree of the background image. Usually, when the sensitivity is high, a very small

object taken from the region can trigger the alarm.

Up to 4 rules can be configured.

9.12 Audio Exception Detection

Audio exception detection function detects the abnormal sounds in the surveillance scene, such as the sudden

increase / decrease of the sound intensity, and some certain actions can be taken when the alarm is triggered.

1. Enter the VCA settings interface.
2. Select the camera to configure the VCA.

You can click the checkbox of Save VCA Picture to save the captured pictures of VCA detection.

3. Select the VCA detection type to Audio Exception Detection .
4. Click

to configure the trigger channel, arming schedule and linkage action for the face detection alarm. 5. Click the Rule Settings button to set the audio exception rules.
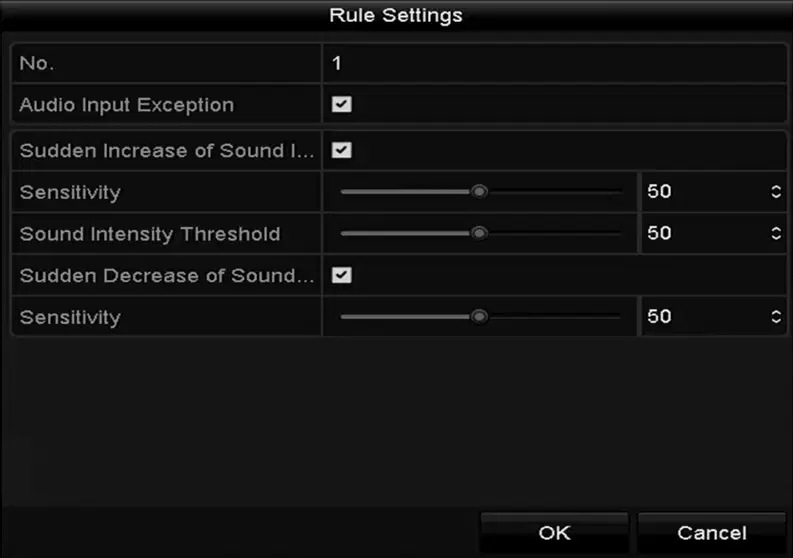
Hikvision DS-8004HFI-ST — 9.12 Audio Exception Detection diagram (page 152)
Fig. 174 · 9.12 Audio Exception Detection

Figure 9. 8 Set Audio Exception Detection Rules

1. Check the checkbox of Audio Input Exception to enable the audio loss detection function.
2. Check the checkbox of Sudden Increase of Sound Intensity Detection to detect the sound steep rise in

the surveillance scene. You can set the detection sensitivity and threshold for sound steep rise.

Sensitivity: Range [1-100], the smaller the value is, the more severe the change should be to trigger the

detection.

Sound Intensity ThresholdRange [1-100], it can filter the sound in the environment, the louder the

environment sound, the higher the value should be. You can adjust it according to the real environment.

Menu> Camera> VCA

Page 153 of the Hikvision DS-8004HFI-ST user manual — 9.15 PIR Alarm
Page 153 · click to enlarge
Page 153
3. Check the checkbox of Sudden Decrease of Sound Intensity Detection to detect the sound steep drop

in the surveillance scene. You can set the detection sensitivity[1-100] for sound steep drop.

6. Click Apply to activate the settings.

9.13 Sudden Scene Change Detection

Scene change detection function detects the change of surveillance environment affected by the external factors;

such as the intentional rotation of the camera, and some certain actions can be taken when the alarm is triggered.

Please refer to the Chapter 9.2 Face Detection for operating steps to configure the scene change detection.

The Sensitivity in the Rule Settings ranges from 1 to 100, and the higher the value is, the more easily the

change of scene can trigger the alarm.

9.14 Defocus Detection

The image blur caused by defocus of the lens can be detected, and some certain actions can be taken when the

alarm is triggered.

Please refer to the Chapter 9.2 Face Detection for operating steps to configure the defocus detection.

The Sensitivity in the Rule Settings ranges from 1 to 100, and the higher the value is, the more easily the

defocus image can trigger the alarm.

9.15 PIR Alarm

A PIR (Passive Infrared) alarm is triggered when an intruder moves within the detector's field of view. The heat

energy dissipated by a person, or any other warm blooded creature such as dogs, cats, etc., can be detected.

1. Enter the VCA settings interface.
2. Select the camera to configure the VCA.

You can click the checkbox of Save VCA Picture to save the captured pictures of VCA detection.

3. Select the VCA detection type to PIR Alarm .
4. Click

to configure the trigger channel, arming schedule and linkage action for the PIR alarm. 5. Click the Rule Settings button to set the rules. Please refer to the Chapter 9.1 Face Detection for

instructions.

6. Click Apply to activate the settings.

Menu> Camera> VCA

Page 154 of the Hikvision DS-8004HFI-ST user manual — Chapter 10 VCA Search
Page 154 · click to enlarge
Page 154

Chapter 10 VCA Search

Page 155 of the Hikvision DS-8004HFI-ST user manual — 10.1 Face Search
Page 155 · click to enlarge
Page 155

With the configured VCA detection, the NVR supports the VCA search for the behavior analysis, face capture, people counting and heat map results.

10.1 Face Search

When there are detected face picture captured and saved in HDD, you can enter the Face Search interface to search

the picture and play the picture related video file according to the specified conditions. Before you start:

Please refer to Section 9.2 Face Detection for configuring the face detection. Steps:

1. Enter the Face Search interface.

Menu>VCA Search> Face Search

2. Select the camera (s) for the face search.
Hikvision DS-8004HFI-ST — 10.1 Face Search diagram (page 155)
Fig. 175 · 10.1 Face Search

Figure 1. 6 Face Search

3. Specify the start time and end time for search the captured face pictures or video files.
4. Click Search to start searching. The search results of face detection pictures are displayed in list or in chart.
Page 156 of the Hikvision DS-8004HFI-ST user manual — 10.1 Face Search
Page 156 · click to enlarge
Page 156
Hikvision DS-8004HFI-ST — 10.1 Face Search diagram (page 156)
Fig. 176 · 10.1 Face Search
Hikvision DS-8004HFI-ST — 10.1 Face Search diagram (page 156)
Fig. 177 · 10.1 Face Search

Figure 1. 7 Face Search Interface

5. Play the face picture related video file.

You can double click on a face picture to play its related video file in the view window on the top right, or

select a picture item and click

to play it.

to play the previous/next file. 6. If you want to export the captured face pictures to local storage device, connect the storage device to the

You can also click

to stop the playing, or click

device and click Export All to enter the Export interface.

Click Export to export all face pictures to the storage device.

Please refer to Chapter 7 Backup for the operation of exporting files.

Hikvision DS-8004HFI-ST — 10.1 Face Search diagram (page 156)
Fig. 178 · 10.1 Face Search

Figure 1. 8 Export Files

/

Page 157 of the Hikvision DS-8004HFI-ST user manual — will be enabled if the alarm is triggered. Steps:
Page 157 · click to enlarge
Page 157

10.2 Behavior Search

The behavior analysis detects a series of suspicious behavior based on VCA detection, and certain linkage methods

will be enabled if the alarm is triggered. Steps:

1. Enter the Behavior Search interface.

Menu>VCA Search> Behavior Search

2. Select the camera (s) for the behavior search.
3. Specify the start time and end time for searching the matched pictures.
Hikvision DS-8004HFI-ST — will be enabled if the alarm is triggered. Steps: diagram (page 157)
Fig. 179 · will be enabled if the alarm is triggered. Steps:

Figure 1. 9 Behavior Search Interface

4. Select the VCA detection type from the dropdown list, including the line crossing detection, intrusion

detection, unattended baggage detection, object removal detection, region entrance detection, region exiting

detection, parking detection, loitering detection, people gathering detection and fast moving detection.

5. Click Search to start searching. The search results of pictures are displayed in list or in chart.
Page 158 of the Hikvision DS-8004HFI-ST user manual — daily/weekly/monthly/annual reports for analysis. Steps:
Page 158 · click to enlarge
Page 158
Hikvision DS-8004HFI-ST — 10.3 People Counting diagram (page 158)
Fig. 180 · 10.3 People Counting

Figure 1. 10 Behavior Search Results

6. Play the behavior analysis picture related video file.

You can double click on a picture from the list to play its related video file in the view window on the top

right, or select a picture item and click

to play it.

to play the previous/next file. 7. If you want to export the captured pictures to local storage device, connect the storage device to the device

You can also click

to stop the playing, or click

and click Export All to enter the Export interface.

Click Export to export all pictures to the storage device.

10.3 People Counting

The People Counting is used to calculate the number of people entered or left a certain configured area and form in

daily/weekly/monthly/annual reports for analysis. Steps:

1. Enter the People Counting interface.

Menu>VCA Search> People Counting

2. Select the camera for the people counting.
3. Select the report type to Daily Report, Weekly Report, Monthly Report or Annual Report.
4. Set the statistics time.
5. Click the Counting button to start people counting statistics.

/

Page 159 of the Hikvision DS-8004HFI-ST user manual — 10.3 People Counting
Page 159 · click to enlarge
Page 159
Hikvision DS-8004HFI-ST — 10.3 People Counting diagram (page 159)
Fig. 181 · 10.3 People Counting
Hikvision DS-8004HFI-ST — 10.3 People Counting diagram (page 159)
Fig. 182 · 10.3 People Counting

Figure 1. 11 People Counting Interface

6. You can click the Export button to export the statistics report in excel format.
Page 160 of the Hikvision DS-8004HFI-ST user manual — set. Steps:
Page 160 · click to enlarge
Page 160

10.4 Heat Map

Heat map is a graphical representation of data represented by colors. The heat map function is usually used to

analyze the visit times and dwell time of customers in a configured area.

The heat map function must be supported by the connected IP camera and the corresponding configuration must be

set. Steps:

1. Enter the Heat Map interface.

Menu>VCA Search> Heat Map

2. Select the camera for the heat map processing.
3. Select the report type to Daily Report, Weekly Report, Monthly Report or Annual Report.
4. Set the statistics time.
Hikvision DS-8004HFI-ST — set. Steps: diagram (page 160)
Fig. 183 · set. Steps:
Hikvision DS-8004HFI-ST — set. Steps: diagram (page 160)
Fig. 184 · set. Steps:
Hikvision DS-8004HFI-ST — set. Steps: diagram (page 160)
Fig. 185 · set. Steps:

Figure 1. 12 Heat Map Interface

5. Click the Counting button to export the report data and start heat map statistics, and the results are displayed

in graphics marked in different colors.

As shown in the figure above, red color block (255, 0, 0) indicates the most welcome area, and blue color

block (0, 0, 255) indicates the less-popular area.

6. You can click the Export button to export the statistics report in excel format.
Page 161 of the Hikvision DS-8004HFI-ST user manual — Chapter 11 Network Settings
Page 161 · click to enlarge
Page 161

Chapter 11 Network Settings

Page 162 of the Hikvision DS-8004HFI-ST user manual — DS-8100HFI(HWI)-ST
Page 162 · click to enlarge
Page 162

11.1 Configuring General Settings

Network settings must be properly configured before you operate device over network.

1. Enter the Network Settings interface.

Menu > Configuration > Network

Hikvision DS-8004HFI-ST — 11.1 Configuring General Settings diagram (page 162)
Fig. 186 · 11.1 Configuring General Settings

Figure 11. 1 Network Settings Interface for DS-9200HWI-ST & DS-9100HFI-ST/RT/XT (HWI-ST) &

DS-8100HFI(HWI)-ST

Hikvision DS-8004HFI-ST — DS-8100HFI(HWI)-ST diagram (page 162)
Fig. 187

Figure 11. 2 Network Settings Interface for DS-9000HFI-ST/RT/XT (HWI-ST) & DS-8000HFI(HWI)-ST

Hikvision DS-8004HFI-ST — DS-8100HFI(HWI)-ST diagram (page 162)
Fig. 188

Figure 11. 3 Network Settings Interface for DS-7200HWI-SV

Page 163 of the Hikvision DS-8004HFI-ST user manual — 11.1 Configuring General Settings
Page 163 · click to enlarge
Page 163

The FTP setting is supported by DVR series only.

The Dual NIC (network interface card) is not supported by DS-7200HWI-SV series.

We use the interface of DS-9100HFI-ST series (unless otherwise stated) as example to describe the

following settings.

2. Select the General tab.
3. In the General Settings interface:

For DS-7200HWI-SV series, you can configure the following settings: NIC Type, IPv4 Address, IPv4

Subnet Mask, IPv4 Gateway, MTU and DNS Server.

For other series, you can configure the following settings: Working Mode, NIC Type, IPv4 Address, IPv4

Subnet Mask, IPv4 Gateway, MTU and DNS Server.

If the DHCP server is available, you can check the checkbox of Enable DHCP to automatically obtain an IP

address and other network settings from that server.

The valid value range of MTU is 500 ~ 9676.

4. After having configured the general settings, click Apply to save the settings.

Working Mode: There are two 10M/100M/1000M NIC cards provided by the device, and it allows the device to

work in the Multi-address, Load Balance and Net Fault-tolerance modes.

Multi-address ModeThe parameters of the two NIC cards can be configured independently. You can select

LAN1 or LAN2 in Select NIC text field for parameter settings.

You can select one NIC card as default route. And when the system is connecting with the extranet the data will be

forwarded through the default route.
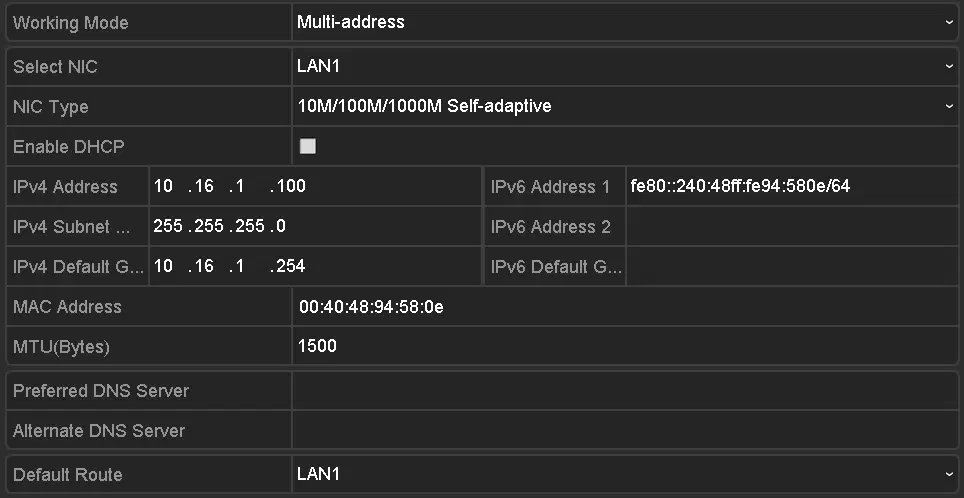
Hikvision DS-8004HFI-ST — 11.1 Configuring General Settings diagram (page 163)
Fig. 189 · 11.1 Configuring General Settings

Figure 11. 4 Multi-address Working Mode

Load Balance Mode: By using the same IP address, and two NIC cards share the load of the total bandwidth,

which enables the system to provide two Gigabit network capacity.

Page 164 of the Hikvision DS-8004HFI-ST user manual — 11.1 Configuring General Settings
Page 164 · click to enlarge
Page 164
Hikvision DS-8004HFI-ST — 11.1 Configuring General Settings diagram (page 164)
Fig. 190 · 11.1 Configuring General Settings

Figure 11. 5 Load Balance Working Mode

Net Fault-tolerance Mode: The two NIC cards use the same IP address, and you can select the Main NIC to

LAN1 or LAN2. By this way, in case of one NIC card failure, the device will automatically enable the other

standby NIC card so as to ensure the normal running of the whole system.
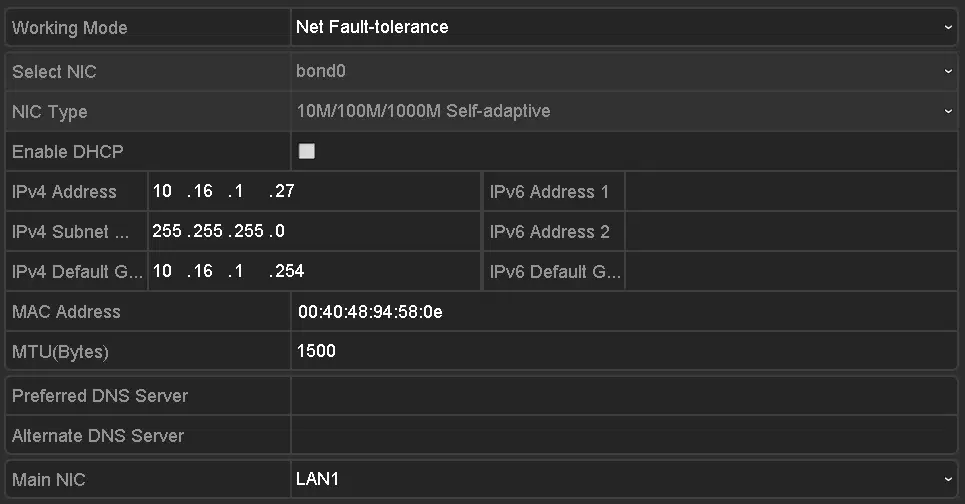
Hikvision DS-8004HFI-ST — 11.1 Configuring General Settings diagram (page 164)
Fig. 191 · 11.1 Configuring General Settings

Figure 11. 6 Net Fault-tolerance Working Mode

Page 165 of the Hikvision DS-8004HFI-ST user manual — 11.2.2 Configuring DDNS Settings
Page 165 · click to enlarge
Page 165

11.2 Configuring Advanced Settings

We use the interface of DS-9100HFI-ST series (unless otherwise stated) as example to describe the following

settings.

11.2.1 Configuring PPPoE Settings

Your device also allows access by Point-to-Point Protocol over Ethernet (PPPoE).

1. Enter the Network Settings interface.

Menu > Configuration > Network

2. Select the PPPoE tab to enter the PPPoE Settings interface.
Hikvision DS-8004HFI-ST — 11.2.1 Configuring PPPoE Settings diagram (page 165)
Fig. 192 · 11.2.1 Configuring PPPoE Settings

Figure 11. 7 PPPoE Settings Interface

3. Check

checkbox to enable PPPoE.

4. Enter User Name and Password for PPPoE access.

The User Name and Password should be assigned by your ISP.

Hikvision DS-8004HFI-ST — 11.2.1 Configuring PPPoE Settings diagram (page 165)
Fig. 193 · 11.2.1 Configuring PPPoE Settings

Figure 11. 8 PPPoE Settings Interface

5. Click Apply to save and exit the interface.
6. After successful settings, the system asks you to reboot the device to activate the new settings, and the

PPPoE dial-up is automatically connected after reboot.

You can go to Menu > Maintenance > System Info > Network interface to view the status of PPPoE

connection. Please refer to Chapter 13.1.5Viewing Network Information for PPPoE status.

11.2.2 Configuring DDNS Settings

If your device is set to use PPPoE as its default network connection, you may set Dynamic DNS (DDNS) to be

used for network access.

Page 166 of the Hikvision DS-8004HFI-ST user manual — 11.2 Configuring Advanced Settings
Page 166 · click to enlarge
Page 166

Prior registration with your ISP is required before configuring the system to use DDNS.

1. Enter the Network Settings interface.

Menu > Configuration > Network

2. Select the DDNS tab to enter the DDNS Settings interface.
3. Check

checkbox to enable DDNS.

4. Select DDNS Type . Five different DDNS types are selectable: IPServer, DynDNS, PeanutHull, NO-IP and

HiDDNS.

  • IPServer: Enter Server Address for IPServer, and other fields are read only.

The Server Address should be the IP address of the PC that runs IPServer.

Hikvision DS-8004HFI-ST — 11.2 Configuring Advanced Settings diagram (page 166)
Fig. 194 · 11.2 Configuring Advanced Settings

Figure 11. 9 IPServer Settings Interface

  • DynDNS:
1. Enter Server Address for DynDNS (e.g. members.dyndns.org).
2. In the Device Domain Name text field, enter the domain obtained from the DynDNS website.
3. Enter the User Name and Password registered in the DynDNS website.
Hikvision DS-8004HFI-ST — 11.2 Configuring Advanced Settings diagram (page 166)
Fig. 195 · 11.2 Configuring Advanced Settings

Figure 11. 10 DynDNS Settings Interface

  • PeanutHull: Enter User Name and Password obtained from the PeanutHull website, and other fields

are read only.

Hikvision DS-8004HFI-ST — 11.2 Configuring Advanced Settings diagram (page 166)
Fig. 196 · 11.2 Configuring Advanced Settings

Figure 11. 11 Peanut Hull Settings Interface

  • NO-IP:

Enter the account information in the corresponding fields.

1. Enter Server Address for NO-IP.
2. In the Device Domain Name text field, enter the domain obtained from the NO-IP website

(www.no-ip.com).

Page 167 of the Hikvision DS-8004HFI-ST user manual — 11.2 Configuring Advanced Settings
Page 167 · click to enlarge
Page 167
3. Enter the User Name and Password registered in the NO-IP website.
Hikvision DS-8004HFI-ST — 11.2 Configuring Advanced Settings diagram (page 167)
Fig. 197 · 11.2 Configuring Advanced Settings

Figure 11. 12 NO-IP Settings Interface

  • HiDDNS: You need to enter the Server Address and Device Domain Name for HiDDNS, and other

fields are read only.

1. Edit the Server Address of the HiDDNS server. By default, www.hik-online.com will be

automatically available in the Server Address field when HiDDNS is selected.

2. Enter the Device Domain Name. You can register the device domain name in the HiDDNS

server first and then enter the name to the Device Domain Name in the device; you can also

enter the domain name directly on the device to create a new one.

If a new device domain name is defined in the device, it will replace the old one registered on the

server.

Hikvision DS-8004HFI-ST — 11.2 Configuring Advanced Settings diagram (page 167)
Fig. 198 · 11.2 Configuring Advanced Settings

Figure 11. 13 HiDDNS Settings Interface

The device name can only contain the lower-case English letter, numeric and ‘-’; and it must start

with the lower-case English letter and cannot end with ‘-’.

Access the Device via Web Browser or Client Software

After having successfully registered the device on the HiDDNS server, you can access your

device via web browser or Client Software with the Device Domain Name (Device Name).

Task 1Access the Device via Web Browser

Open a web browser, and enter http://www.hik-online.com/alias in the address bar. Alias refers to

the Device Domain Name on the device or the Device Name on the HiDDNS server.

Examplehttp://www.hik-online.com/dvr

If you mapped the HTTP port on your router and changed it to port No. except 80, you have to

enter http://www.hik-online.com/alias:HTTP port in the address bar to access the device. You can

refer to Chapter 9.2.6 for the mapped HTTP port No.

Task 2Access the Devices via iVMS-4200

For iVMS-4200, in the Add Device window, select

and then edit the device

Page 168 of the Hikvision DS-8004HFI-ST user manual — 11.2.3 Configuring NTP Server Settings
Page 168 · click to enlarge
Page 168

information.

Nickname: Edit a name for the device as you want.

Server Addresswww.hik-online.com
Device Domain NameIt refers to the Device Domain Name on the device or the Device Name

on the HiDDNS server you created.

User Name: Enter the user name of the device. By default it is admin.

Password: Enter the password of the device. By default it is 12345.

Hikvision DS-8004HFI-ST — 11.2.3 Configuring NTP Server Settings diagram (page 168)
Fig. 199 · 11.2.3 Configuring NTP Server Settings

Figure 11. 14 Access Device via iVMS4200

5. Click Apply to save and exit the interface.

11.2.3 Configuring NTP Server Settings

A Network Time Protocol (NTP) Server can be configured on your device to ensure the accuracy of system

date/time.

1. Enter the Network Settings interface.

Menu > Configuration > Network

2. Select the NTP tab to enter the NTP Settings interface.
Hikvision DS-8004HFI-ST — 11.2.3 Configuring NTP Server Settings diagram (page 168)
Fig. 200 · 11.2.3 Configuring NTP Server Settings

Figure 11. 15 NTP Settings Interface

3. Check

checkbox to enable NTP.

4. Configure the following NTP settings:

Interval: Time interval between the two synchronizing actions with NTP server. The unit is minute.

NTP Server: IP address of NTP server.

NTP Port: Port of NTP server.

5. Click Apply to save and exit the interface.
Page 169 of the Hikvision DS-8004HFI-ST user manual — 11.2.4 Configuring Email Settings
Page 169 · click to enlarge
Page 169

The time synchronization interval can be set from 1 to 10080min, and the default value is 60min. If the device is

connected to a public network, you should use a NTP server that has a time synchronization function, such as the

server at the National Time Center (IP Address: 210.72.145.44). If the device is setup in a more customized

network, NTP software can be used to establish a NTP server used for time synchronization.

11.2.4 Configuring Email Settings

The system can be configured to send an Email notification to all designated users if an alarm event is detected, a

motion detection event is detected, etc.

Before you start:

The device must be connected to a local area network (LAN) that maintains an SMTP mail server. The network

must also be connected to either an intranet or the Internet depending on the location of the email accounts to

which you want to send notification.

1. Enter the Network Settings interface.

Menu > Configuration > Network

2. Set the IPv4 Address, IPv4 Subnet Mask, IPv4 Gateway and the Preferred DNS Server in the Network

Settings interface.

Figure 11. 16 Network Settings Interface

3. Click Apply to save the settings.
4. Select the Email tab to enter the Email Settings interface.
5. Configure the following Email settings:
Enable Server Authentication (optional)If your mail server requires authentication, check this checkbox

to use authentication to log in to this server and enter the login User Name and Password.

User Name: The user name of sender’s account registered on the SMTP server.

Password: The password of sender’s account registered on the SMTP server.

SMTP Server: The SMTP Server IP address or host name (e.g., smtp.263xmail.com).

SMTP Port: The SMTP port. The default TCP/IP port used for SMTP is 25.

Enable SSL (optional): Check the checkbox to enable SSL if required by the SMTP server.

Sender: The name of sender.

Sender’s Address: The Email address of sender.

Select Receivers: Select the receiver. Up to 3 receivers can be configured.

Page 170 of the Hikvision DS-8004HFI-ST user manual — 11.2.5 Configuring FTP Server Settings
Page 170 · click to enlarge
Page 170

Receiver: The name of user to be notified.

Receiver’s Address: The Email address of user to be notified.

Enable Attached PicturesCheck the checkbox of Enable Attached Picture if you want to send email

with attached alarm images.

Interval: The interval refers to the time between two actions of sending attached pictures.

Hikvision DS-8004HFI-ST — 11.2.5 Configuring FTP Server Settings diagram (page 170)
Fig. 201 · 11.2.5 Configuring FTP Server Settings

Figure 11. 17 Configure Email Settings

6. Click Apply to save the Email settings.
7. Optionally, you can click Test to test whether the Email settings work.

11.2.5 Configuring FTP Server Settings

FTP configuration is supported by DVR series only.

The FTP (File Transfer Protocol) can be configured on your device to realize dual-directional transmission of

control files over Internet. And the captured pictures of device can be uploaded to FTP server as well.

1. Enter the Network Settings interface.

Menu > Configuration > Network

2. Select the FTP tab to enter the FTP Settings interface.
3. Select a FTP server. Preferred FTP Server and Alternate FTP Server are selectable.
4. Check

checkbox to enable the FTP server.

When both two FTP servers are enabled and configured properly, once the preferred FTP server fails, the

alternate FTP server will be used until the preferred FTP server resumes work.

5. Configure the FTP settings for preferred and alternate FTP server, including FTP protocol, server address,

port, user name, password and the directory.

Page 171 of the Hikvision DS-8004HFI-ST user manual — 11.2.6 Configuring SNMP Settings
Page 171 · click to enlarge
Page 171
Hikvision DS-8004HFI-ST — 11.2.6 Configuring SNMP Settings diagram (page 171)
Fig. 202 · 11.2.6 Configuring SNMP Settings

Figure 11. 18 Configure FTP Settings

FTP Protocol: Select the protocol for the FTP server. FTP and SFTP (Secure File Transfer Protocol) are

available. For SFTP, the remote FTP server should support the SFTP protocol. It is a more secure way for

file transmission by adopting the secure encryption method. However, due to the secure encryption method,

the speed of the file transmission with SFTP protocol is much lower than that with FTP protocol.

DirectoryIn the Directory field, you can select the Root directory, Parent directory and secondary

directory. When the Parent Directory is selected, you have the option to use the Device Name, Device No. or

Device IP for the name of the directory, or you can customize the directory name; and the when the

Secondary Directory is selected, you can use the Camera Name or Camera No. as the name of the directory,

or you can customize the directory name.

If you want to modify the Device Name, Device No., Device IP or Camera Name, please enter the

corresponding interface to modify.

6. Click Apply to save and exit the interface.

Please make sure the remote FTP server has been started up before setting the FTP parameters.

11.2.6 Configuring SNMP Settings

You can use Simple Network Management Protocol (SNMP) to get the device status and alarm related

information.

1. Enter the Network Settings interface.

Menu > Configuration > Network

2. Select the SNMP tab to enter the SNMP Settings interface.
3. Check

checkbox to enable SNMP.

4. Configure the SNMP settings.
Hikvision DS-8004HFI-ST — 11.2.6 Configuring SNMP Settings diagram (page 171)
Fig. 203 · 11.2.6 Configuring SNMP Settings

Figure 11. 19 Configure SNMP Settings

Page 172 of the Hikvision DS-8004HFI-ST user manual — 11.2.7 Configuring NAT Settings
Page 172 · click to enlarge
Page 172
5. Click Apply to save and exit the interface.

Before setting the SNMP, please download the SNMP software and manage to receive the device information via

SNMP port. By setting the Trap Address, the device is allowed to send the alarm event and exception message to

the surveillance center.

11.2.7 Configuring NAT Settings

Two ways are provided for port mapping to realize the remote access via the cross-segment network, UPnP™ and

manual mapping.

Universal Plug and Play (UPnP™) permits the device to discover the presence of other network devices on the

network seamlessly and establish functional network services for data sharing, communications, etc. You can use

the UPnP™ function to enable the fast connection of the device to the WAN via a router without port mapping.

Before you start:

Enable the UPnP™ function of the router to which your device is connected. When the network working mode of

the device is set as multi-address, the Default Route of the device should be in the same network segment as that of

the LAN IP address of the router.

1. Enter the Network Settings interface.

Menu > Configuration > Network

2. Select the NAT tab to enter the UPnP™ interface.
3. Check

checkbox to enable UPnP™.

4. Select the Mapped Type as Manual or Auto in the drop-down list.
Task1Auto

If you select Auto, the Port Mapping items are read-only, and the external ports are set by the router

automatically.

1. Click Apply to save the settings.
2. You can click Refresh to get the latest status of the port mapping.
Hikvision DS-8004HFI-ST — 11.2.7 Configuring NAT Settings diagram (page 172)
Fig. 204 · 11.2.7 Configuring NAT Settings

Figure 11. 20 UPnP™ Settings Finished-Auto

Task2Manual

If you select Manual as the mapping type, you can edit the external port on your demand by clicking

activate the External Port Settings dialog box.

1. Click

to activate the External Port Settings dialog box. Configure the external port No. for server

UPnPTM · to

Page 173 of the Hikvision DS-8004HFI-ST user manual — 11.2.7 Configuring NAT Settings
Page 173 · click to enlarge
Page 173

port, http port, RTSP port and https port respectively.

You can use the default port No., or change it according to actual requirements.

External Port indicates the port No. for port mapping in the router.

The value of the port No. should be between 1 and 65535 and the value must be different from

each other. If multiple devices are configured for the UPnP™ settings under the same router, the

value of the port No. for each device should be unique.

Hikvision DS-8004HFI-ST — 11.2.7 Configuring NAT Settings diagram (page 173)
Fig. 205 · 11.2.7 Configuring NAT Settings

Figure 11. 21 External Port Settings Dialog Box

2. Click Apply to save the settings.
3. You can click Refresh to get the latest status of the port mapping.
Hikvision DS-8004HFI-ST — 11.2.7 Configuring NAT Settings diagram (page 173)
Fig. 206 · 11.2.7 Configuring NAT Settings

Figure 11. 22 UPnP™ Settings Finished-Manual

If your router does not support the UPnPTM function, perform the following steps to map the port manually in an

easy way.

Before you start:

Make sure the router support the configuration of internal port and external port in the interface of Forwarding.

1. Enter the Network Settings interface.

Menu > Configuration > Network

2. Select the NAT tab to enter the port mapping interface.
3. Leave the Enable UPnP checkbox unchecked.
4. Click

to activate the External Port Settings dialog box. Configure the external port No. for server port,

http port, RTSP port and https port respectively.

The value of the RTSP port No. should be 554 or between 1024 and 65535, while the value of the other ports

should be between 1 and 65535 and the value must be different from each other. If multiple devices are

configured for the UPnP™ settings under the same router, the value of the port No. for each device should be

Manual Mapping

Page 174 of the Hikvision DS-8004HFI-ST user manual — 11.2.8 Configuring More Network Settings
Page 174 · click to enlarge
Page 174

unique.

Hikvision DS-8004HFI-ST — 11.2.8 Configuring More Network Settings diagram (page 174)
Fig. 207 · 11.2.8 Configuring More Network Settings

Figure 11. 23 External Port Settings Dialog Box

5. Click OK to save the setting for the current port and return to the upper-level menu.
6. Click Apply button to save the settings.
7. Enter the virtual server setting page of router. Input the internal port value in the Internal Source Port text

field, the external port value in the External Source Port text field, and other required information.

Each item should be corresponding with the internal or external device port, including server port, http port,

RTSP port and https port.

Hikvision DS-8004HFI-ST — 11.2.8 Configuring More Network Settings diagram (page 174)
Fig. 208 · 11.2.8 Configuring More Network Settings

Figure 11. 24 Setting Virtual Server Item

The above virtual server setting interface is for reference only, it may be different due to different router

manufactures. Please contact the manufacturer of router if you have any problems with setting virtual server.

11.2.8 Configuring More Network Settings

You can also configure the remote alarm host settings, Server / HTTP port settings, multicast settings, RTSP port

settings and high-speed download settings.

Alarm Host: With a remote alarm host configured, the device will send the alarm event or exception

message to the host when an alarm is triggered. The remote alarm host must have the CMS (Client

Management System) software installed.

Server and HTTP PortYou can change the server and HTTP ports in the Network Settings menu. The

default server port is 8000 and the default HTTP port is 80.

Multicast: The multicast can be configured to realize live view for more than 128 cameras through network.

A multicast address spans the Class-D IP range of 224.0.0.0 to 239.255.255.255. It is recommended to use

the IP address ranging from 239.252.0.0 to 239.255.255.255.

RTSP: The RTSP (Real Time Streaming Protocol) is a network control protocol designed for use in

entertainment and communications systems to control streaming media servers.

Page 175 of the Hikvision DS-8004HFI-ST user manual — 11.2.8 Configuring More Network Settings
Page 175 · click to enlarge
Page 175
High-speed DownloadYou can enable the High-speed Download function to widen the outgoing

bandwidth of the device. In this way you can speed up the download of record files through web browser or

CMS software.

1. Enter the Network Settings interface (Menu > Configuration > Network), and select the More Settings tab to

enter the More Settings interface.

Hikvision DS-8004HFI-ST — 11.2.8 Configuring More Network Settings diagram (page 175)
Fig. 209 · 11.2.8 Configuring More Network Settings

Figure 11. 25 More Settings Interface

2. Enter Alarm Host IP and Alarm Host Port in the text fields.

The Alarm Host IP refers to the IP address of the remote PC on which the CMS (Client Management

System) software (e.g., iVMS-4200) is installed, and the Alarm Host Port must be the same as the

alarm monitoring port configured in the software.

3. Enter the Server Port and HTTP Port in the text fields.

The Server Port should be set to the range of 2000-65535 and it is used for remote client software

access. The HTTP port is used for remote IE access.

4. Enter the Multicast IP in the text field.

When adding a device to the CMS (Client Management System) software, the multicast address must

be the same as the device’s multicast IP.

5. Enter the RTSP Port in the text field.

The default RTSP port is 554, and you can change it according to different requirements.

6. Check the checkbox of Enable High-speed Download , and confirm the pop-up message box.

If you enable the high-speed download function, the outgoing bandwidth of the device will be

increased by 40Mbps, and the local menu operation will be affected. It is recommended to disable this

function after finishing the remote download of record files.

7. Click Apply to save the new settings and exit.
Page 176 of the Hikvision DS-8004HFI-ST user manual — 11.2.9 Configuring HTTPS Settings
Page 176 · click to enlarge
Page 176

11.2.9 Configuring HTTPS Settings

HTTPS provides authentication of the web site and associated web server that one is communicating with, which

protects against Man-in-the-middle attacks. Perform the following steps to set the port number of https.

Example:

If you set the port number as 443 and the IP address is 192.0.0.64, you may access the device by inputting

https://192.0.0.64:443 via the web browser.

The HTTPS port can be only configured through the web browser.

1. Open web browser, input the IP address of device, and the web server will select the language automatically

according to the system language and maximize the web browser.

2. Input the correct user name and password, and click Login button to log in the device.
3. Enter the HTTPS settings interface.

Configuration > Network > Advanced Settings > HTTPS

4. Create the self-signed certificate or authorized certificate.
Hikvision DS-8004HFI-ST — 11.2.9 Configuring HTTPS Settings diagram (page 176)
Fig. 210 · 11.2.9 Configuring HTTPS Settings

Figure 11. 26 HTTPS Settings

OPTION 1Create the self-signed certificate
1. Check the checkbox of Create Self-signed Certificate .
2. Click the Create button and a dialog box pops up as follows:
Page 177 of the Hikvision DS-8004HFI-ST user manual — 11.2.10 Virtual Host Settings
Page 177 · click to enlarge
Page 177
Hikvision DS-8004HFI-ST — 11.2.10 Virtual Host Settings diagram (page 177)
Fig. 211 · 11.2.10 Virtual Host Settings

Figure 11. 27 Create Self-signed Certificate

3. Enter the country, host name/IP, validity and other information.
4. Click OK to save the settings.
OPTION 2Create the authorized certificate

We take the example of the signed certificate is unavailable.

1. Check the checkbox of Create the certificate request first and continue the installation .
2. Click the Create button to create the certificate request.
3. Click Download to download the certificate request.
4. Submit it to the trusted certificate authority for signature by clicking Browse and select the certificate

file.

5. Click Install to finish the settings.
5. The certificate information will be displayed after you successfully created and installed the certificate.
6. Check the checkbox to enable the HTTPS function.

The HTTPS Port should be set to the range of 1-65535.

11.2.10 Virtual Host Settings

You can directly get access to the IP camera management interface from the HDVR management interface.

The Virtual host function is only supported by the HDVR series.

You can only configure the virtual host settings through the web browser.

1. Enter the Advanced settings interface.

Configuration > Network > Advanced Settings > other

Page 178 of the Hikvision DS-8004HFI-ST user manual — 11.2.11 Telnet Settings
Page 178 · click to enlarge
Page 178
Hikvision DS-8004HFI-ST — 11.2.11 Telnet Settings diagram (page 178)
Fig. 212 · 11.2.11 Telnet Settings

Figure 11. 28 Advanced Settings Interface

2. Check the checkbox of the Enable Virtual Host .
3. Click the Save button to save the setting.
4. Enter the IP camera management interface of HDVR. The Connect column appears on the right-most side of

the camera list.

Configuration > System > Camera Management > IP Camera

Hikvision DS-8004HFI-ST — 11.2.11 Telnet Settings diagram (page 178)
Fig. 213 · 11.2.11 Telnet Settings

Figure 11. 29 Accessing IP Camera

5. Click the link to go the management page of the selected IP camera.

11.2.11 Telnet Settings

Telnet function provides an easy way to get access to the DVR/HDVR. You can see the advanced information

about the device by inputting command; as well the configuration can also be realized through telnet connection.

1. Enter the Advanced settings interface.

Configuration > System > Security

Hikvision DS-8004HFI-ST — 11.2.11 Telnet Settings diagram (page 178)
Fig. 214 · 11.2.11 Telnet Settings

Figure 11. 30 Advanced Settings Interface

2. Check the checkbox of the Enable Telnet .
Page 179 of the Hikvision DS-8004HFI-ST user manual — 11.2.11 Telnet Settings
Page 179 · click to enlarge
Page 179
3. Click the Save button to save the setting.
4. You can open the Command Prompt window in your PC, and input “telnet IP Address” to connect with the

DVR, as shown in the figure below.

Example:

The IP address of the DVR is 192.0.0.64, you can input “telnet 192.0.0.64” and then press Enter to connect

to the DVR.

Hikvision DS-8004HFI-ST — 11.2.11 Telnet Settings diagram (page 179)
Fig. 215 · 11.2.11 Telnet Settings

Figure 11. 31 Connect to DVR

The telnet function turns invalid after the device shutting down or rebooting, and you need to enable it again if

required.

Page 180 of the Hikvision DS-8004HFI-ST user manual — 11.3 Checking Network Traffic
Page 180 · click to enlarge
Page 180

11.3 Checking Network Traffic

You can check the network traffic to obtain real-time information of device such as linking status, MTU,

sending/receiving rate, etc.

1. Enter the Network Traffic interface.

Menu > Maintenance > Net Detect

Hikvision DS-8004HFI-ST — 11.3 Checking Network Traffic diagram (page 180)
Fig. 216 · 11.3 Checking Network Traffic

Figure 11. 32 Network Traffic Interface

2. You can view the sending rate and receiving rate information on the interface. The traffic data is refreshed

every 1 second.

Page 181 of the Hikvision DS-8004HFI-ST user manual — 11.4.2 Exporting Network Packet
Page 181 · click to enlarge
Page 181

11.4 Network Detection

You can obtain network connecting status of device through the network detection function, including network

delay, packet loss, etc.

11.4.1 Testing Network Delay and Packet Loss

1. Enter the Network Detection interface.

Menu > Maintenance > Net Detect

2. Click the Network Detection tab to enter the Network Detection menu.
Hikvision DS-8004HFI-ST — 11.4.1 Testing Network Delay and Packet Loss diagram (page 181)
Fig. 217 · 11.4.1 Testing Network Delay and Packet Loss

Figure 11. 33 Network Detection Interface for Other Series

Dual NIC is not supported by DS-7200HWI-SV series.

We use the interface of DS-9100HFI-ST series (unless otherwise stated) as example to describe the

following settings.

3. Select a NIC to test network delay and packet loss.
4. Enter the destination address in the text field of Destination Address .
5. Optionally, you can click Test to test the network delay and packet loss. The testing result pops up on the

window. If the testing is failed, the error message box will pop up as well.

11.4.2 Exporting Network Packet

By connecting the device to network, the captured network data packet can be exported to USB-flash disk,

SATA/eSATA DVD-R/W and other local backup devices.

Dual NIC is not supported by DS-7200HWI-SV series.

We use the interface of DS-9100HFI-ST series (unless otherwise stated) as example to describe the following

settings.

Page 182 of the Hikvision DS-8004HFI-ST user manual — 11.4.3 Checking Network Status
Page 182 · click to enlarge
Page 182
1. Enter the Network Traffic interface.

Menu > Maintenance > Net Detect

2. Click the Network Detection tab to enter the Network Detection interface.
3. Select the backup device from the drop-down list of Device Name.

Click Refresh if the connected local backup device cannot be displayed. When it fails to detect the backup

device, please check whether it is compatible with the device. You can format the backup device if the format

is incorrect.

Hikvision DS-8004HFI-ST — 11.4.3 Checking Network Status diagram (page 182)
Fig. 218 · 11.4.3 Checking Network Status

Figure 11. 34 Export Network Packet

4. Click Export to start exporting.
5. After the exporting is complete, click OK to finish the packet export.

Up to 1M data can be exported each time.

11.4.3 Checking Network Status

You can also check the network status and quick set the network parameters in this interface.

Dual NIC is not supported by DS-7200HWI-SV series.

We use the interface of DS-9100HFI-ST series (unless otherwise stated) as example to describe the following

settings.

1. Enter the Network Traffic interface.

Menu > Maintenance > Net Detect

2. Click the Network Detection tab to enter the Network Detection interface.
3. Click Status to get the network status.
Page 183 of the Hikvision DS-8004HFI-ST user manual — 11.4.4 Checking Network Statistics
Page 183 · click to enlarge
Page 183
Hikvision DS-8004HFI-ST — 11.4.4 Checking Network Statistics diagram (page 183)
Fig. 219 · 11.4.4 Checking Network Statistics

Figure 11. 35 Checking Network Status

You can click Network to enter the quick setting interface of network parameters if needed.

Hikvision DS-8004HFI-ST — 11.4.4 Checking Network Statistics diagram (page 183)
Fig. 220 · 11.4.4 Checking Network Statistics

Figure 11. 36 Network Parameters Configuration

11.4.4 Checking Network Statistics

You can check the network statistics to obtain the real-time information of the device.

1. Enter the Network Statistics interface.

Menu > Maintenance> Net Detect

2. Click the Network Stat. tab to enter the Network Statistics interface.
Page 184 of the Hikvision DS-8004HFI-ST user manual — 11.4.4 Checking Network Statistics
Page 184 · click to enlarge
Page 184
Hikvision DS-8004HFI-ST — 11.4.4 Checking Network Statistics diagram (page 184)
Fig. 221 · 11.4.4 Checking Network Statistics

Figure 11. 37 Network Stat. Interface

3. View the bandwidth of IP Camera, bandwidth of Remote Live View, bandwidth of Remote Playback,

bandwidth of Net Receive Idle and bandwidth of Net Send Idle.

The bandwidth of IP Camera is only displayed in HDVR series.

The value of the bandwidth is subject to the actual model.

4. Click Refresh to get the latest bandwidth statistics.
Page 185 of the Hikvision DS-8004HFI-ST user manual — Chapter 12 RAID Configuration
Page 185 · click to enlarge
Page 185

Chapter 12 RAID Configuration

Page 186 of the Hikvision DS-8004HFI-ST user manual — 12.1 Configuring Array and Virtual Disk
Page 186 · click to enlarge
Page 186

This chapter is available for DS-9100/9000HFI-RT series only. For the configuration for alarm linkage actions of

array exception, please refer to Chapter 8.6 and Chapter 8.7.

12.1 Configuring Array and Virtual Disk

RAID (redundant array of independent disks) is a storage technology that combines multiple disk drive

components into a logical unit. A RAID setup stores data over multiple hard disk drives to provide enough

redundancy so that data can be recovered if one disk fails. Data is distributed across the drives in one of several

ways called "RAID levels", depending on what level of redundancy and performance is required. The

DS-9000/9100HFI-RT is capable of realizing RAID settings, supporting RAID 0, RAID 1, RAID 5 and RAID 10.

Before you start:

Please install the HDD(s) properly and it is recommended to use the same enterprise-level HDDs (including model

and capacity) for array creation and configuration so as to maintain reliable and stable running of the disks.

Introduction:

The DS-9000/9100HFI-RT series can store the data (such as record, picture, log information) in the HDD only

after you have created the virtual disk or you have configured network HDD (refer to Chapter 11.2 Managing

Network HDD). Our device provides two ways for creating the virtual disk, including one-touch configuration and

manual configuration. The following flow chart shows the process of creating virtual disk.

Hikvision DS-8004HFI-ST — 12.1 Configuring Array and Virtual Disk diagram (page 186)
Fig. 222 · 12.1 Configuring Array and Virtual Disk

Figure 12. 1 RAID Working Flow

Page 187 of the Hikvision DS-8004HFI-ST user manual — 12.1.1 One-touch Configuration
Page 187 · click to enlarge
Page 187

12.1.1 One-touch Configuration

Through one-touch configuration, you can quickly create the disk array and virtual disk. By default, the array type

to be created is RAID 5.

1. Enter the Physical Disk Settings interface.

Menu > HDD > RAID > Physical Disk

Hikvision DS-8004HFI-ST — 12.1.1 One-touch Configuration diagram (page 187)
Fig. 223 · 12.1.1 One-touch Configuration

Figure 12. 2 Physical Disk Settings Interface

2. Click One-touch Config to enter the One-touch Array Configuration interface.

As the default array type is RAID 5, at least 3 HDDs must be installed in you device.

Hikvision DS-8004HFI-ST — 12.1.1 One-touch Configuration diagram (page 187)
Fig. 224 · 12.1.1 One-touch Configuration

Figure 12. 3 One-touch Array Configuration

3. Edit the array name in the Array Name text filed and click OK start array configuration.

If you install 4 HDDs or above for one-touch configuration, a hot spare disk will be set by default. It is

recommended to set hot spare disk for automatically rebuilding the array when the array is abnormal.

4. When the array configuration is complete, click OK in the pop-up message box to finish the settings.
Page 188 of the Hikvision DS-8004HFI-ST user manual — 12.1.2 Manually Creating Array and Virtual Disk
Page 188 · click to enlarge
Page 188
5. You can click Array tab to view the information of the successfully created array.

By default, one-touch configuration creates an array and a virtual disk.

Hikvision DS-8004HFI-ST — 12.1.2 Manually Creating Array and Virtual Disk diagram (page 188)
Fig. 225 · 12.1.2 Manually Creating Array and Virtual Disk

Figure 12. 4 Array Settings Interface

6. Click Virtual Disk tab to view the automatically created virtual disk .

By default, one-touch configuration adopts background initialization to initialize the virtual disk.

Hikvision DS-8004HFI-ST — 12.1.2 Manually Creating Array and Virtual Disk diagram (page 188)
Fig. 226 · 12.1.2 Manually Creating Array and Virtual Disk

Figure 12. 5 Virtual Disk Settings Interface

7. After the initialization of the virtual disk is complete, the virtual disk will be displayed in the HDD

Information interface (Menu>HDD>General). For operation guide of initializing the virtual disk, please refer

to Chapter 11.1 Initializing HDDs.

For configuring hot spare disk manually, please refer to steps 12-15 of Chapter 10.1.2.

12.1.2 Manually Creating Array and Virtual Disk

You can manually create the array of RAID 0, RAID 1, RAID 5 and RAID 10.

In this section, we take RAID 5 as an example to describe the manual configuration of array and virtual disk.

1. Enter the Physical Disk Settings interface.

Menu > HDD > RAID > Physical Disk

Page 189 of the Hikvision DS-8004HFI-ST user manual — 12.1.2 Manually Creating Array and Virtual Disk
Page 189 · click to enlarge
Page 189
Hikvision DS-8004HFI-ST — 12.1.2 Manually Creating Array and Virtual Disk diagram (page 189)
Fig. 227 · 12.1.2 Manually Creating Array and Virtual Disk

Figure 12. 6 Physical Disk Settings Interface

2. Click Create to enter the Create Array interface.
Hikvision DS-8004HFI-ST — 12.1.2 Manually Creating Array and Virtual Disk diagram (page 189)
Fig. 228 · 12.1.2 Manually Creating Array and Virtual Disk

Figure 12. 7 Create Array Interface

3. Edit the Array Name; set the RAID Level to RAID 0, RAID 1, RAID 5 or RAID 10; select the Physical Disk

that you want to configure array.

If you choose RAID 0, at least 2 HDDs must be installed.

If you choose RAID 1, 2 HDDs need to be configured for RAID 1.

If you choose RAID 5, at least 3 HDDs must be installed.

If you choose RAID 10, 4/6/8 HDDs need to be configured for RAID 10.

4. Click OK to create array.

If the number of HDDs you select is not compatible with the requirement of the RAID level, the error

message box will pop up.

Page 190 of the Hikvision DS-8004HFI-ST user manual — 12.1.2 Manually Creating Array and Virtual Disk
Page 190 · click to enlarge
Page 190
Hikvision DS-8004HFI-ST — 12.1.2 Manually Creating Array and Virtual Disk diagram (page 190)
Fig. 229 · 12.1.2 Manually Creating Array and Virtual Disk

Figure 12. 8 Error Message Box

5. You can click Array tab to view the successfully created array.
Hikvision DS-8004HFI-ST — 12.1.2 Manually Creating Array and Virtual Disk diagram (page 190)
Fig. 230 · 12.1.2 Manually Creating Array and Virtual Disk

Figure 12. 9 Array Settings Interface

6. Click to select an array and click Create Vd to enter the Create Virtual Disk interface .

The device supports creating at most 8 virtual disks.

Hikvision DS-8004HFI-ST — 12.1.2 Manually Creating Array and Virtual Disk diagram (page 190)
Fig. 231 · 12.1.2 Manually Creating Array and Virtual Disk

Figure 12. 10 Create Virtual Disk Interface

7. Edit the name of the virtual disk, set the capacity for the virtual disk and select the initialization type for the

virtual disk.

You can also click the Information of Array Capacity area to set the remaining capacity of the array

for the disk.

It is recommended to create one virtual disk of an array.

At least 100GB capacity must be configured for each virtual disk.

There are three initialization types, including Background, Foreground and Fast.

Fast (Not Recommended)The fast initialization usually takes short time and only initializes part of

the RAID, and cannot detect the bad sector.

Foreground (Recommended)By using foreground initialization, the RAID will be initialized totally
Page 191 of the Hikvision DS-8004HFI-ST user manual — 12.1.2 Manually Creating Array and Virtual Disk
Page 191 · click to enlarge
Page 191

and the bad sector of the hard disks can be detected and repaired. The virtual disk can be used only

after the initialization is complete.

BackgroundThe background initialization can synchronize the disks, and detect and repair the bad

sector of the disks. During the background initialization, the virtual disk is allowed to be used.

8. Click Apply to save the settings and click OK to return to Array Settings interface.
9. Click Virtual Disk tab to enter the Virtual Disk interface. The successfully created virtual disk will be listed

on the interface.

Hikvision DS-8004HFI-ST — 12.1.2 Manually Creating Array and Virtual Disk diagram (page 191)
Fig. 232 · 12.1.2 Manually Creating Array and Virtual Disk

Figure 12. 11 Virtual Disk Interface

10. Enter the HDD Information interface (Menu>HDD>General) and the virtual disk will be displayed. For

operation guide of initializing the virtual disk, please refer to Chapter 11.1 Initializing HDDs.

If you adopt foreground initialization, the virtual disk will be displayed in the HDD Information interface

after the initialization is complete.

Hikvision DS-8004HFI-ST — 12.1.2 Manually Creating Array and Virtual Disk diagram (page 191)
Fig. 233 · 12.1.2 Manually Creating Array and Virtual Disk

Figure 12. 12 HDD Information Interface
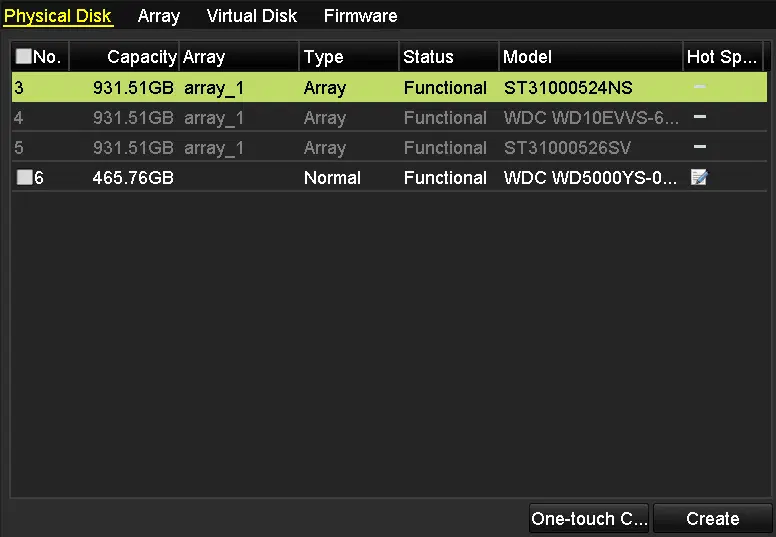
11. Enter the Physical Disk Settings interface to configure the hot spare disk.
Hikvision DS-8004HFI-ST — 12.1.2 Manually Creating Array and Virtual Disk diagram (page 191)
Fig. 234 · 12.1.2 Manually Creating Array and Virtual Disk

Figure 12. 13 Physical Disk Settings Interface

12. Select a free disk and click the icon

. Then the free disk will be set as the global hot spare disk.

You can click the icon

to delete the hot spare disk.

Page 192 of the Hikvision DS-8004HFI-ST user manual — 12.1.2 Manually Creating Array and Virtual Disk
Page 192 · click to enlarge
Page 192
Hikvision DS-8004HFI-ST — 12.1.2 Manually Creating Array and Virtual Disk diagram (page 192)
Fig. 235 · 12.1.2 Manually Creating Array and Virtual Disk

Figure 12. 14 Hot Spare Disk

Page 193 of the Hikvision DS-8004HFI-ST user manual — 12.2.1 Automatically Rebuilding Array
Page 193 · click to enlarge
Page 193

12.2 Rebuilding Array

The working status of array includes Functional, Disk Loss and Offline. By viewing the array status, you can take

immediate and proper maintenance for the disks so as to ensure the high security and reliability of the data stored

in the disk array.

When there is no disk loss in the array, the working status of array will change to Functional; when the number of

lost disks has exceeded the limit, the working status of array will change to Offline; in other conditions, the

working status is Disk Loss.

When the virtual disk is in Degraded status, you can restore it to Functional by array rebuilding.

12.2.1 Automatically Rebuilding Array

When the virtual disk is in Degraded status, the device can start rebuilding the array automatically with the hot

spare disk to ensure the high security and reliability of the data.

Before you start:

The hot spare disk needs to be configured.

1. Enter the Array Settings interface. When the status of the array is Disk Loss, the hot spare disk will be

automatically used for array rebuilding.

Menu > HDD > RAID > Array

Hikvision DS-8004HFI-ST — 12.2.1 Automatically Rebuilding Array diagram (page 193)
Fig. 236 · 12.2.1 Automatically Rebuilding Array

Figure 12. 15 Array Settings Interface

2. Enter the Virtual Disk interface to view the rebuilding status of the virtual disk.
Hikvision DS-8004HFI-ST — 12.2.1 Automatically Rebuilding Array diagram (page 193)
Fig. 237 · 12.2.1 Automatically Rebuilding Array

Figure 12. 16 Virtual Disk Settings Interface

If there is no hot spare disk after rebuilding, it is recommended to install a HDD into the device and set is as a hot

spare disk to ensure the high security and reliability of the array.

Menu>HDD>RAID>Virtual Disk

Page 194 of the Hikvision DS-8004HFI-ST user manual — 12.2.2 Manually Rebuilding Array
Page 194 · click to enlarge
Page 194

12.2.2 Manually Rebuilding Array

If there is no hot spare disk available, you can rebuild the array manually to restore the array when the virtual disk

is in Degraded status.

1. Enter the Array Settings interface. The status of the array is displayed as Disk Loss, and the status of the

virtual disk is displayed as Degraded.

Menu > HDD > RAID > Array;

Menu > HDD > RAID > Virtual Disk

Hikvision DS-8004HFI-ST — 12.2.2 Manually Rebuilding Array diagram (page 194)
Fig. 238 · 12.2.2 Manually Rebuilding Array

Figure 12. 17 Array Settings Interface

Hikvision DS-8004HFI-ST — 12.2.2 Manually Rebuilding Array diagram (page 194)
Fig. 239 · 12.2.2 Manually Rebuilding Array

Figure 12. 18 Virtual Disk Interface

2. Click the icon

on the Array Settings interface to rebuild the array.

At least one available physical disk should exist for rebuilding the array.

Hikvision DS-8004HFI-ST — 12.2.2 Manually Rebuilding Array diagram (page 194)
Fig. 240 · 12.2.2 Manually Rebuilding Array

Figure 12. 19 Rebuild Array Interface

3. Select the available free physical disk and click OK to confirm to rebuild the array.
4. The “Do not unplug the physical disk when it is under rebuilding” message box pops up. Click OK to start

rebuilding.

5. After rebuilding successfully, the array and virtual disk will restore to Functional. You can enter the Array

Settings interface and Virtual Disk interface to view the rebuilding status.

Page 195 of the Hikvision DS-8004HFI-ST user manual — 12.3 Repairing Virtual Disk
Page 195 · click to enlarge
Page 195

12.3 Repairing Virtual Disk

When the disk cannot be displayed on the HDD Information interface while the virtual disk can still show in the

Array Settings interface, you have to repair the virtual disk.

If the virtual disk is under foreground initialization, the repairing cannot be done.

1. Enter the Virtual Disk interface.

Menu > HDD > RAID > Virtual Disk

Hikvision DS-8004HFI-ST — 12.3 Repairing Virtual Disk diagram (page 195)
Fig. 241 · 12.3 Repairing Virtual Disk

Figure 12. 20 Virtual Disk Interface

2. Click

to repair the virtual disk. After successfully repairing, the following message box will pop up.

Click OK to finish the settings.

Hikvision DS-8004HFI-ST — 12.3 Repairing Virtual Disk diagram (page 195)
Fig. 242 · 12.3 Repairing Virtual Disk

Figure 12. 21 Repairing Virtual Disk Successfully

The disk shows again in the HDD Information interface (Menu>HDD>General).

Hikvision DS-8004HFI-ST — 12.3 Repairing Virtual Disk diagram (page 195)
Fig. 243 · 12.3 Repairing Virtual Disk

Figure 12. 22 HDD Information Interface

Page 196 of the Hikvision DS-8004HFI-ST user manual — 12.4.4 Deleting the Array
Page 196 · click to enlarge
Page 196

12.4 Deleting Array / Virtual Disk

Before deleting the array, the virtual disk(s) under this array must be deleted first. Deleting array and virtual disk

will delete all the data saved in the disk.

12.4.3 Deleting the Virtual Disk

1. Enter the Virtual Disk interface.

Menu > HDD > RAID > Virtual Disk

Hikvision DS-8004HFI-ST — 12.4.3 Deleting the Virtual Disk diagram (page 196)
Fig. 244 · 12.4.3 Deleting the Virtual Disk

Figure 12. 23 Virtual Disk Interface

2. Select a virtual disk and click

to delete the virtual disk.

Deleting virtual disk will cause to delete all the data saved in the disk.

12.4.4 Deleting the Array

If all the virtual disks under an array have been deleted, then you can delete that array.

1. Enter the Array Settings interface.
Hikvision DS-8004HFI-ST — 12.4.4 Deleting the Array diagram (page 196)
Fig. 245 · 12.4.4 Deleting the Array

Figure 12. 24 Array Settings Interface

2. Select an array and click

to delete the array.

Deleting array will cause to delete all the data in the array.

Menu>HDD>RAID>Array

Page 197 of the Hikvision DS-8004HFI-ST user manual — 12.5 Upgrading Firmware
Page 197 · click to enlarge
Page 197

12.5 Upgrading Firmware

You can view the information of the firmware and upgrade the firmware by local backup device or remote FTP

server.

1. Enter the Firmware interface to view the information of the firmware, including the version, maximum

physical disk quantity, maximum array quantity, auto-rebuild status, etc.

Menu > HDD > RAID > Firmware

Hikvision DS-8004HFI-ST — 12.5 Upgrading Firmware diagram (page 197)
Fig. 246 · 12.5 Upgrading Firmware

Figure 12. 25 Firmware Interface

2. You can click Upgrade to upgrade the firmware. Local upgrade and FTP upgrade are available. Since the

upgrading process of the firmware is the same as that of the device firmware, you can refer to Chapter 13.4

for detailed information.

Please contact the dealer immediately if the device cannot work properly after upgrading.

Page 198 of the Hikvision DS-8004HFI-ST user manual — 12.5 Upgrading Firmware
Page 198 · click to enlarge
Page 198
Hikvision DS-8004HFI-ST — 12.5 Upgrading Firmware diagram (page 198)
Fig. 247 · 12.5 Upgrading Firmware

Figure 12. 26 Upgrade the Firmware

Page 199 of the Hikvision DS-8004HFI-ST user manual — Chapter 13 HDD Management
Page 199 · click to enlarge
Page 199

Chapter 13 HDD Management

Page 200 of the Hikvision DS-8004HFI-ST user manual — 13.1 Initializing HDDs
Page 200 · click to enlarge
Page 200

We use the interface of DS-9100HFI-ST series (unless otherwise stated) as example to describe the following

settings.

13.1 Initializing HDDs

A newly installed hard disk drive (HDD) must be initialized before it can be used with your device.

If there is uninitialized HDD existed in the device, perform the following steps to initialize the HDD(s).

1. Enter the HDD Information interface.

Menu > HDD > General

Hikvision DS-8004HFI-ST — 13.1 Initializing HDDs diagram (page 200)
Fig. 248 · 13.1 Initializing HDDs

Figure 13. 1 HDD Information Interface

2. Select HDD to be initialized.
3. Click Init to initialize the selected HDD.
Hikvision DS-8004HFI-ST — 13.1 Initializing HDDs diagram (page 200)
Fig. 249 · 13.1 Initializing HDDs

Figure 13. 2 Start Initialization

4. After the HDD has been initialized, the status of the HDD will change from Uninitialized to Normal .
Hikvision DS-8004HFI-ST — 13.1 Initializing HDDs diagram (page 200)
Fig. 250 · 13.1 Initializing HDDs

Figure 13. 3 HDD Status Changes to Normal

Page 201 of the Hikvision DS-8004HFI-ST user manual — 13.1 Initializing HDDs
Page 201 · click to enlarge
Page 201

Initializing the HDD will erase all data on it.

The HDDs which are free of working for a long time can be enabled to sleep, thus to decrease the power

consumption of the device and extend the life of the HDDs.

Click Menu > HDD > Advanced.

Hikvision DS-8004HFI-ST — 13.1 Initializing HDDs diagram (page 201)
Fig. 251 · 13.1 Initializing HDDs

Figure 13. 4 Enable HDD Sleeping

Check the checkbox of Enable HDD Sleeping (by default), and the HDDs which are free of working for a long

time will be set to sleep.

Uncheck the checkbox of Enable HDD Sleeping, and the HDDs will be set to work for all time.

Page 202 of the Hikvision DS-8004HFI-ST user manual — 13.2 Managing Network HDD
Page 202 · click to enlarge
Page 202

13.2 Managing Network HDD

You can add the allocated NAS or disk of IP SAN to device, and use it as network HDD.

1. Enter the HDD Information interface.

Menu > HDD > General

2. Click Add to enter the Add NetHDD interface.
3. Add the allocated NetHDD.
4. Select the type to NAS or IP SAN.
5. Configure the NAS or IP SAN settings.

Add NAS disk:

1. Enter the NetHDD IP address in the text field.
2. Click Search to search the available NAS disks.
3. Select the NAS disk from the list shown below.

Or you can just manually enter the directory in the text field of NetHDD Directory.

4. Click OK to add the configured NAS disk.

Up to 8 NAS disks can be added.

Hikvision DS-8004HFI-ST — 13.2 Managing Network HDD diagram (page 202)
Fig. 252 · 13.2 Managing Network HDD

Figure 13. 5 Add NAS Disk

Add IP SAN:

1. Enter the NetHDD IP address in the text field.
2. Click Search to search the available IP SAN disks.
3. Select the IP SAN disk from the list shown below.
4. Click OK to add the selected IP SAN disk.

Up to 8 IP SAN disk can be added.

Page 203 of the Hikvision DS-8004HFI-ST user manual — 13.2 Managing Network HDD
Page 203 · click to enlarge
Page 203
Hikvision DS-8004HFI-ST — 13.2 Managing Network HDD diagram (page 203)
Fig. 253 · 13.2 Managing Network HDD

Figure 13. 6 Add IP SAN Disk

6. After having successfully added the NAS or IP SAN disk, return to the HDD Information menu. The added

NetHDD will be displayed in the list.

If the added NetHDD is uninitialized, please select it and click Init for initialization.

Hikvision DS-8004HFI-ST — 13.2 Managing Network HDD diagram (page 203)
Fig. 254 · 13.2 Managing Network HDD

Figure 13. 7 Initialize Added NetHDD

Page 204 of the Hikvision DS-8004HFI-ST user manual — 13.3 Managing eSATA
Page 204 · click to enlarge
Page 204

13.3 Managing eSATA

When there is an external eSATA device connected to device, you can configure eSATA for the use of

Record/Capture or Export, and you can manage the eSATA in the device.

1. Enter the Advanced Record Settings interface.
2. Select the eSATA type to eSATA1.
3. Set the Usage as Record/Capture or Export.

Export: Use the eSATA for backup. Refer to Backup using eSATA HDDs in Chapter 7.1.2 Backing up by

Normal Video Search for operating instructions.

Record/Capture: Use the eSATA for record/capture. Refer to the following steps for operating instructions.

Hikvision DS-8004HFI-ST — 13.3 Managing eSATA diagram (page 204)
Fig. 255 · 13.3 Managing eSATA

Figure 13. 8 Set eSATA Usage

4. When the eSATA usage is selected to Record/Capture, enter the HDD Information interface.

Menu > HDD > General

5. Edit the property of the selected eSATA, or initialize it is required.

Three storage modes can be configured for the eSATA when it is used for Record/Capture. Please refer to

Chapter 11.4, Chapter 11.5 and Chapter 11.6 for details.

Hikvision DS-8004HFI-ST — 13.3 Managing eSATA diagram (page 204)
Fig. 256 · 13.3 Managing eSATA

Figure 13. 9 Initialize Added eSATA

Menu > Record>Advanced

Page 205 of the Hikvision DS-8004HFI-ST user manual — 13.4 Managing HDD Group
Page 205 · click to enlarge
Page 205

13.4 Managing HDD Group

13.4.1 Setting HDD Groups

Multiple HDDs can be managed in groups. Video from specified channels can be recorded onto a particular HDD

group through HDD settings.

1. Enter the Storage Mode interface.

Menu > HDD > Advanced > Storage Mode

2. Set the Mode to Group, as shown below.

Reboot the device to activate the new settings.

Hikvision DS-8004HFI-ST — 13.4 Managing HDD Group diagram (page 205)
Fig. 257 · 13.4 Managing HDD Group

Figure 13. 10 Storage Mode Interface

IP Camera is supported by HDVR series only.

3. Click Apply and reboot the device to activate the new settings.
4. After reboot of device, enter the HDD Information interface.

Menu > HDD > General

5. Select a HDD from the list and click

to enter the Local HDD Settings interface.

Hikvision DS-8004HFI-ST — 13.4 Managing HDD Group diagram (page 205)
Fig. 258 · 13.4 Managing HDD Group

Figure 13. 11 Local HDD Settings Interface

Page 206 of the Hikvision DS-8004HFI-ST user manual — 13.4.2 Setting HDD Property
Page 206 · click to enlarge
Page 206
6. Select the Group number for the current HDD.

The default group No. for each HDD is 1.

7. Click OK and confirm the pop-up message box to finish the settings.

13.4.2 Setting HDD Property

The HDD property can be set to redundancy, read-only or read/write (R/W). Before setting the HDD property,

please set the storage mode to Group (refer to step1-4 of Chapter 11.4.1 Setting HDD Groups).

A HDD can be set to read-only to prevent important recorded files from being overwritten when the HDD becomes

full in overwrite recording mode.

When the HDD property is set to redundancy, the video can be recorded both onto the redundancy HDD and the

R/W HDD simultaneously so as to ensure high security and reliability of video data.

1. Enter the HDD Information interface.

Menu > HDD > General

2. Select a HDD from the list and click

to enter the Local HDD Settings interface.

Figure 13. 12 Set HDD Property

3. Set the HDD property to R/W, Read-only or Redundancy.
4. Click OK to save the settings and exit the interface.
5. In the HDD Information menu, the HDD property will be displayed in the list.

At least 2 hard disks must be installed on your device when you want to set a HDD to Redundancy, and there is

one HDD with R/W property.

Page 207 of the Hikvision DS-8004HFI-ST user manual — 13.5 Configuring Quota Mode
Page 207 · click to enlarge
Page 207

13.5 Configuring Quota Mode

Each camera can be configured with allocated quota for the storage of recorded files or captured pictures.

1. Enter the Storage Mode interface.

Menu > HDD > Advanced

2. Set the Mode to Quota.
3. Select a camera for which you want to configure quota. In HDVR series device you can select IP Camera .
4. Enter the storage capacity in the text fields of Max. Record Capacity (GB) and Max. Picture Capacity

(GB).

Hikvision DS-8004HFI-ST — 13.5 Configuring Quota Mode diagram (page 207)
Fig. 259 · 13.5 Configuring Quota Mode

Figure 13. 13 Configure Record/Picture Quota

5. You can copy the quota settings of the current camera to other cameras if required. Click Copy to enter the

Copy Camera menu, as shown below.

Hikvision DS-8004HFI-ST — 13.5 Configuring Quota Mode diagram (page 207)
Fig. 260 · 13.5 Configuring Quota Mode

Figure 13. 14 Copy Settings to Other Camera(s)

IP Camera is supported by HDVR series only.

6. Select the camera (s) to be configured with the same quota settings. You can also click the checkbox of

Analog or IP Camera to select all cameras.

7. Click OK to finish the Copy settings and back to the Storage Mode interface.
8. Click Apply to save the settings.

The device must be rebooted to activate the changes.

If the quota capacity is set to 0, then all cameras will use the total capacity of HDD for record and picture

capture.

Page 208 of the Hikvision DS-8004HFI-ST user manual — 13.6 Configuring Frame Extracting Mode
Page 208 · click to enlarge
Page 208

13.6 Configuring Frame Extracting Mode

If you want to extend the record time of the HDD, you can set the storage mode of the HDD to Frame Extracting.

In this mode, the bitrate of frame extracting record is less than 1/8 of that of normal record and the frame rate of

frame extracting record is 1 fps so as to maintain longer storage time of the record files.

Frame extracting record is only supported by analog cameras.

1. Enter the Storage Mode interface.

Menu > HDD > Advanced

2. Set the Mode to Frame Extracting.

The device must be rebooted to activate the change.

Hikvision DS-8004HFI-ST — 13.6 Configuring Frame Extracting Mode diagram (page 208)
Fig. 261 · 13.6 Configuring Frame Extracting Mode

Figure 13. 15 Storage Mode Settings Interface

3. Drag

to adjust the storage percentages of normal record, frame extracting record and picture according to

actual requirements.

4. You can edit the bitrate of the camera and the Allowed Record Time and Extended Record Time will change

accordingly.

Allowed Record TimeThe total recording time that is allowed when using the frame-extracting recording

mode.

Extended Record TimeThe recording time that is extended when using the frame-extracting recording

mode.

Example: With the frame extracting mode configured, the Allowed Record Time is estimated as 12 and the

Extended Record Time as 10, it means the HDD capacity allows the frame extracting record to last 12 days

and the record time is extended for about 10 days. If you have not configured the frame extracting mode, the

HDD capacity allows the record to last 2 days only.

5. Click Apply and reboot the device to activate the new settings.
Page 209 of the Hikvision DS-8004HFI-ST user manual — 13.6 Configuring Frame Extracting Mode
Page 209 · click to enlarge
Page 209

The estimation of the record time is only for reference.

If you change the storage capacity of the device, e.g., a new HDD is connected or a HDD is removed,

you have to configure the frame extracting mode again.

Page 210 of the Hikvision DS-8004HFI-ST user manual — 13.7 Configuring Disk Clone
Page 210 · click to enlarge
Page 210

13.7 Configuring Disk Clone

Before you start:

Connect a HDD to the device via the eSATA interface.

You can clone all the data stored on the HDD, which is installed on the device, to a connected eSATA disk

according to the actual needs or when the S.M.A.R.T. detection result declares the HDD is abnormal. For details of

S.M.A.R.T. detection, see Chapter 11.9.

The disk clone function is not supported by 9100HFI-RT/9000HFI-RT/7200HWI-SV Series.

For 9100HFI-XT/9000HFI-XT Series, the disk clone is only available when the RAID function is disabled.

1. Enter the HDD Advanced Setting interface:

Menu > HDD > Advanced

2. Click the Disk Clone tab to enter the Disk Clone Settings interface.
Hikvision DS-8004HFI-ST — 13.7 Configuring Disk Clone diagram (page 210)
Fig. 262 · 13.7 Configuring Disk Clone

Figure 13. 16 Disk Clone Settings Interface

3. Make sure the usage of the eSATA disk is set as Export.

If not, click the Set button to set it. Choose Export and click the OK button.

Page 211 of the Hikvision DS-8004HFI-ST user manual — 13.7 Configuring Disk Clone
Page 211 · click to enlarge
Page 211
Hikvision DS-8004HFI-ST — 13.7 Configuring Disk Clone diagram (page 211)
Fig. 263 · 13.7 Configuring Disk Clone

Figure 13. 17 Setting eSATA Usage

The capacity of destination disk must be the same as that of the clone source disk.

4. Check the checkbox of the HDD to be cloned in the Clone Source list.
5. Click the Clone button and confirm the pop-up message box.

You can check the clone progress in the HDD status.

Hikvision DS-8004HFI-ST — 13.7 Configuring Disk Clone diagram (page 211)
Fig. 264 · 13.7 Configuring Disk Clone

Figure 13. 18 Check Disk Clone Progress

Page 212 of the Hikvision DS-8004HFI-ST user manual — 13.8 Checking HDD Status
Page 212 · click to enlarge
Page 212

13.8 Checking HDD Status

You may check the status of the installed HDDs on device so as to take immediate check and maintenance in case

of HDD failure.

Checking HDD Status in HDD Information Interface

1. Enter the HDD Information interface.
2. Check the status of each HDD which is displayed on the list.
Hikvision DS-8004HFI-ST — 13.8 Checking HDD Status diagram (page 212)
Fig. 265 · 13.8 Checking HDD Status

Figure 13. 19 View HDD Status (1)

If the status of HDD is Normal or Sleeping, it works normally. If the status is Uninitialized or Abnormal, please

initialize the HDD before use. And if the HDD initialization is failed, please replace it with a new one.

Checking HDD Status in HDD Information Interface

1. Enter the System Information interface.

Menu > Maintenance > System Info

2. Click the HDD tab to view the status of each HDD displayed on the list.
Hikvision DS-8004HFI-ST — 13.8 Checking HDD Status diagram (page 212)
Fig. 266 · 13.8 Checking HDD Status

Figure 13. 20 View HDD Status (2)

Menu > HDD>General

Page 213 of the Hikvision DS-8004HFI-ST user manual — 13.9 Checking S.M.A.R.T. Information
Page 213 · click to enlarge
Page 213

13.9 Checking S.M.A.R.T. Information

The S.M.A.R.T. (Self-Monitoring, Analysis and Reporting Technology) is a monitoring system for HDD to detect

and report on various indicators of reliability in the hopes of anticipating failures.

This chapter is not available for DS-9100/9000HFI-RT series.

1. Enter the S.M.A.R.T. Settings interface.

Menu > Maintenance > HDD Detect >S.M.A.R.T. Settings

2. Select a HDD to view its S.M.A.R.T. information list.

If you want to use the HDD even when the S.M.A.R.T. checking is failed, you can check the checkbox

before the Continue to use this disk when self-evaluation is failed item.

3. Three self-tests of S.M.A.R.T are provided, including Short Test, Expanded Test and Conveyance Test. You

can select a self-test type and click

to start self-test.

Hikvision DS-8004HFI-ST — 13.9 Checking S.M.A.R.T. Information diagram (page 213)
Fig. 267 · 13.9 Checking S.M.A.R.T. Information

Figure 13. 21 S.M.A.R.T. Settings Interface

Page 214 of the Hikvision DS-8004HFI-ST user manual — 13.10 Detecting Bad Sector
Page 214 · click to enlarge
Page 214

13.10 Detecting Bad Sector

You can detect the bad sector of the HDD to check the status of the HDD.

This chapter is not available for DS-9100/9000HFI-RT series.

1. Enter the Bad Sector Detection interface.

Menu > Maintenance > HDD Detect > Bad Sector Detection

2. Select a HDD and choose Full Detection or Key Area Detection as the detection type.
3. Click Detect to start detecting.
Hikvision DS-8004HFI-ST — 13.10 Detecting Bad Sector diagram (page 214)
Fig. 268 · 13.10 Detecting Bad Sector

Figure 13. 22 Bad Sector Detecting

4. You can click Pause to pause the detection and click Resume to resume the detection.
5. If there is error information about the HDD, you can click Error info to view the information.
Page 215 of the Hikvision DS-8004HFI-ST user manual — 13.11 Configuring HDD Error Alarms
Page 215 · click to enlarge
Page 215

13.11 Configuring HDD Error Alarms

You can configure the HDD error alarms when the HDD status is Uninitialized or Abnormal.

1. Enter the Exception interface.

Menu > Configuration > Exceptions

2. Select the Exception Type to HDD Error from the drop-down list.
3. Click the checkbox(s) below to select the HDD error alarm type (s).

The alarm type can be selected to: Audible Warning, Notify Surveillance Center, Send Email and

Trigger Alarm Output. Please refer to Chapter 8.7 Setting Alarm Linkage Actions.
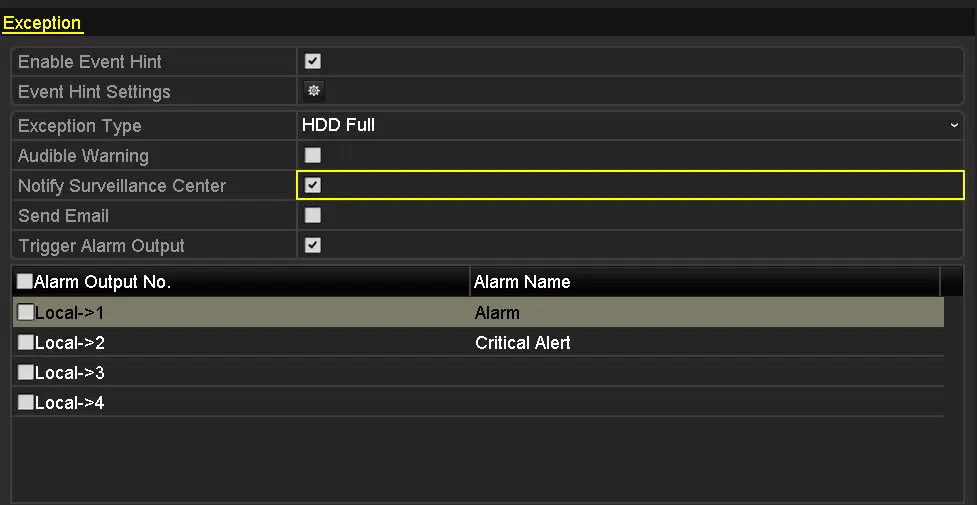
Hikvision DS-8004HFI-ST — 13.11 Configuring HDD Error Alarms diagram (page 215)
Fig. 269 · 13.11 Configuring HDD Error Alarms

Figure 13. 23 Configure HDD Error Alarm

4. When the Trigger Alarm Output (not supported by DS-7200HWI-SV series) is selected, you can also select

the alarm output to be triggered from the list below.

5. Click Apply to save the settings.
Page 216 of the Hikvision DS-8004HFI-ST user manual — Chapter 14 Camera Settings
Page 216 · click to enlarge
Page 216

Chapter 14 Camera Settings

Page 217 of the Hikvision DS-8004HFI-ST user manual — 14.1 Configuring OSD Settings
Page 217 · click to enlarge
Page 217

14.1 Configuring OSD Settings

You can configure the OSD (On-screen Display) settings for the camera, including date /time, camera name, etc.

We use the interface of DS-9100HFI-ST series (unless otherwise stated) as example to describe the following

settings.

1. Enter the OSD Configuration interface.

Menu > Camera > OSD

2. Select the camera to configure OSD settings.
3. Edit the Camera Name in the text field.
4. Configure the Display Name, Display Date and Display Week by checking the checkbox.
5. Select the Date Format, Time Format and Display Mode.
Hikvision DS-8004HFI-ST — 14.1 Configuring OSD Settings diagram (page 217)
Fig. 270 · 14.1 Configuring OSD Settings

Figure 14. 1 OSD Configuration Interface

6. You can use the mouse to click and drag the text frame on the preview window to adjust the OSD position.
7. Copy Camera Settings
1. If you want to copy the OSD settings of the current camera to other cameras, click Copy to enter the

Copy Camera interface.

Copying the OSD settings to network cameras is not available.

2. Select the camera (s) to be configured with the same OSD settings. You can also check

checkbox to select all cameras.

3. Click OK to finish the Copy settings and back to the OSD Configuration interface.
8. Click Apply to apply the settings.
Page 218 of the Hikvision DS-8004HFI-ST user manual — 14.3 Configuring Video Parameters
Page 218 · click to enlarge
Page 218

14.2 Configuring Privacy Mask

Privacy mask enables you to cover certain areas on the live video to prevent certain spots in the surveillance area

from being live viewed and recorded.

1. Enter the Privacy Mask Settings interface.

Menu > Camera > Privacy Mask

2. Select the camera to set privacy mask.
3. Check

checkbox to enable privacy mask.

4. Use the mouse to draw a zone on the window. The zones will be marked with different frame colors.

Up to 4 privacy mask zones can be configured, and the size of each area can be adjusted.

5. The configured privacy mask zones on the window can be cleared by clicking the corresponding Clear

Zone1-4 icons on the right side of the window, or click Clear All to clear all zones.

Hikvision DS-8004HFI-ST — 14.2 Configuring Privacy Mask diagram (page 218)
Fig. 271 · 14.2 Configuring Privacy Mask

Figure 14. 2 Set Privacy Mask Area

6. You can click Copy to copy the privacy mask settings of the current camera to other cameras. Please refer to

step 7 of Chapter 12.1 Configuring OSD Settings.

Copying the privacy mask settings to network cameras is not available.

7. Click Apply to save the settings.

14.3 Configuring Video Parameters

1. Enter the Image Settings interface.

Menu > Camera > Image

Page 219 of the Hikvision DS-8004HFI-ST user manual — 14.2 Configuring Privacy Mask
Page 219 · click to enlarge
Page 219
Hikvision DS-8004HFI-ST — 14.2 Configuring Privacy Mask diagram (page 219)
Fig. 272 · 14.2 Configuring Privacy Mask

Figure 14. 3 Image Settings Interface for Analog Camera Connected to DS-9200 HWI-ST Series

Hikvision DS-8004HFI-ST — 14.2 Configuring Privacy Mask diagram (page 219)
Fig. 273 · 14.2 Configuring Privacy Mask

Figure 14. 4 Image Settings Interface for Analog Camera Connected to Other Series

Hikvision DS-8004HFI-ST — 14.2 Configuring Privacy Mask diagram (page 219)
Fig. 274 · 14.2 Configuring Privacy Mask

Figure 14. 5 Image Settings Interface for IP Camera

Hikvision DS-8004HFI-ST — 14.2 Configuring Privacy Mask diagram (page 219)
Fig. 275 · 14.2 Configuring Privacy Mask

Figure 14. 6 Image Settings Interface for Rotate Camera

The defog mode is only available for analog cameras connected to DS-9200 HWI-ST series device.3

Page 220 of the Hikvision DS-8004HFI-ST user manual — 14.2 Configuring Privacy Mask
Page 220 · click to enlarge
Page 220

types of defog modes are available: Auto (default), Manual and Disable.

IP Camera is supported by the HDVR series.

Rotate function and Mirror function are only supported by Rotate Camera.

2. Select the camera to set image parameters.
3. Select the mode from the drop-down list of Mode . For analog cameras, four modes are selectable: Standard,

Indoor, Dim Light and Outdoor. While for IP cameras, only Customize is supported.

4. Adjust the image parameters according to actual needs. The parameters are including Brightness, Contrast,

Saturation, Hue, Sharpness and Denoising. You can also click Default to restore the default settings.

5. For Rotate Camera, you can clockwise rotate the image for 270 degrees by selecting the Enable Rotate as

Clockwise 270 degrees. And you can adjust the image to a mirror image by selecting Mirror Mode as

Left-Right, Up-Down or Center.

Sharpness, Denoising and restoring default settings are not supported by IP cameras.

6. Click Copy to copy the image settings of the current camera to other analog cameras.

Copying the image settings to IP cameras is not available.

7. Click Apply to save the settings.
Page 221 of the Hikvision DS-8004HFI-ST user manual — Chapter 15 Device Management and
Page 221 · click to enlarge
Page 221

Chapter 15 Device Management and

Maintenance

Page 222 of the Hikvision DS-8004HFI-ST user manual — XXXXXXXXXXXXXX
Page 222 · click to enlarge
Page 222

15.1 Viewing System Information

1. Enter the System Information interface.

Menu > Maintenance > System Info

Hikvision DS-8004HFI-ST — 15.1 Viewing System Information diagram (page 222)
Fig. 276 · 15.1 Viewing System Information

XXXXXXXXXXXXXX

XXXXXXXXXXXXXXXXXXXXXXXXXXXXXXXX

XXXXXXXXXXXXXXX

XXXXXXXXXXXXXXX

Figure 15. 1 Device Information Interface

2. Select the tab and you can view the detailed information of device, camera, record, alarm, network and HDD.

IP Camera is supported by HDVR series.

The alarm function is not supported by DS-7200HWI-SV series.

You can add the device to your mobile client software (iVMS-4500) via scanning the QR Code.

Page 223 of the Hikvision DS-8004HFI-ST user manual — 15.2 Searching & Exporting Log Files
Page 223 · click to enlarge
Page 223

15.2 Searching & Exporting Log Files

The operation, alarm, exception, information and running status of the device can be stored in log files, which can

be viewed and exported at any time.

Before you start:

Connect the backup device, such as USB flash drive, to the device before exporting the log files.

1. Enter the Log Search interface.

Menu > Maintenance > Log Information

Hikvision DS-8004HFI-ST — 15.2 Searching & Exporting Log Files diagram (page 223)
Fig. 277 · 15.2 Searching & Exporting Log Files

Figure 15. 2 Log Search Interface

2. Enter the Export interface.
Task 1Export All Logs

Click Export All to enter the Export interface, and all the system logs will be exported to the backup device.

Task 2Export Specified Logs
1. Specify the search conditions, including the Start Time, End Time, Major Type and Minor Type.
2. Click Search to search the log files. The matched log files will be displayed on the list.

or double-click the item, and you can view the detailed information of the

corresponding log.

, and you can view the related video files if available.

Up to 2000 log files can be displayed each time.

Click the icon · Click the icon

Page 224 of the Hikvision DS-8004HFI-ST user manual — 15.2 Searching & Exporting Log Files
Page 224 · click to enlarge
Page 224
Hikvision DS-8004HFI-ST — 15.2 Searching & Exporting Log Files diagram (page 224)
Fig. 278 · 15.2 Searching & Exporting Log Files

Figure 15. 3 Log Search Results

3. Click Export to enter the Export interface, and the matched logs will be exported to the backup device.
Hikvision DS-8004HFI-ST — 15.2 Searching & Exporting Log Files diagram (page 224)
Fig. 279 · 15.2 Searching & Exporting Log Files

Figure 15. 4 Export interface

3. Select the backup device and log file format from the respective drop-down lists.
4. Click the button Export on the Export interface to export the system logs to the selected backup device.

The log files exported to the backup device are named by exporting time, e.g., 20140704143907logBack.txt.

Page 225 of the Hikvision DS-8004HFI-ST user manual — 15.3 Importing/Exporting Configuration Files
Page 225 · click to enlarge
Page 225

15.3 Importing/Exporting Configuration Files

The configuration files of the device can be exported to local device for backup; and the configuration files of one

device can be imported to multiple devices if they are to be configured with the same parameters.

1. Enter the Import/Export Configuration File interface.

Menu > Maintenance > Import/Export

2. Select the backup device from the drop-down list.
3. Click Export to export configuration files of the device to the selected backup device.
4. To import the configuration file, select the file from the selected backup device and click Import .

After the import process is completed, the device will automatically reboot to activate the new settings.

Hikvision DS-8004HFI-ST — 15.3 Importing/Exporting Configuration Files diagram (page 225)
Fig. 280 · 15.3 Importing/Exporting Configuration Files

Figure 15. 5 Import/Export Config File

Page 226 of the Hikvision DS-8004HFI-ST user manual — 15.4.2 Upgrading by FTP
Page 226 · click to enlarge
Page 226

15.4 Upgrading System

The firmware on your device can be upgraded by local backup device or remote FTP server.

15.4.1 Upgrading by Local Backup Device

1. Connect your device with a local backup device where the update firmware file is located.
2. Enter the Upgrade interface.

Menu > Maintenance > Upgrade

3. Click the Local Upgrade tab to enter the local upgrade menu.
Hikvision DS-8004HFI-ST — 15.4.1 Upgrading by Local Backup Device diagram (page 226)
Fig. 281 · 15.4.1 Upgrading by Local Backup Device

Figure 15. 6 Local Upgrade Interface

4. Select the update file from the backup device.
5. Click Upgrade to start upgrading.
6. After the upgrading is complete, reboot the device to activate the new firmware.

15.4.2 Upgrading by FTP

Before you start:

Configure PC (running FTP server) and device to the same Local Area Network. Run the 3rd-party TFTP software

on the PC and copy the firmware into the root directory of TFTP.

1. Enter the Upgrade interface.

Menu > Maintenance > Upgrade

2. Click the FTP tab to enter the local upgrade interface.
Hikvision DS-8004HFI-ST — 15.4.2 Upgrading by FTP diagram (page 226)
Fig. 282 · 15.4.2 Upgrading by FTP

Figure 15. 7 FTP Upgrade Interface

3. Enter the FTP Server Address in the text field.
4. Click Upgrade to start upgrading.
5. After the upgrading is complete, reboot the device to activate the new firmware.
Page 227 of the Hikvision DS-8004HFI-ST user manual — 15.5 Restoring Default Settings
Page 227 · click to enlarge
Page 227

15.5 Restoring Default Settings

1. Enter the Default interface.

Menu > Maintenance > Default

2. Click OK to restore the default settings.

Except the network parameters (including IP address, subnet mask, gateway, MTU, NIC working mode, default

route and server port), all other parameters of the device will be restored to factory default settings.

Page 228 of the Hikvision DS-8004HFI-ST user manual — Chapter 16 Others
Page 228 · click to enlarge
Page 228

Chapter 16 Others

Page 229 of the Hikvision DS-8004HFI-ST user manual — 16.1 Configuring RS-232 Serial Port
Page 229 · click to enlarge
Page 229

16.1 Configuring RS-232 Serial Port

The RS-232 port can be used in two ways:

Parameters Configuration: Connect a PC to the device through the PC serial port. Device parameters can be

configured by using software such as HyperTerminal. The serial port parameters must be the same as the device’s

when connecting with the PC serial port.

Transparent ChannelConnect a serial device directly to the device. The serial device will be controlled

remotely by the PC through the network.

RS-232 serial port is not available for DS-7200HWI-SV series.

1. Enter the RS-232 Settings interface.

Menu > Configuration > RS-232

Hikvision DS-8004HFI-ST — 16.1 Configuring RS-232 Serial Port diagram (page 229)
Fig. 283 · 16.1 Configuring RS-232 Serial Port

Figure 16. 1 RS-232 Settings Interface

2. Configure RS-232 parameters, including baud rate, data bit, stop bit, parity, flow control and usage.
3. Click Apply to save the settings.
Page 230 of the Hikvision DS-8004HFI-ST user manual — 16.2 Configuring General Settings
Page 230 · click to enlarge
Page 230

16.2 Configuring General Settings

You can configure the BNC output standard, VGA output resolution, mouse pointer speed, etc.

1. Enter the General Settings interface.

Menu > Configuration > General

2. Select the General tab.
Hikvision DS-8004HFI-ST — 16.2 Configuring General Settings diagram (page 230)
Fig. 284 · 16.2 Configuring General Settings

Figure 16. 2 General Settings Interface When HDMI/VGA Simultaneous Output Disabled

Hikvision DS-8004HFI-ST — 16.2 Configuring General Settings diagram (page 230)
Fig. 285 · 16.2 Configuring General Settings

Figure 16. 3 General Settings Interface When HDMI/VGA Simultaneous Output Enabled

  • 3. Configure the following settings:
  • Language: The default language used is English .
  • CVBS Output Standard: Select the CVBS output standard to NTSC or PAL, which must be the

same with the video input standard.

  • VGA Resolution: Select the VGA output resolution, which must be the same with the resolution

of the monitor screen.

  • HDMI Resolution: Select the HDMI resolution, which must be the same with the resolution of the

monitor screen.

  • Resolution: Select the resolution for the VGA and HDMI output, which must be the same with the

resolution of the monitor screen.

When HDMI/VGA Simultaneous Output is disabled (Menu >Configuration >More Settings),

individual operation and settings can be achieved on VGA output and HDMI output.

  • Time Zone: Select the time zone.
  • Date Format: Select the date format.
  • System Date: Select the system date.
Page 231 of the Hikvision DS-8004HFI-ST user manual — 16.2 Configuring General Settings
Page 231 · click to enlarge
Page 231
  • System Time: Select the system time.
  • Mouse Pointer Speed: Set the speed of mouse pointer; 4 levels are configurable.
  • Enable Wizard: Enable/disable the Wizard when the device starts up.
  • Enable Password: Enable/disable the use of the login password.
4. Click Apply to save the settings.
Page 232 of the Hikvision DS-8004HFI-ST user manual — 16.3 Configuring DST Settings
Page 232 · click to enlarge
Page 232

16.3 Configuring DST Settings

1. Enter the General Settings interface.

Menu > Configuration > General

2. Choose DST Settings tab.
Hikvision DS-8004HFI-ST — 16.3 Configuring DST Settings diagram (page 232)
Fig. 286 · 16.3 Configuring DST Settings

Figure 16. 4 DST Settings Interface

checkbox before the Auto DST Adjustment item.

Or you can manually check the Enable DST checkbox, and then you choose the date of the DST period.

You can check

Page 233 of the Hikvision DS-8004HFI-ST user manual — 16.4 Configuring More Settings
Page 233 · click to enlarge
Page 233

16.4 Configuring More Settings

1. Enter the General Settings interface.

Menu > Configuration > General

2. Click the More Settings tab to enter the More Settings interface.
Hikvision DS-8004HFI-ST — 16.4 Configuring More Settings diagram (page 233)
Fig. 287 · 16.4 Configuring More Settings

Figure 16. 5 More Settings Interface

3. Configure the following settings:
  • Device Name: Edit the name of device.
  • Device No.: Edit the serial number of device. The Device No. can be set in the range of 1~255, and

the default No. is 255.

  • CVBS Output Brightness: Adjust the video output brightness.
  • Auto Logout: Set timeout time for menu inactivity. E.g., when the time is set to 5 Minutes , then

the system will exit from the current operation menu to live view screen after 5 minutes of menu

inactivity.

  • Enable HDMI/VGA Simultaneous Output: The operation and settings on VGA output and

HDMI output cannot be achieved respectively when this function is enabled.

This function is not supported by DS-7200HWI-SV& DS-9200HWI-ST series.

  • Menu Output Mode: Set the menu output mode as Auto, HDMI, VGA or Main CVBS. E.g.,

when VGA is selected and VGA output interface is connected, then the menu will be displayed on

VGA monitor.

When HDMI/VGA Simultaneous Output is enabled, Auto, HDMI/VGA and Main CVBS are

selectable for Menu Output Mode.

4. Click Apply to save the settings.
Page 234 of the Hikvision DS-8004HFI-ST user manual — 16.5 Managing User Accounts
Page 234 · click to enlarge
Page 234

16.5 Managing User Accounts

There is a default account in the device: Administrator. The Administrator user name is admin and the password is

12345. The Administrator has the permission to add and delete user and configure user parameters.

1. Enter the User Management interface.

Menu > Configuration > User

Hikvision DS-8004HFI-ST — 16.5 Managing User Accounts diagram (page 234)
Fig. 288 · 16.5 Managing User Accounts

Figure 16. 6 User Management Interface

2. Click Add to enter the Add User interface.
Hikvision DS-8004HFI-ST — 16.5 Managing User Accounts diagram (page 234)
Fig. 289 · 16.5 Managing User Accounts

Figure 16. 7 Add User Interface

3. Enter the information for new user, including User Name , Password , Level and User’s MAC Address .

Level: Set the user level to Operator or Guest. Different user levels have different operating permission.

OperatorThe Operator user level has permission of Local Log Search in Local Configuration,

Remote Log Search and Two-way Audio in Remote Configuration and all operating permission

in Camera Configuration.

GuestThe Guest user has permission of Local Log Search in Local Configuration, Remote Log

Search in Remote Configuration and only has the local/remote playback in the Camera

Configuration.

User’s MAC Address: The MAC address of the remote PC which logs onto the device. If it is configured

and enabled, it only allows the remote user with this MAC address to access the device.

4. Click OK to save the settings. The added user will be displayed in a list on the User Management interface.
Hikvision DS-8004HFI-ST — 16.5 Managing User Accounts diagram (page 234)
Fig. 290 · 16.5 Managing User Accounts

Figure 16. 8 User List

Page 235 of the Hikvision DS-8004HFI-ST user manual — 16.5 Managing User Accounts
Page 235 · click to enlarge
Page 235
5. You can assign permissions for the added user.
1. Select the user from the list and then click the icon

to enter the Permission Settings interface.
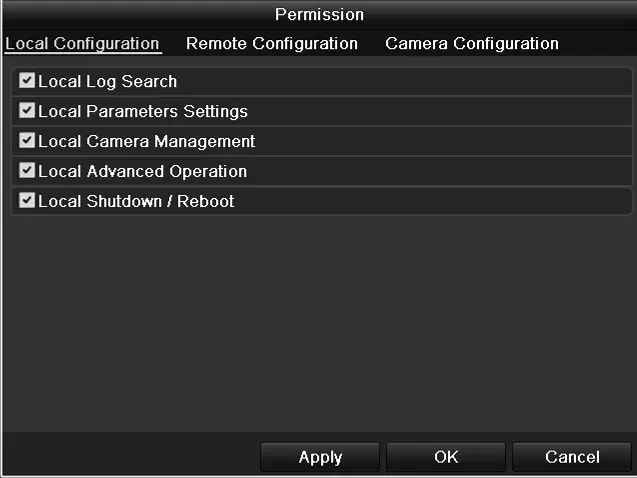
Hikvision DS-8004HFI-ST — 16.5 Managing User Accounts diagram (page 235)
Fig. 291 · 16.5 Managing User Accounts

Figure 16. 9 User Permission Settings Interface

2. Set the operating permission of Local Configuration, Remote Configuration and Camera Configuration

for the user.

  • Local Log Search: Searching and viewing logs and system information of device.
  • Local Parameters Settings: Configuring parameters, restoring factory default parameters and

importing/exporting configuration files. • Local Camera Management: Enabling and disabling analog camera (s). Adding, deleting and

editing of network camera (s). This function is supported by HDVR series. • Local Advanced Operation: Operating HDD management (initializing HDD, setting HDD

property), upgrading system firmware, clearing I/O alarm output. • Local Shutdown /Reboot: Shutting down or rebooting the device.

  • Remote Log Search: Remotely viewing logs that are saved on the device.
  • Remote Parameters Settings: Remotely configuring parameters, restoring factory default

parameters and importing/exporting configuration files. • Remote Camera Management: Remotely enabling and disabling analog camera (s), and adding,

  • deleting and editing of network camera (s). This function is supported by HDVR series.
  • Remote Serial Port Control: Configuring settings for RS-232 and RS-485 ports.
  • Remote Video Output Control: Sending remote control panel signal.
  • Two-way Audio: Realizing two-way radio between the remote client and the device.
  • Remote Alarm Control: Remotely arming (notify alarm and exception message to the remote

client) and controlling the alarm output. • Remote Advanced Operation: Remotely operating HDD management (initializing HDD, setting

HDD property), upgrading system firmware, clearing I/O alarm output. • Remote Shutdown/Reboot: Remotely shutting down or rebooting the device.

  • Remote Live View: Remotely viewing live video of the selected camera (s).
  • Local Manual Operation: Locally starting/stopping manual recording, picture capturing and

alarm output of the selected camera (s). • Remote Manual Operation: Remotely starting/stopping manual recording, picture capturing and

alarm output of the selected camera (s). • Local Playback: Locally playing back recorded files of the selected camera (s).

Local Configuration · Remote Configuration · Camera Configuration

Page 236 of the Hikvision DS-8004HFI-ST user manual — 16.5 Managing User Accounts
Page 236 · click to enlarge
Page 236
  • Remote Playback: Remotely playing back recorded files of the selected camera (s).
  • Local PTZ Control: Locally controlling PTZ movement of the selected camera (s).
  • Remote PTZ Control: Remotely controlling PTZ movement of the selected camera (s).
  • Local Video Export: Locally exporting recorded files of the selected camera (s).

Local Camera Management is supported by HDVR series.

3. Click OK to save the settings and exit.
6. To delete the added user, you can select the user from the list and click the corresponding icon
7. To edit the added user, you can select the user from the list and click the corresponding icon

, and then edit the user information, including user name, password, level and MAC address.

You cannot delete the admin user and can only change the password of it.

Only the admin user account has the permission of restoring factory default parameters.

Page 237 of the Hikvision DS-8004HFI-ST user manual — Chapter 17 Appendix
Page 237 · click to enlarge
Page 237

Chapter 17 Appendix

Page 238 of the Hikvision DS-8004HFI-ST user manual — Glossary
Page 238 · click to enlarge
Page 238

Glossary

  • Dual Stream: Dual stream is a technology used to record high resolution video locally while transmitting

a lower resolution stream over the network. The two streams are generated by the device, with the main

stream having a maximum resolution of 4CIF and the sub-stream having a maximum resolution of CIF.

  • DVR: Acronym for Digital Video Recorder. A DVR is device that is able to accept video signals from

analog cameras, compress the signal and store it on its hard drives.

  • HDD: Acronym for Hard Disk Drive. A storage medium which stores digitally encoded data on platters

with magnetic surfaces.

  • DHCP: Dynamic Host Configuration Protocol (DHCP) is a network application protocol used by devices

(DHCP clients) to obtain configuration information for operation in an Internet Protocol network.

  • HTTP: Acronym for Hypertext Transfer Protocol. A protocol to transfer hypertext request and information

between servers and browsers over a network

  • PPPoE: PPPoE, Point-to-Point Protocol over Ethernet, is a network protocol for encapsulating

Point-to-Point Protocol (PPP) frames inside Ethernet frames. It is used mainly with ADSL services where

individual users connect to the ADSL transceiver (modem) over Ethernet and in plain Metro Ethernet

networks.

  • DDNS: Dynamic DNS is a method, protocol, or network service that provides the capability for a

networked device, such as a router or computer system using the Internet Protocol Suite, to notify a domain

name server to change, in real time (ad-hoc) the active DNS configuration of its configured hostnames,

addresses or other information stored in DNS.

  • Hybrid DVR: A hybrid DVR is a combination of a DVR and NVR.
  • NTP: Acronym for Network Time Protocol. A protocol designed to synchronize the clocks of computers

over a network.

  • NTSC: Acronym for National Television System Committee. NTSC is an analog television standard used

in such countries as the United States and Japan. Each frame of an NTSC signal contains 525 scan lines at

60Hz.

  • NVR: Acronym for Network Video Recorder. An NVR can be a PC-based or embedded system used for

centralized management and storage for IP cameras, IP Domes and other DVRs.

  • PAL: Acronym for Phase Alternating Line. PAL is also another video standard used in broadcast

televisions systems in large parts of the world. PAL signal contains 625 scan lines at 50Hz.

  • PTZ: Acronym for Pan, Tilt, Zoom. PTZ cameras are motor driven systems that allow the camera to pan

left and right, tilt up and down and zoom in and out.

  • USB: Acronym for Universal Serial Bus. USB is a plug-and-play serial bus standard to interface devices to

a host computer.

Page 239 of the Hikvision DS-8004HFI-ST user manual — Troubleshooting
Page 239 · click to enlarge
Page 239

Troubleshooting

No image displayed on the monitor after the device is starting up normally.

a) No VGA or HDMI connections.

b) Connection cable is damaged.

c) Input mode of the monitor is incorrect.

1. Verify the device is connected with the monitor via HDMI or VGA cable.

If not, please connect the device with the monitor and reboot.

2. Verify the connection cable is good.

If there is still no image display on the monitor after rebooting, please check if the connection cable is

good, and change a cable to connect again.

3. Verify Input mode of the monitor is correct.

Please check the input mode of the monitor matches with the output mode of the device (e.g. if the output

mode of DVR is HDMI output, then the input mode of monitor must be the HDMI input). And if not,

please modify the input mode of monitor.

4. Check if the fault is solved by the step 1 to step 3.

If it is solved, finish the process.

If not, please contact the engineer from our company to do the further process.

There is an audible warning sound “Di-Di-Di-Didi” after a new bought device starts up.

a) No HDD is installed in the device.

b) The installed HDD has not been initialized.

c) The installed HDD is not compatible with the device or is broken-down.

1. Verify at least one HDD is installed in the device.
1. If not, please install the compatible HDD.

Please refer to the “Quick Operation Guide” for the HDD installation steps.

2. If you don’t want to install a HDD, select “Menu>Configuration > Exceptions”, and uncheck the

Audible Warning checkbox of “HDD Error”.

2. Verify the HDD is initialized.
1. Select “Menu>HDD>General”.
2. If the status of the HDD is “Uninitialized”, please check the checkbox of corresponding HDD and click

the “Init” button.

3. Verify the HDD is detected or is in good condition.
1. Select “Menu>HDD>General”.
2. If the HDD is not detected or the status is “Abnormal”, please replace the dedicated HDD according to

the requirement.

Possible Reasons · Possible Reasons

Page 240 of the Hikvision DS-8004HFI-ST user manual — Troubleshooting
Page 240 · click to enlarge
Page 240
4. Check if the fault is solved by the step 1 to step 3.
1. If it is solved, finish the process.
2. If not, please contact the engineer from our company to do the further process.

The status of the added IPC displays as “Disconnected” when it is connected through the protocol of our

company. Select “Menu>Camera>Camera>IP Camera” to get the camera status.

a) Network failure, and the DVR and IPC lost connections.

b) The configured parameters are incorrect when adding the IPC.

c) Insufficient bandwidth.

1. Verify the network is connected.
1. Connect the HDVR and PC with the RS-232 cable.
2. Open the Super Terminal software, and execute the ping command. Input “ping IP” (e.g. ping

172.6.22.131).

Simultaneously press Ctrl and C to exit the ping command.

If there exists return information and the time value is little, the network is normal.

2. Verify the configuration parameters are correct.
1. Select “Menu>Camera>Camera>IP Camera”.
2. Verify the following parameters are the same with those of the connected IP devices, including IP

address, protocol, management port, user name and password.

3. Verify the whether the bandwidth is enough.
1. Select “Menu >Maintenance > Net Detect > Network Stat.”.
2. Check the usage of the access bandwidth, and see if the total bandwidth has reached its limit.
4. Check if the fault is solved by the step 1 to step 3.

If it is solved, finish the process.

If not, please contact the engineer from our company to do the further process.

The IPC frequently goes online and offline and the status of it displays as “Disconnected”.

a) The IPC and the HDVR versions are not compatible.

b) Unstable power supply of IPC.

c) Unstable network between IPC and HDVR.

d) Limited flow by the switch connected with IPC and HDVR.

1. Verify the IPC and the HDVR versions are compatible.
1. Enter the IPC Management interface “Menu > Camera > Camera>IP Camera”, and view the firmware

version of connected IPC.

2. Enter the System Info interface “Menu>Maintenance>System Info>Device Info”, and view the

firmware version of HDVR.

2. Verify power supply of IPC is stable.

Possible Reasons · Possible Reasons

Page 241 of the Hikvision DS-8004HFI-ST user manual — Troubleshooting
Page 241 · click to enlarge
Page 241
1. Verify the power indicator is normal.
2. When the IPC is offline, please try the ping command on PC to check if the PC connects with the IPC.
3. Verify the network between IPC and HDVR is stable.
1. When the IPC is offline, connect PC and HDVR with the RS-232 cable.
2. Open the Super Terminal, use the ping command and keep sending large data packages to the

connected IPC, and check if there exists packet loss.

Simultaneously press Ctrl and C to exit the ping command.

Example: Input ping 172.6.22.131 –l 1472 –f.

4. Verify the switch is not flow control.

Check the brand, model of the switch connecting IPC and HDVR, and contact with the manufacturer of

the switch to check if it has the function of flow control. If so, please turn it down.

5. Check if the fault is solved by the step 1 to step 4.

If it is solved, finish the process.

If not, please contact the engineer from our company to do the further process.

When there is no monitor connected to the HDVR and you add the IPC via web browser, the IPC status

shows as Connected; and then you connect the HDVR with the monitor via VGA or HDMI interface and

reboot the device, there is black screen with the mouse cursor.

Connect the HDVR with the monitor before startup via VGA or HDMI interface, and manage the IPC to connect with the device locally or remotely, the status of IPC displays as Connected. And then connect the device with the CVBS, and there is black screen either. Possible Reasons:

After connecting the IPC to the HDVR, the image is output via the main spot interface by default.

1. Enable the output channel.
2. Select “Menu > Configuration > Live View > View”, and select video output interface in the drop-down list and configure the window you want to view.

The view settings can only be configured by the local operation of HDVR.

Different camera orders and window-division modes can be set for different output interfaces separately, and digits like “D1”and “D2” stands for the channel number, and “X” means the selected window has no image output.

3. Check if the fault is solved by the above steps.

If it is solved, finish the process.

If not, please contact the engineer from our company to do the further process.

Live view stuck when video outputs locally.

Possible Reasons:

a) Poor network between device and IPC, and there exists packet loss during the transmission.

b) The frame rate has not reached the real-time frame rate.

1. Verify the network between device and IPC is connected.
Page 242 of the Hikvision DS-8004HFI-ST user manual — Troubleshooting
Page 242 · click to enlarge
Page 242
1. When image is stuck, connect the RS-232 ports on PC and the rear panel of device with the RS-232 cable.
2. Open the Super Terminal, and execute the command of “ ping 192.168.0.0 –l 1472 –f ” (the IP address may change according to the real condition), and check if there exists packet loss.

Simultaneously press Ctrl and C to exit the ping command.

2. Check the parameters of Main Stream (Continuous) and Main Stream (Event).

Select “Menu > Record > Parameters > Record”, and set the resolution of Main Stream (Event) the same

as the one of Main Stream (Continuous).

3. Verify the frame rate is real-time frame rate.

Select “Menu > Record > Parameters > Record”, and set the Frame rate to Full Frame.

4. Check if the fault is solved by the above steps.

If it is solved, finish the process.

If not, please contact the engineer from our company to do the further process.

When using the device to get the live view audio, there is no sound or there is too much noise, or the

volume is too low.

Possible Reasons: a) Cable between the pickup and camera is not connected well; impedance mismatches or incompatible. b) The stream type is not set as “Video & Audio”. c) The encoding standard is not supported with device.

1. Verify the cable between the pickup and camera is connected well; impedance matches and compatible.
2. Verify the setting parameters are correct.

Select “Menu > Record > Parameters > Record”, and set the Stream Type as “Audio & Video”.

3. Verify the audio encoding standard of the camera is supported by the HDVR.

HDVR supports G722.1 and G711 standards, and if the encoding parameter of the input audio is not one

of the previous two standards, you can log in the IPC to configure it to the supported standard.

4. Check if the fault is solved by the above steps.

If it is solved, finish the process.

If not, please contact the engineer from our company to do the further process.

The image gets stuck when HDVR is playing back by single or multi-channel IPC.

Possible Reasons: a) Poor network between HDVR and IPC, and there exists packet loss during the transmission. b)The frame rate is not the real-time frame rate. c) The HDVR supports up to 16-channel synchronize playback at the resolution of 4CIF, if you want a

16-channel synchronize playback at the resolution of 720p, the frame extracting may occur, which leads to a slight stuck.

1. Verify the network between HDVR and IPC is connected.
1. When image is stuck, connect the RS-232 ports on PC and the rear panel of HDVR with the RS-232 cable.
2. Open the Super Terminal, and execute the command of “ ping 192.168.0.0 –l 1472 –f ” (the IP address may change according to the real condition), and check if there exists packet loss.
Page 243 of the Hikvision DS-8004HFI-ST user manual — Troubleshooting
Page 243 · click to enlarge
Page 243

Simultaneously press the Ctrl and C to exit the ping command.

2. Verify the frame rate is real-time frame rate.

Select “Menu > Record > Parameters > Record”, and set the Frame Rate to “Full Frame”.

3. Verify the hardware can afford the playback.

Reduce the channel number of playback.

Select “Menu > Record > Encoding > Record”, and set the resolution and bitrate to a lower level.

4. Reduce the number of local playback channel.

Select “Menu > Playback”, and uncheck the checkbox of unnecessary channels.

5. Check if the fault is solved by the above steps.

If it is solved, finish the process.

If not, please contact the engineer from our company to do the further process.

No record file found in the device local HDD, and the prompt “No record file found” pops up when you

search the record files.

Possible Reasons:

a) The time setting of system is incorrect.

b)The search condition is incorrect.

c) The HDD is error or not detected.

1. Verify the system time setting is correct.

Select “Menu > Configuration > General > General”, and verify the “Device Time” is correct.

2. Verify the search condition is correct.

Select “Playback”, and verify the channel and time are correct.

3. Verify the HDD status is normal.

Select “Menu > HDD > General” to view the HDD status, and verify the HDD is detected and can be

read and written normally.

4. Check if the fault is solved by the above steps.

If it is solved, finish the process.

If not, please contact the engineer from our company to do the further process.

Page 244 of the Hikvision DS-8004HFI-ST user manual — Version 3.1.2
Page 244 · click to enlarge
Page 244

Summary of Changes

Version 3.2.0

1. Support play back by sub-periods. (Chapter 6.1.6)
2. Support VCA alarm for up to 15 VCA detections. (Chapter 9)
3. Support VCA search function for behavior search, face search, people counting and heat map. (Chapter 10)
4. Support the rotate function and mirror function when the DVR connects a Rerate Camera.(Chapter 14.3)
5. The prompt will pop up when you input wrong user name or password in login interface.(Chapter 2.2)

Update:

1. Optimize the interface of right-click menu. (Chapter 3.2.2)
2. Optimize the interface of PTZ control panel. (Chapter 4)
3. Optimize the interface of record parameters. (Chapter 5)
4. Update the interface of recording schedule. (Chapter 5)
5. Optimize the Device Info interface by adding QR Code. (Chapter 15.1)

Version 3.1.3

1. Support VCA recording / capture schedule settings. (Chapter 5.5)
1. Optimize the event playback (Chapter 6.1.2)
2. Optimize the frame-extracting playback. (Chapter 6.1.7)
3. Optimize the VCA settings. (Chapter 8.5)
4. Optimize the frame-extracting record. (Chapter 11.6)
5. Optimize the Enable HDMI/VGA Simultaneous Output function (Chapter 14.4)

Version 3.1.2

1. Support connection to more models of IP camera from third-party manufactures. (List of Compatible IP
1. Optimize the right-click menu, adding PTZ control option. (Chapter 3.2.2, Chapter 3.2.3, Chapter 6.1.1)
2. Optimize the PTZ settings interface and PTZ control panel. (Chapter 4)
3. Optimize the smart playback interface, adding smart settings function. (Chapter 6.1.5)
4. Optimize the outgoing bandwidth after the high-speed download enabled. (Chapter 9.2.12)
1. Combine smart search function with smart playback, deleting original smart search section.(Chapter 6.2.2)
Show 7 more labels / short text on this page
Added · Added · Updated · Added · Cameras) · Updated · Deleted
Page 245 of the Hikvision DS-8004HFI-ST user manual — Version 3.1.0
Page 245 · click to enlarge
Page 245

Version 3.1.0

1. Support smart IP camera connection, VCA alarm and VCA triggered recording. (Chapter 5.2; Chapter 8.3)
2. Support transfer protocol settings when adding/editing IP cameras. (Chapter 2.2)
3. Support viewing the real-time frame rate, bitrate, and resolution of added IP camera on the live view

interface. (Chapter 3.2.4)

4. Support volume adjusting of live view, playback and two-way audio. (Chapter 3.3)
5. Support camera order adjusting on the live view interface. (Chapter 3.3)
6. Support two-way audio record. (Chapter 5.1)
7. Support locking record file when playback. (Chapter 5.9.1)
8. Support marking of normal recording and event recording on the playback process bar. (Chapter 6.1)
9. Support marking of normal recording and event recording on the calendar when playback. (Chapter 6.1.2)
10. Support thumbnail display on the process bar when playback. (Chapter 6.1.1; Chapter 6.1.2)
11. Support volume adjusting of selected camera when playback. (Chapter 6.1.1~Chapter 6.1.4)
12. Support searching and playing back of record files triggered by VCA alarm. (Chapter 6.1.3)
13. Support smart playback of VCA event in 16-time speed. (Chapter 6.1.5)
14. Support smart search of VCA event on the specified area. (Chapter 6.2.2)
15. Support marking record files of multiple channels in two lines when synchronous playback. (Chapter 6.2.4)
16. Support capturing and exporting pictures when playback. (Chapter 7.2)
17. Support remote virtual host and telnet function. (Chapter 9.2.14; Chapter 9.2.15)
18. Support the disk clone function. (Chapter 11.7)
1. Optimize the layout of soft keyboard. (Chapter 1.4)
2. Optimize the control panel of PTZ, adding the configuration shortcut button on the panel. (Chapter 4.3)

Added · Updated

Page 246 of the Hikvision DS-8004HFI-ST user manual — List of Compatible IP Cameras
Page 246 · click to enlarge
Page 246

List of Compatible IP Cameras

List of Hikvision IP Cameras

For the list, our company holds right to interpret.
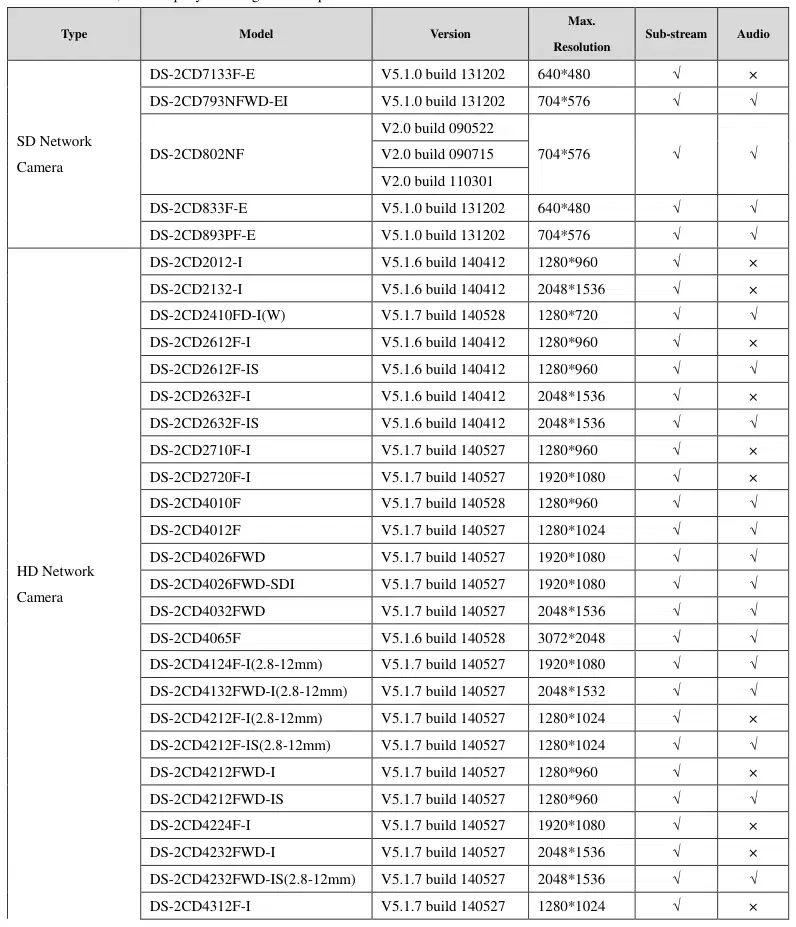
Hikvision DS-8004HFI-ST — List of Compatible IP Cameras diagram (page 246)
Fig. 292 · List of Compatible IP Cameras
Page 247 of the Hikvision DS-8004HFI-ST user manual — List of Compatible IP Cameras
Page 247 · click to enlarge
Page 247
Hikvision DS-8004HFI-ST — List of Compatible IP Cameras diagram (page 247)
Fig. 293 · List of Compatible IP Cameras
Page 248 of the Hikvision DS-8004HFI-ST user manual — List of Compatible IP Cameras
Page 248 · click to enlarge
Page 248
Hikvision DS-8004HFI-ST — List of Compatible IP Cameras diagram (page 248)
Fig. 294 · List of Compatible IP Cameras

DS-2CD986C(B) V2.3.6 build 120401 2560*1920 × ×

Page 249 of the Hikvision DS-8004HFI-ST user manual — List of Compatible IP Cameras
Page 249 · click to enlarge
Page 249
Hikvision DS-8004HFI-ST — List of Compatible IP Cameras diagram (page 249)
Fig. 295 · List of Compatible IP Cameras
Page 250 of the Hikvision DS-8004HFI-ST user manual — List of Third-party IP Cameras
Page 250 · click to enlarge
Page 250

List of Third-party IP Cameras

ONVIF compatibility refers to the camera can be supported both when it uses the ONVIF protocol and its private

protocols. Only ONVIF is supported refers to the camera can only be supported when it uses the ONVIF protocol.

Only AXIS is supported refers to the function can only be supported when it uses the AXIS protocol.

Hikvision DS-8004HFI-ST — List of Third-party IP Cameras diagram (page 250)
Fig. 296 · List of Third-party IP Cameras
Page 251 of the Hikvision DS-8004HFI-ST user manual — List of Third-party IP Cameras
Page 251 · click to enlarge
Page 251
Hikvision DS-8004HFI-ST — List of Third-party IP Cameras diagram (page 251)
Fig. 297 · List of Third-party IP Cameras
Page 252 of the Hikvision DS-8004HFI-ST user manual — List of Third-party IP Cameras
Page 252 · click to enlarge
Page 252
Hikvision DS-8004HFI-ST — List of Third-party IP Cameras diagram (page 252)
Fig. 298 · List of Third-party IP Cameras

0302011050109

Page 253 of the Hikvision DS-8004HFI-ST user manual — List of Third-party IP Cameras
Page 253 · click to enlarge
Page 253
Hikvision DS-8004HFI-ST — List of Third-party IP Cameras diagram (page 253)
Fig. 299 · List of Third-party IP Cameras
Sources

References & links

Pages referenced in this manual — manufacturer, support and downloads.

Ask about the Hikvision DS-8004HFI-ST

Owners and our team usually reply within a day — and your question helps the next person too.

Add your email to get notified when it’s answered — no spam, ever.

0 questions
No questions yet about the Hikvision DS-8004HFI-ST

Be the first to ask — other owners or our team will answer.

Original document

Hikvision DS-8004HFI-ST manual PDF

253 pages·10.1 MB·Security·PDF
Click any page above to open it here
Page 1 / …
100%
Loading pages…